Parental controls are one of the best tools available to help protect your child while using social media. Parental controls reduce risks but cannot eliminate them completely. Regular conversations, periodic account reviews, and active involvement remain the most effective safety tools.
Select a social media platform below to jump to the Parent Guide for that system, or explore the full guide as you scroll.
Important Note: These guides were created in the summer of 2026. Because online platforms, apps, and their parental control settings are updated frequently, the steps and screenshots shown in these guides may change over time. If something looks different on your device, don’t be alarmed. Look for the closest corresponding settings or options, as the location, wording, and appearance of features may have changed.
Location Services
SnapChat
TikTok
YouTube
LOCATION SERVICES
Why Location Privacy Matters
Sharing your location on social media can reveal where you live, go to school, hang out, or spend time regularly. Online predators can use this information to learn about a child’s routines and whereabouts, especially when location data is combined with posts, photos, or other personal information. When an app doesn’t need your location, turning off Location Services or Precise Location can help keep your whereabouts private.
Parent Note: We recommend turning off location services for all social media apps.
How to Turn Location Services Off for Specific Apps on Apple
Step 1: Open Settings
Step 2: Tap Privacy & Security
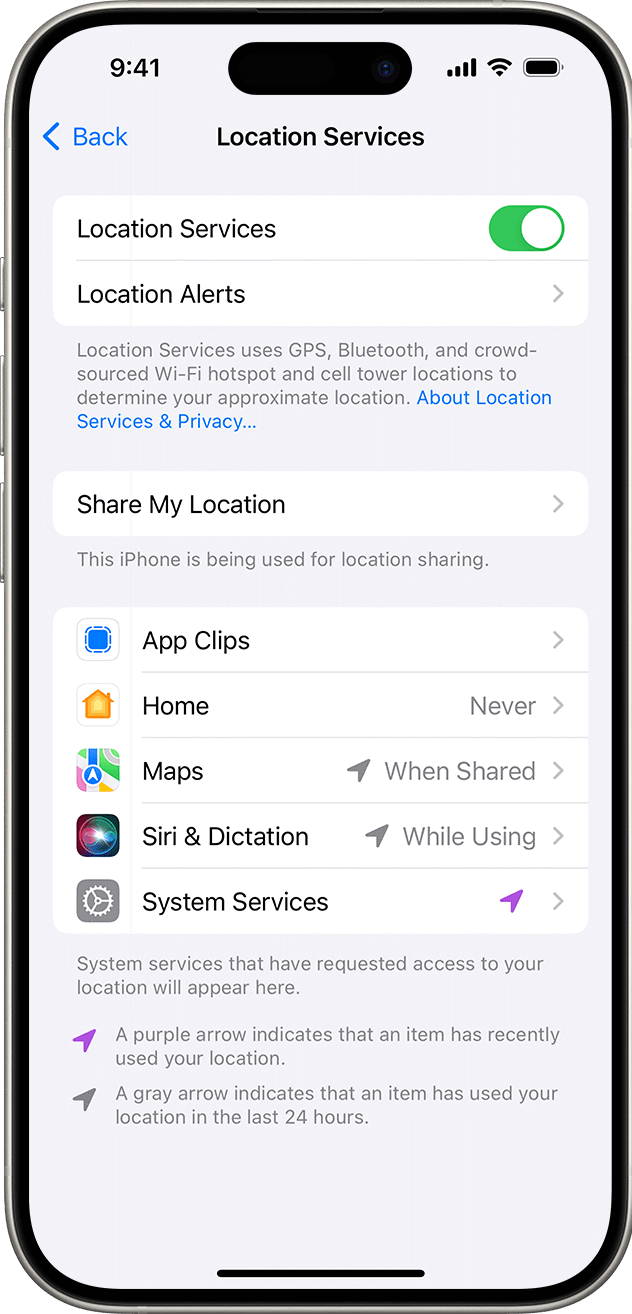
Step 3: Tap Location Services
Step 4: Make sure Location Services is ON
Step 5: Scroll down and find the app you want to change.
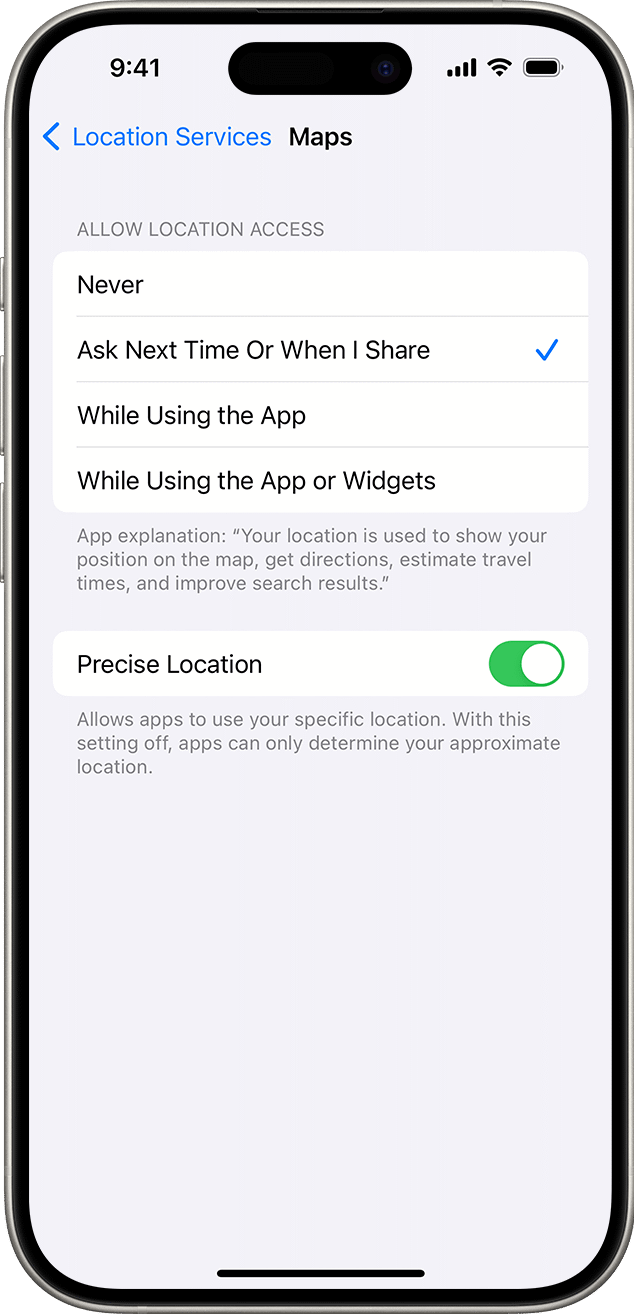
Step 6: Tap the app and choose:
- Never — The app cannot use your location.
- Ask Next Time Or When I Share — The app asks you each time.
- While Using the App — The app can use your location while you are using it.
- Always — The app can use your location even when you aren’t using it.
How to Turn Location Services Off for Specific Apps on Android
- Open Settings

- Tap Location.
- Tap App location permissions or App permissions.
- Find the app you want to change.
- Select Don’t allow.
- Repeat for any other apps you do not want accessing your location.
Instagram has introduced teen accounts which automatically turns on privacy features for accounts owned by teenagers between 13-17 years old.
If your child is 16-17 years old, they can choose to turn privacy settings off. If your child is under 16, they will need your permission before being able to reduce the strictness of any settings.
How can I make an account private?
A private Instagram account will hide your images from strangers. It also means people need to request to follow and message you, limiting who can contact you.
How to set your account to private:
Step 1
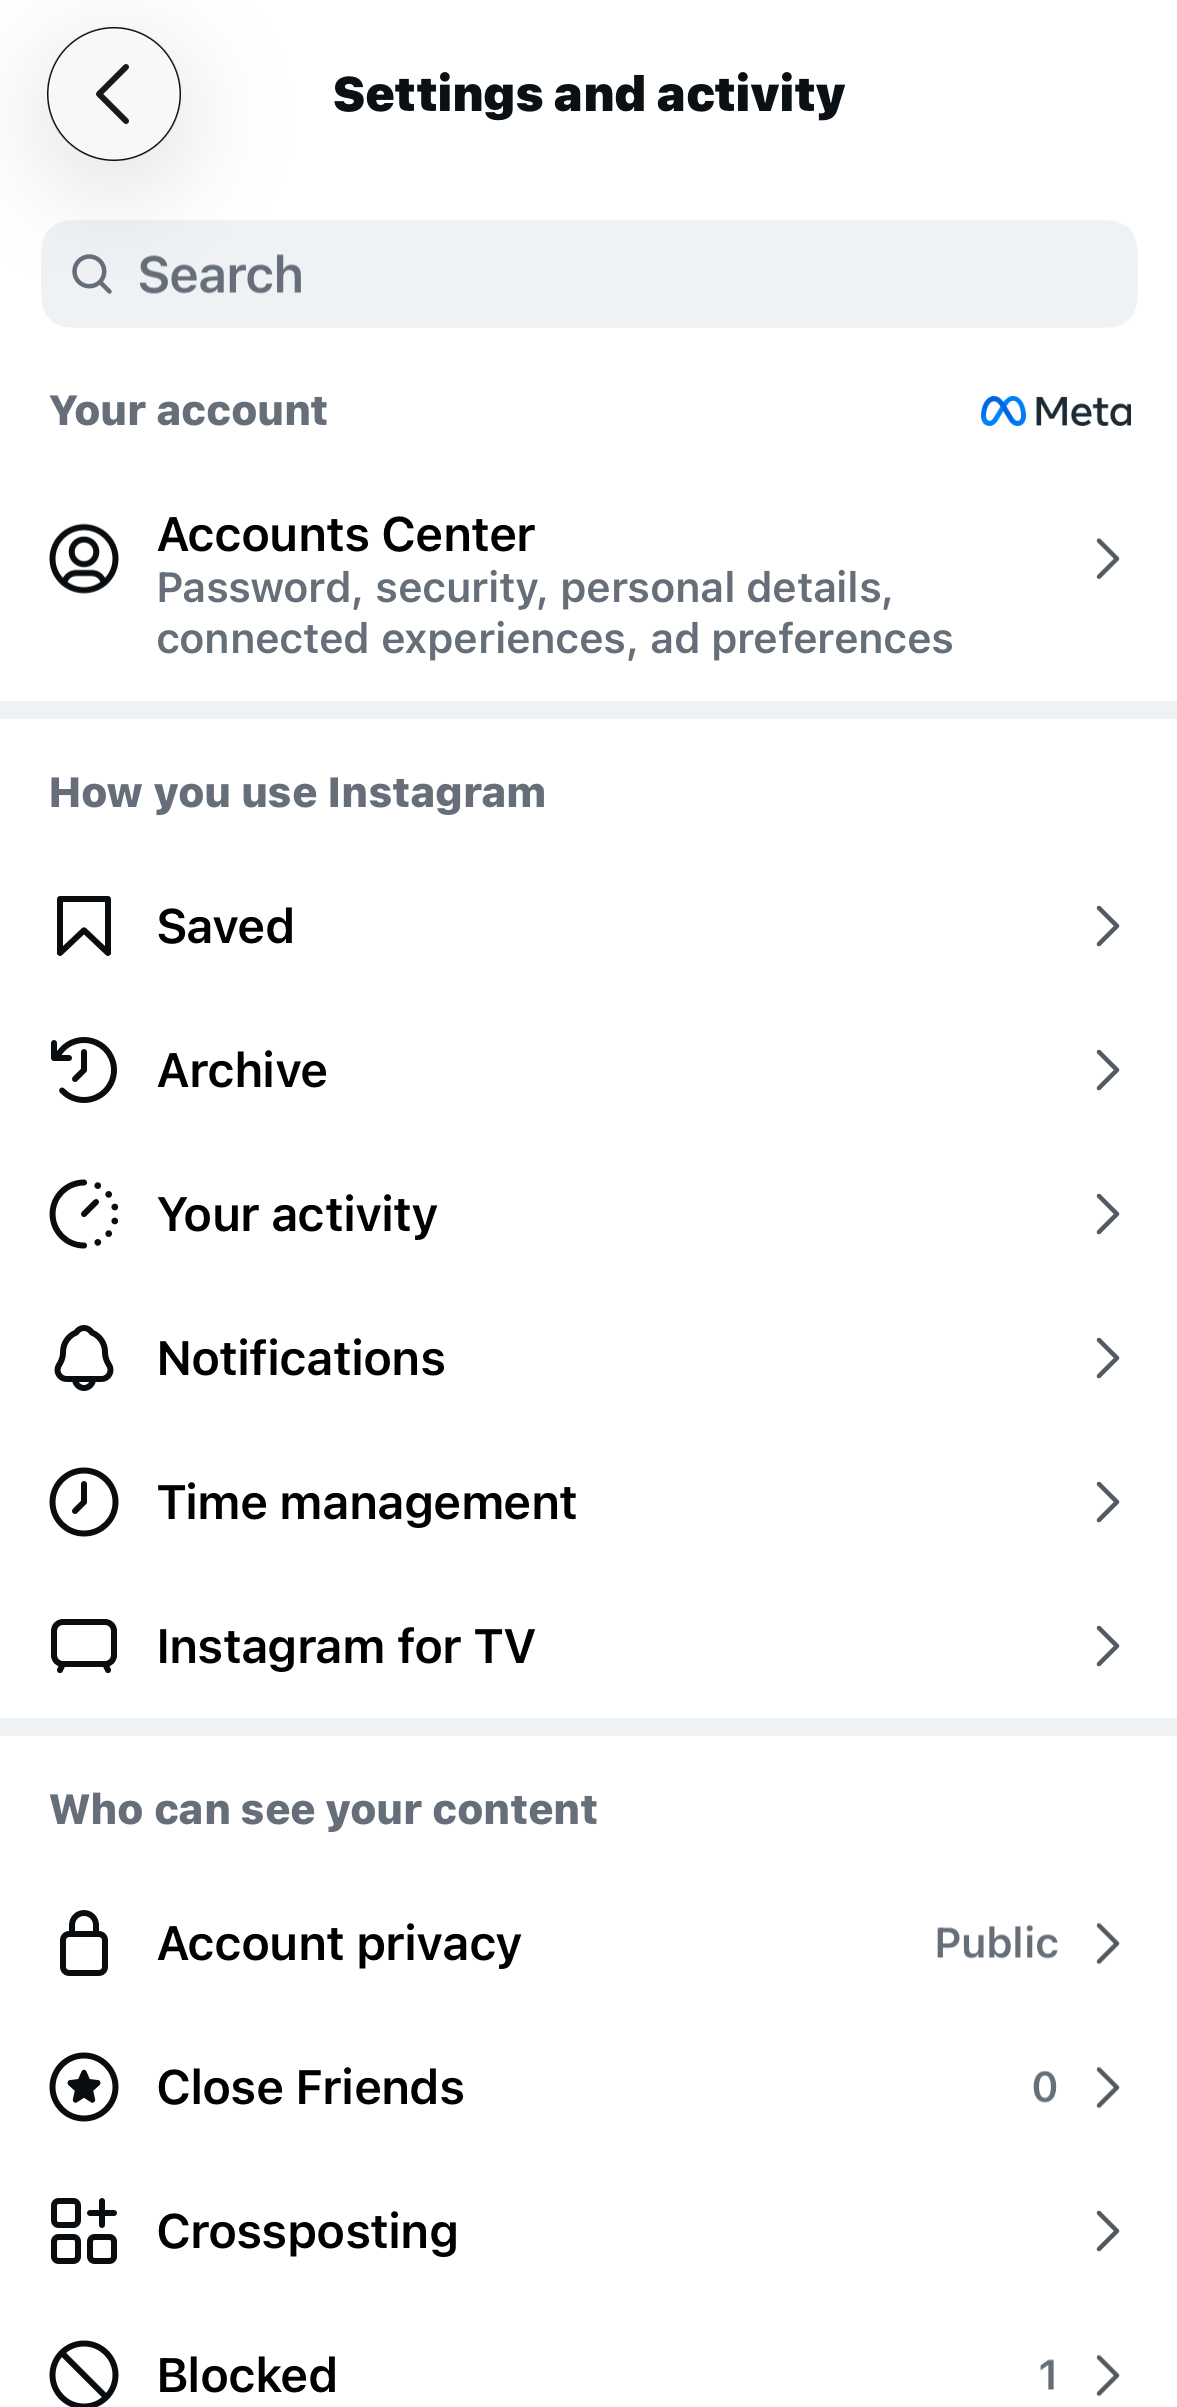
From your feed on the home screen, tap your profile picture in the bottom right to get to your profile. Then tap the 3 horizontal lines in the top right.
Step 2
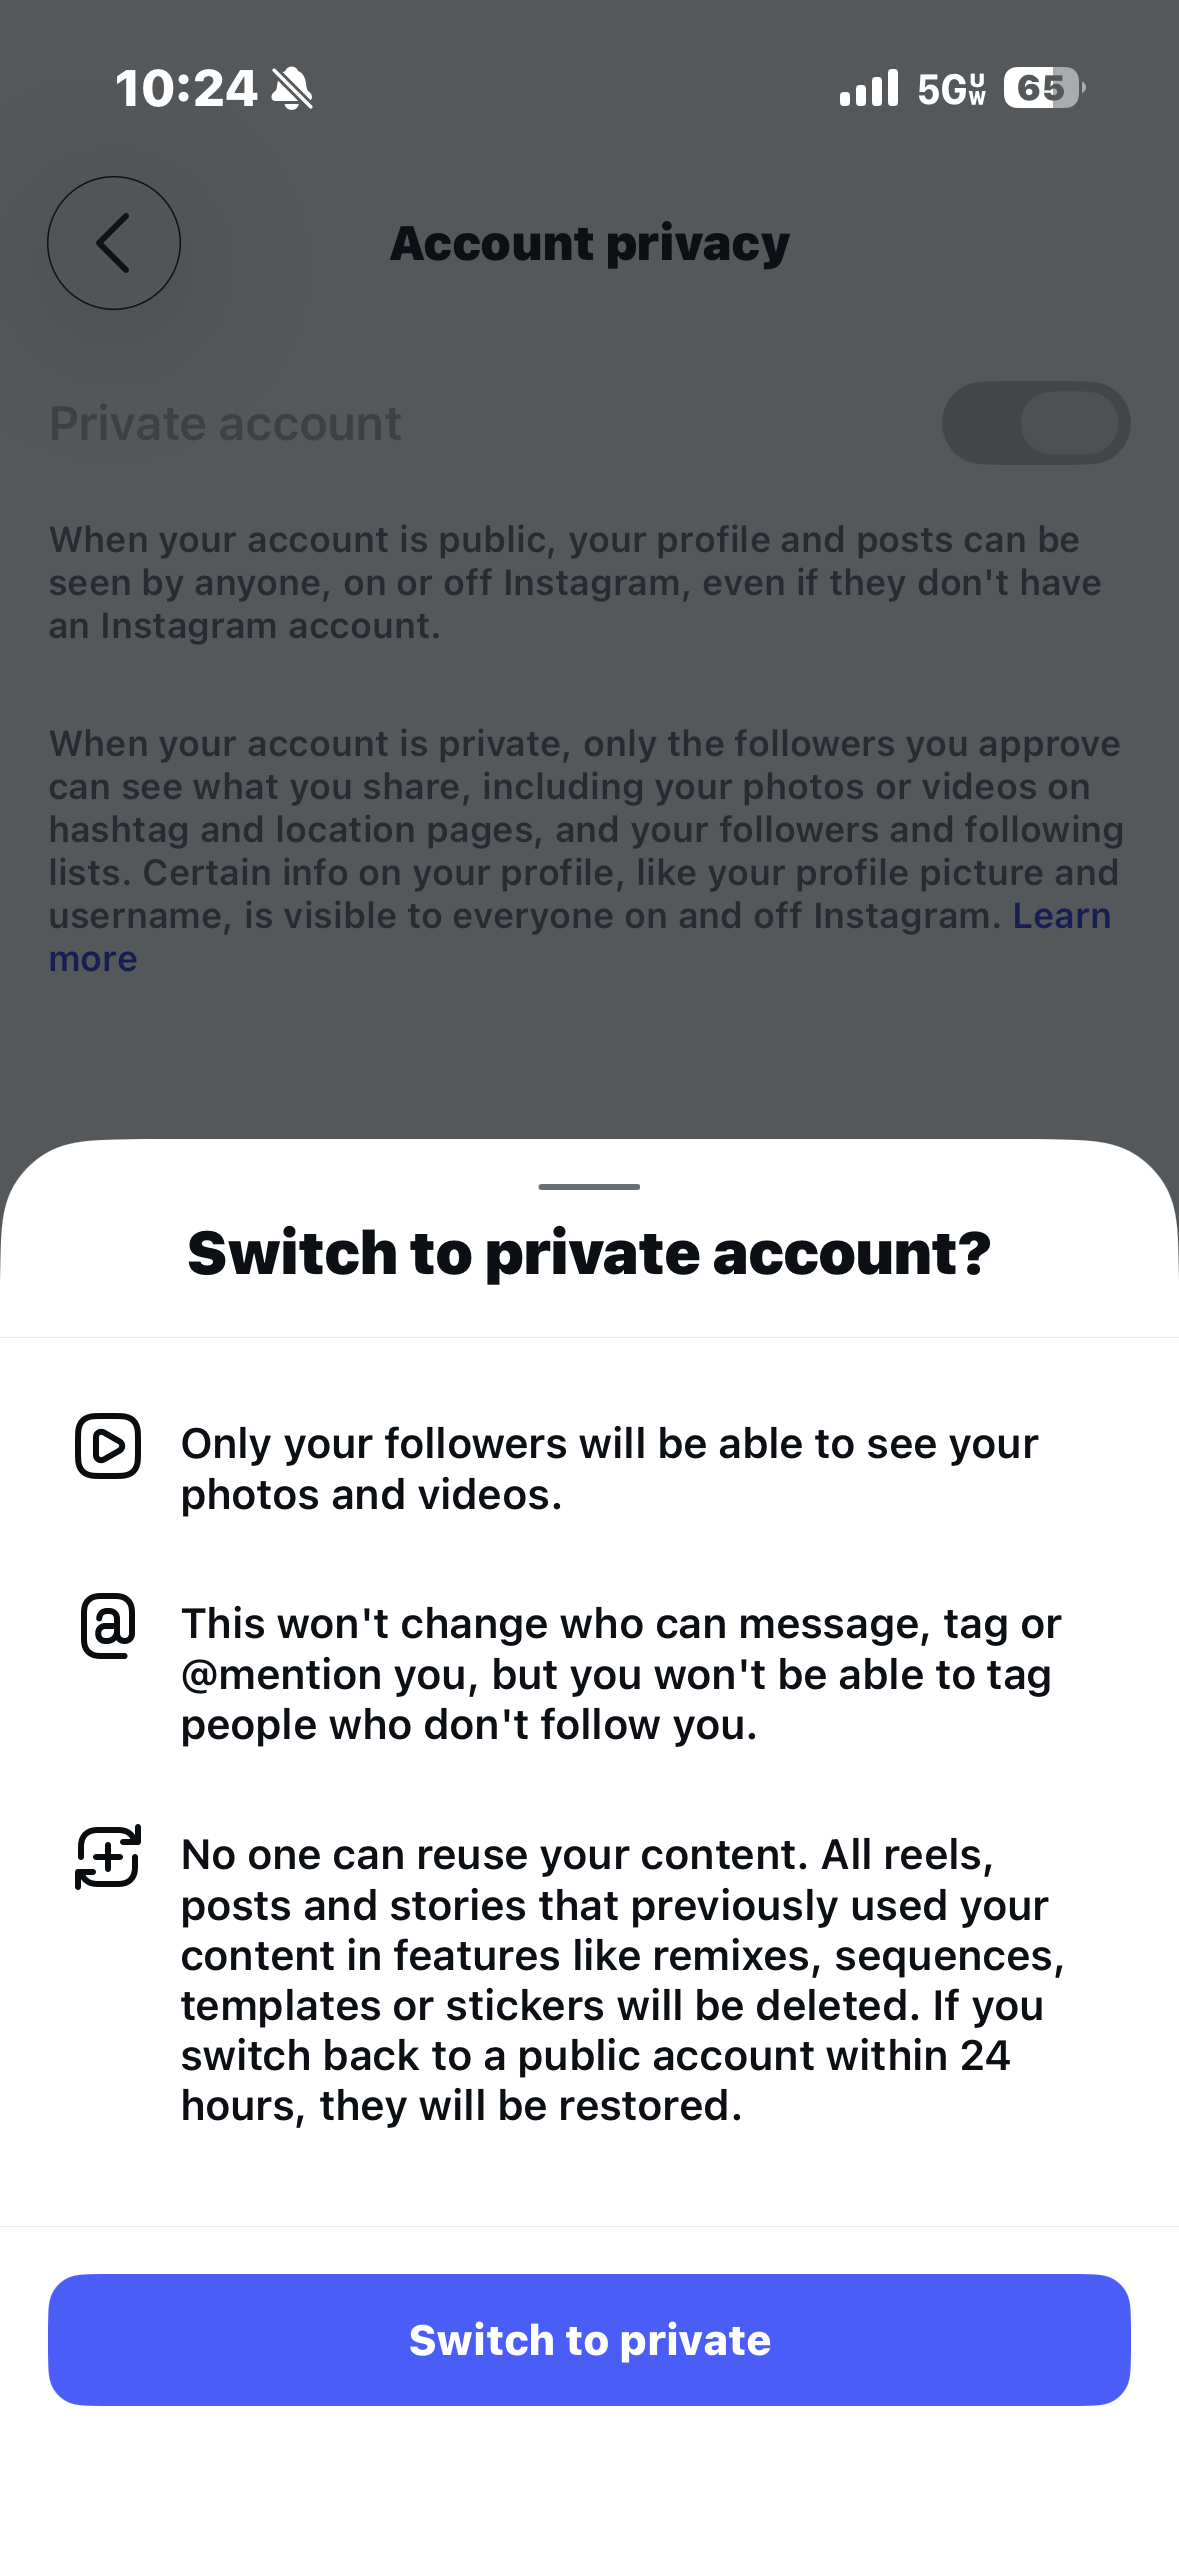
Tap Account Privacy then Privacy. Then toggle the button to private account and then confirm.
Where do I report posts and profiles?
If you or your teen come across content or profiles that are inappropriate or go against Instagram’s guidelines, you can report them. This will help make the app safe for all users.
To report a post:
Step 1 – tap on the two small lines on the top right corner of the user’s post.
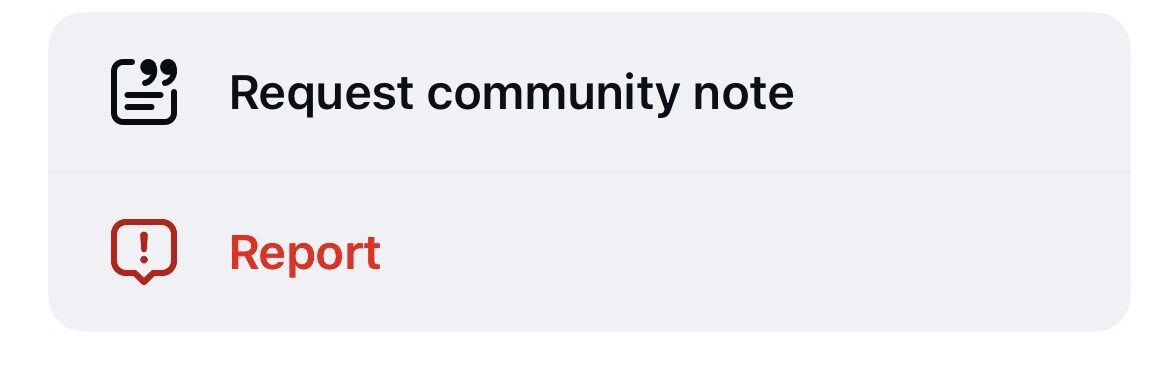
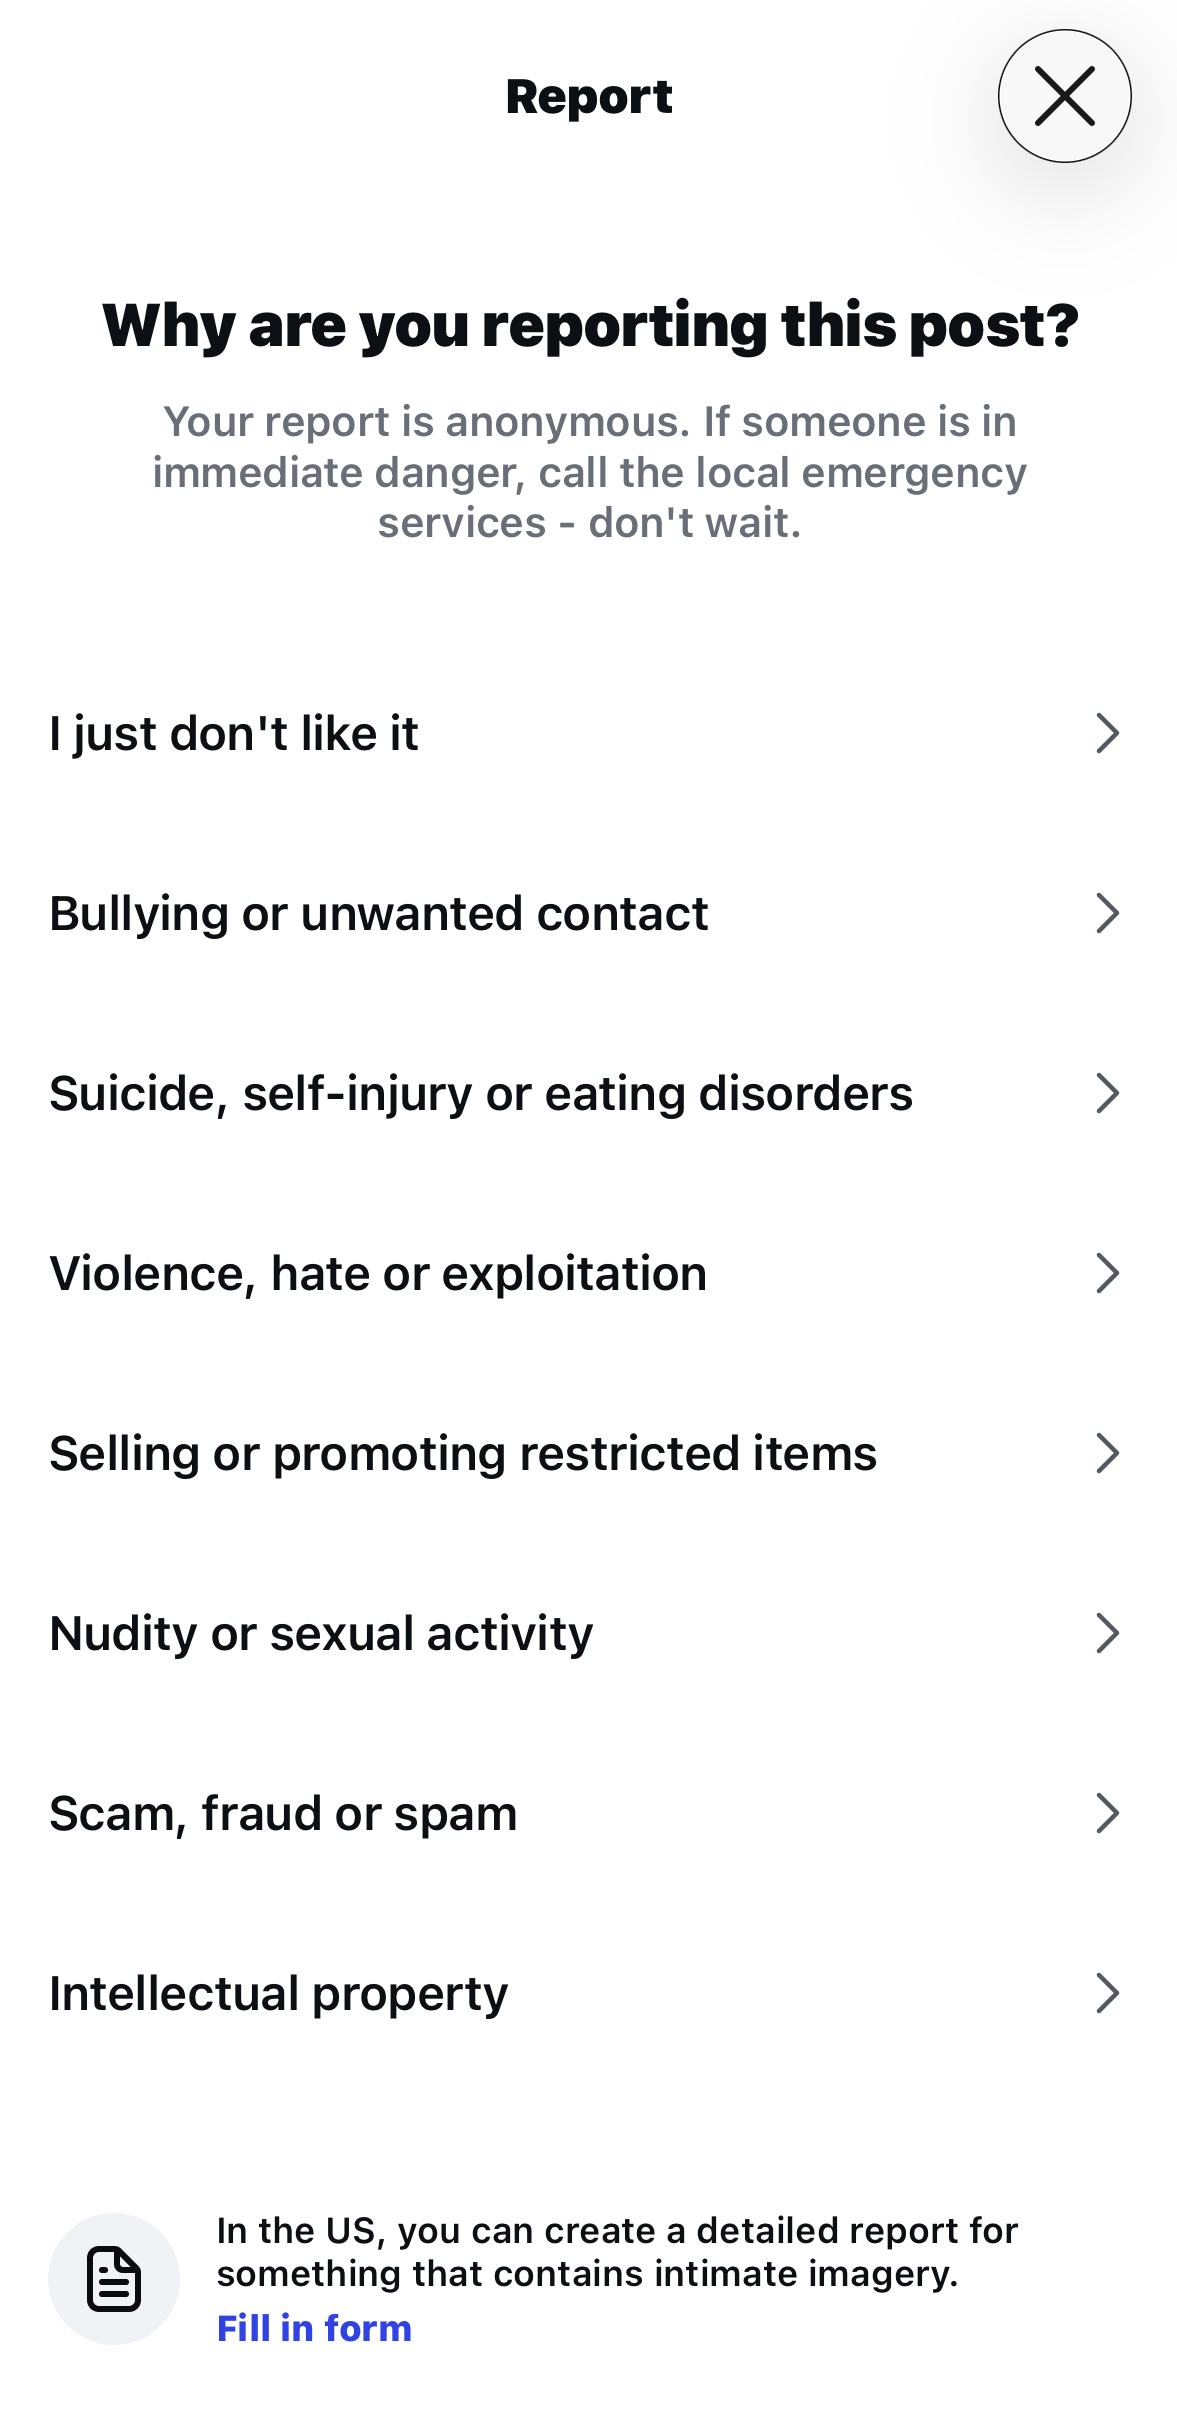
Step 2 – tap Report. Select the appropriate reason to submit a report. You can then choose to block, restrict or unfollow the user as well.
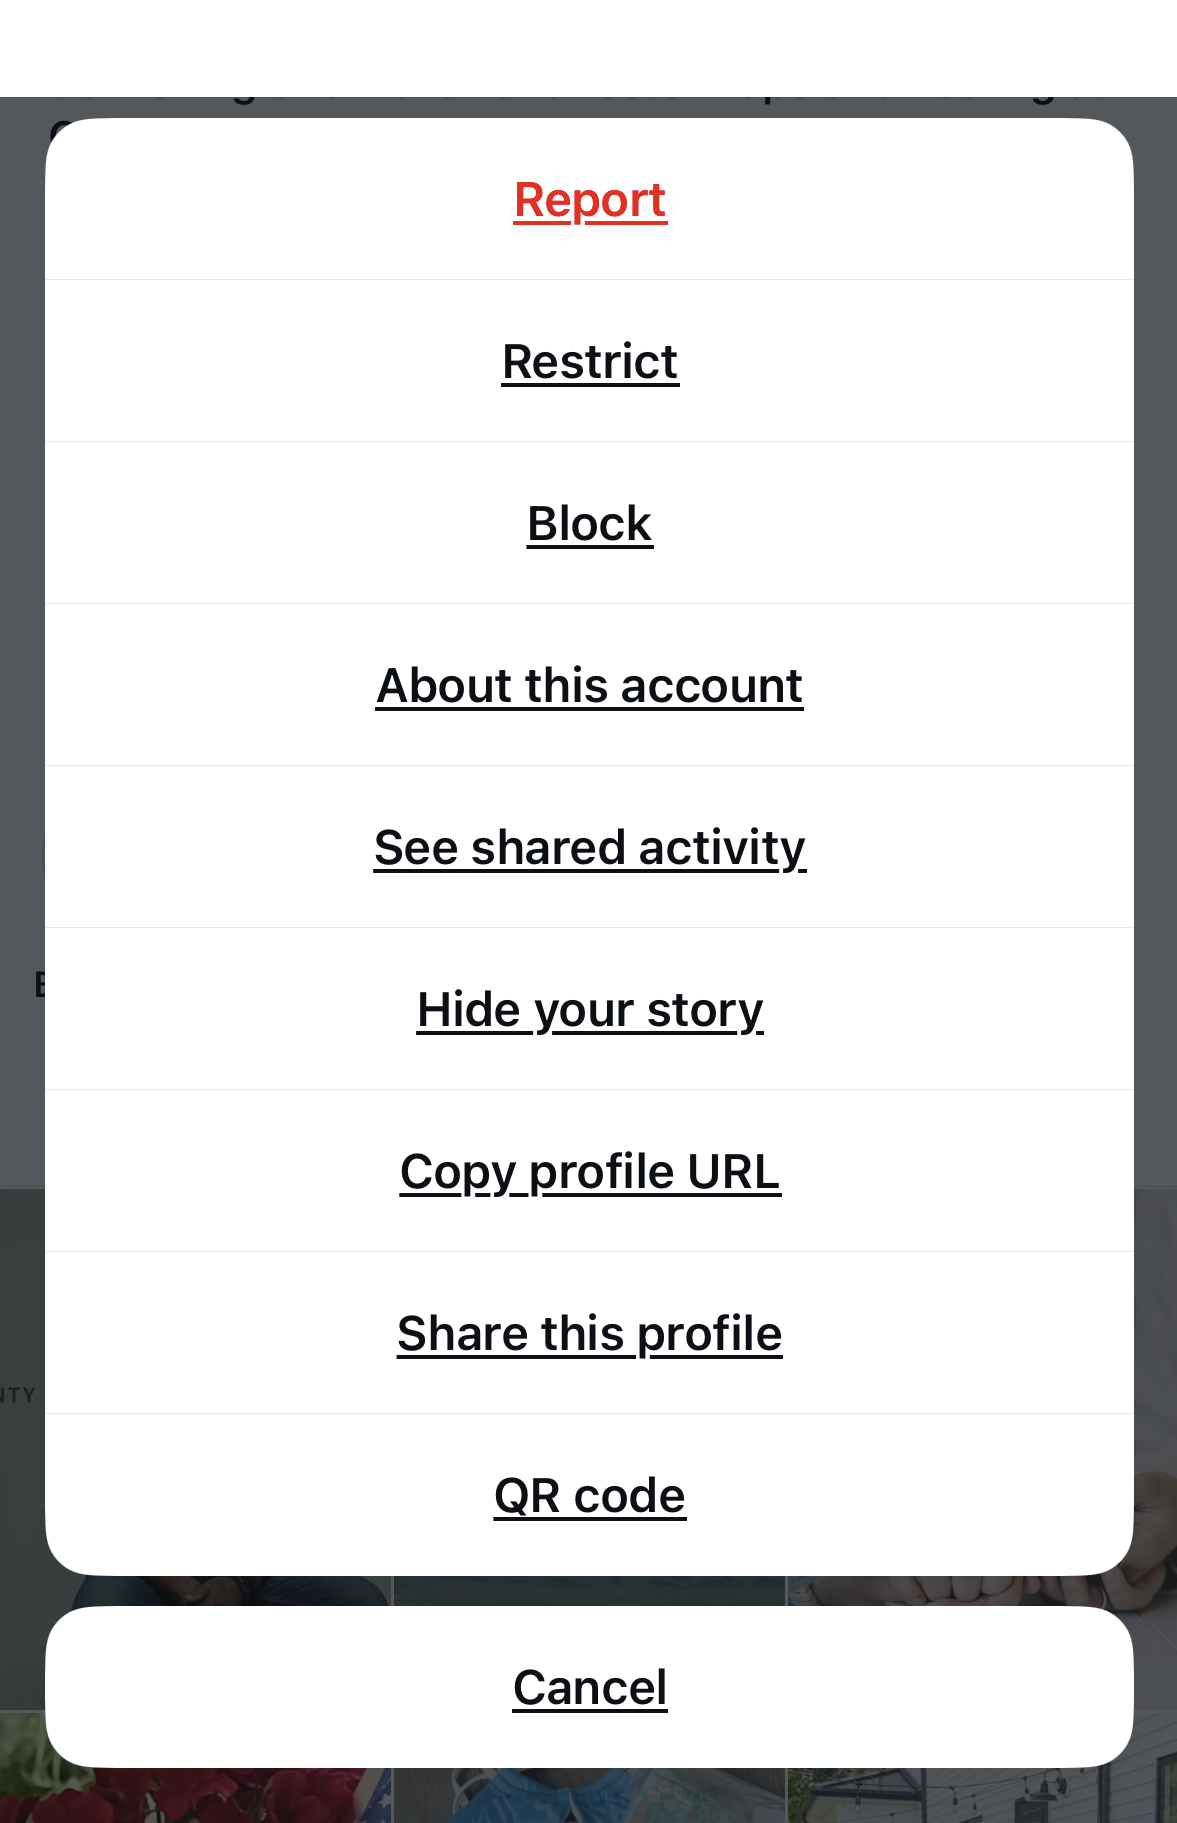
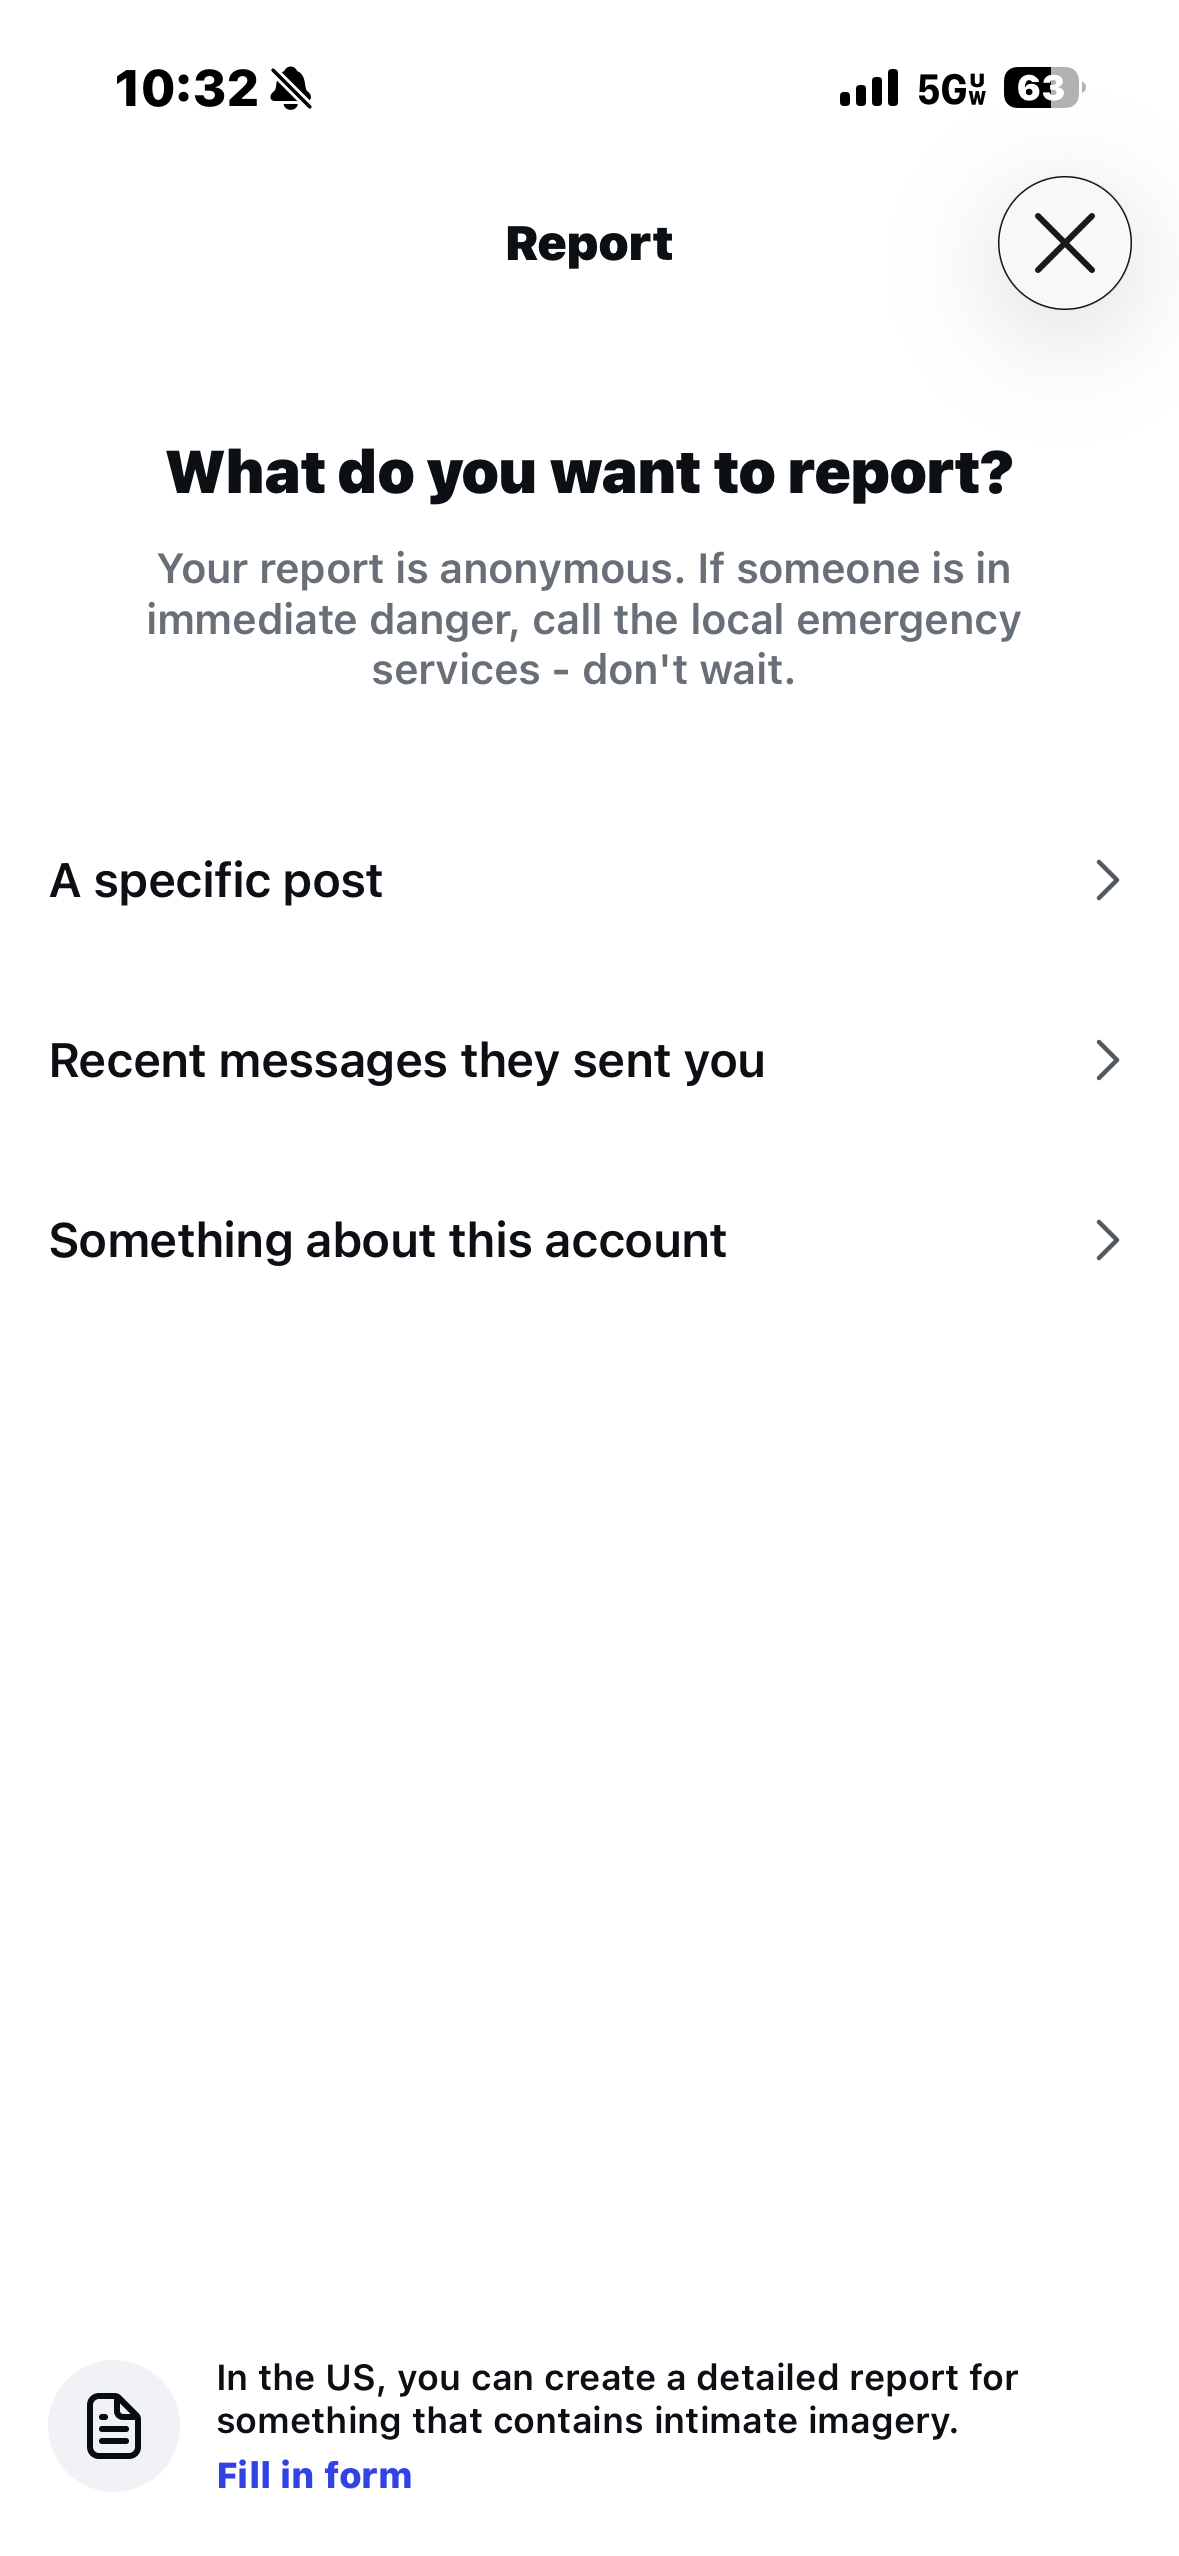
To report a user:
Step 1 – go to their profile by tapping on their username or searching for them.
Step 2 – select the 3 dots in the top right corner and tap Report. Then select the reason to submit the report. Reporting is totally anonymous.
When you report on Instagram, it will be reviewed by moderators and they will take action if it breaks community guidelines.
If someone is in immediate danger contact the police or other local authorities.
What screen time options are there?
To limit how much time you or your teen are spending on the platform, you can set reminders and limits on the app.
To set screen time limits:
Step 1 – go to your profile and tap the 3 horizontal lines in the top right corner. Tap Time management.
Step 2 – Tap the daily limit button to give yourself or your teen a limit. Or you can set a time for instagram to remain in “sleep mode” for the times you desire.
How do I set up Instagram Supervision?
To set Supervision up:
Step 1 – Go to Settings > Family Center > Supervision for Teen Accounts , and send an invite to your teen’s account.
Step 2 – Your teen needs to accept the invite to enable supervision.
To view accounts you supervise and make changes to safety settings:
Step 1 – Settings > Family Center > Supervision – go to your profile and tap the 3 horizontal lines in the top right corner.
Step 2 – Tap the Supervision for Teen Accounts. Now you can view all the settings you would like to change, such as who can message them, and you can also view who your child has been contacting.
SNAPCHAT
Enable In-App Controls & Setting in Snapchat
How do I change the birthday on Snapchat?
The birthday is established during account sign-up, but can also be changed afterwards:
- Tap the profile circle in the upper, left corner.
- Then tap the gear in the upper, right corner.
- Tap “Birthday.”
- Edit the birthday by selecting the date, selecting a new one, and selecting “Continue.” Note, that you can change the birthday 5 times before receiving a warning that “this is the last time you can change the birthday.” Since some Discover and ad content is selected by Snapchat based on the birthday, locking in the correct birthday by changing it 5 times intentionally to lock this feature, is something a protective parent might do.
Managing Friends and Subscriptions on Snapchat:
Friends are accounts where you are following each other. Subscriptions are accounts that you are following, but they aren’t following you back. You might subscribe to an account to view their Stories, but you can’t send them a Snap until you’ve added them as a friend.
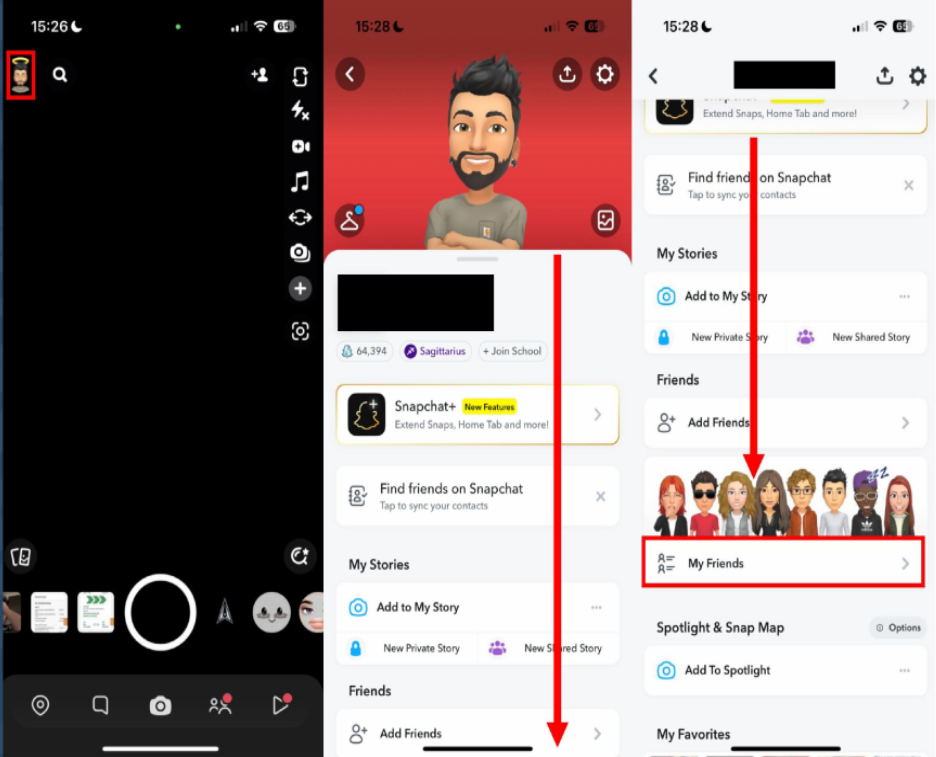
Here’s how to determine what friends have been added:
Here’s where to identify who the account is subscribed to (just to stay connected to the Story) if they’re not friends:
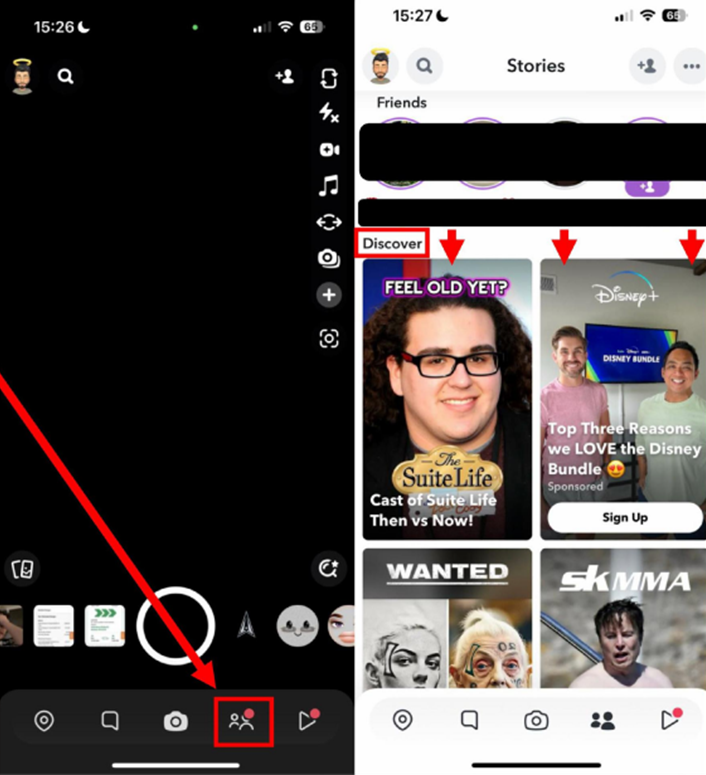
Control Snapchat Discover (main feed of content):
Control content shown in Discover:If they’re already subscribed to a channel, it will appear in the “Subscriptions” section toward the top of Discover. Find the one you want, like Teen Vogue or Brother, and hold down the card/tile. Turn the “Subscribe” toggle off, and then tap “Hide Teen Vogue.”
- If it’s NOT subscribed, scroll until you find it in the cards below. Hold down the card. Tap “Hide [app name].”
- Tap the 3 dots in the upper right corner of Discover.
- Tap “Select Interests” and select any that pertain to your child and unselect any that don’t. This will help train Snapchat model to hopefully show your child more appropriate content over ti font-size: 11pt;”>Change Preferences
Tap “Manage Subscriptions and Notifications.” If your child is subscribed to any channels, they’ll show up here and make sure the little bell is not colored in. This means notifications are turned off for any subscribed channels, decreasing distraction.
Thumb down to “My Friends.”
- When you find the person’s name you want to block, simply swipe across their name on Apple devices or, on Android phones, press and hold the person’s name, then press “Edit” and then “Block” or “Delete”.
How do I report a safety concern on Snapchat?
Tap the profile circle in the upper, left corner.
- To report a Story on Snapchat, just press and hold on to the offending Snap until a ?️ button appears. Tap it to report the Story and let Snapchat know what’s going on.
- To report a Snap someone sent you, just press and hold on the Snap until a ?️ button appears. Tap it to report the Snap and let Snapchat know what’s going on.
- To report a Snapchat account, press and hold on to that Snapchatter’s name and tap the ⚙button. Tap ‘Report’ to report the account and let Snapchat know what’s going on.
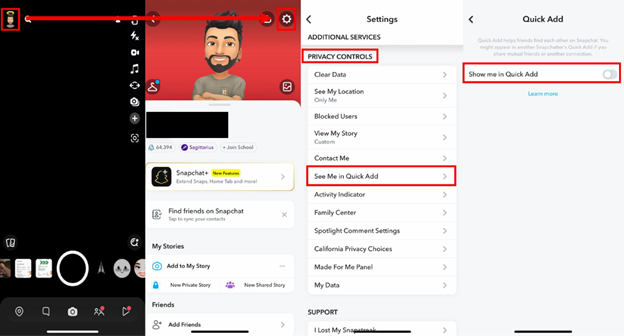
How to Remove My AI from seeing your location:
- Tap on your profile in the top left.
- Then the settings gear in the top right.
- Scroll down to “Privacy Controls”
- Select “View MY Story”
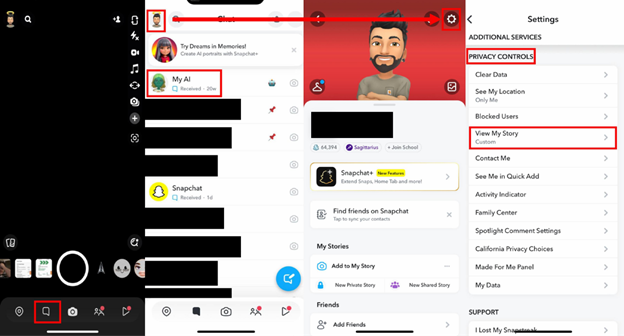
Once you are here, you can block certain users from seeing your story, in this case, we want to block My AI.
- Select “My AI” and tap “Block”
Next, we want to control who can see your location. We recommend doing this for any account used by a child.
- Go back to your Privacy Controls in your Settings.
- Select “See My Location”
- Enable “Ghost Mode” so that no one can see your Last Active location.
- Enable “Hide My Live Location” to ensure your location isn’t seen.
How do I block other users on Snapchat?
- Click the profile circle in the upper left corner.
- Thumb down to “My Friends.”
- When you find the person’s name you want to block, simply swipe across their name on Apple devices or, on Android phones, press and hold the person’s name, then press “Edit” and then “Block” or “Delete”.
How do I report a safety concern on Snapchat?
If a child receives inappropriate media or is being harassed, contact local law enforcement immediately. There are also some in-app steps you can take.
- To report a Story on Snapchat, just press and hold on to the offending Snap until a ?️ button appears. Tap it to report the Story and let Snapchat know what’s going on.
- To report a Snap someone sent you, just press and hold on the Snap until a ?️ button appears. Tap it to report the Snap and let Snapchat know what’s going on.
- To report a Snapchat account, press and hold on to that Snapchatter’s name and tap the ⚙button. Tap ‘Report’ to report the account and let Snapchat know what’s going on.
TIKTOK
TikTok Parent Safety Guide
How to Set Up Family Pairing on TikTok
To link parent and teen accounts:
1. In the TikTok app, tap Profile at the bottom.
2. Tap the Menu ☰ button at the top, then select Settings and privacy.
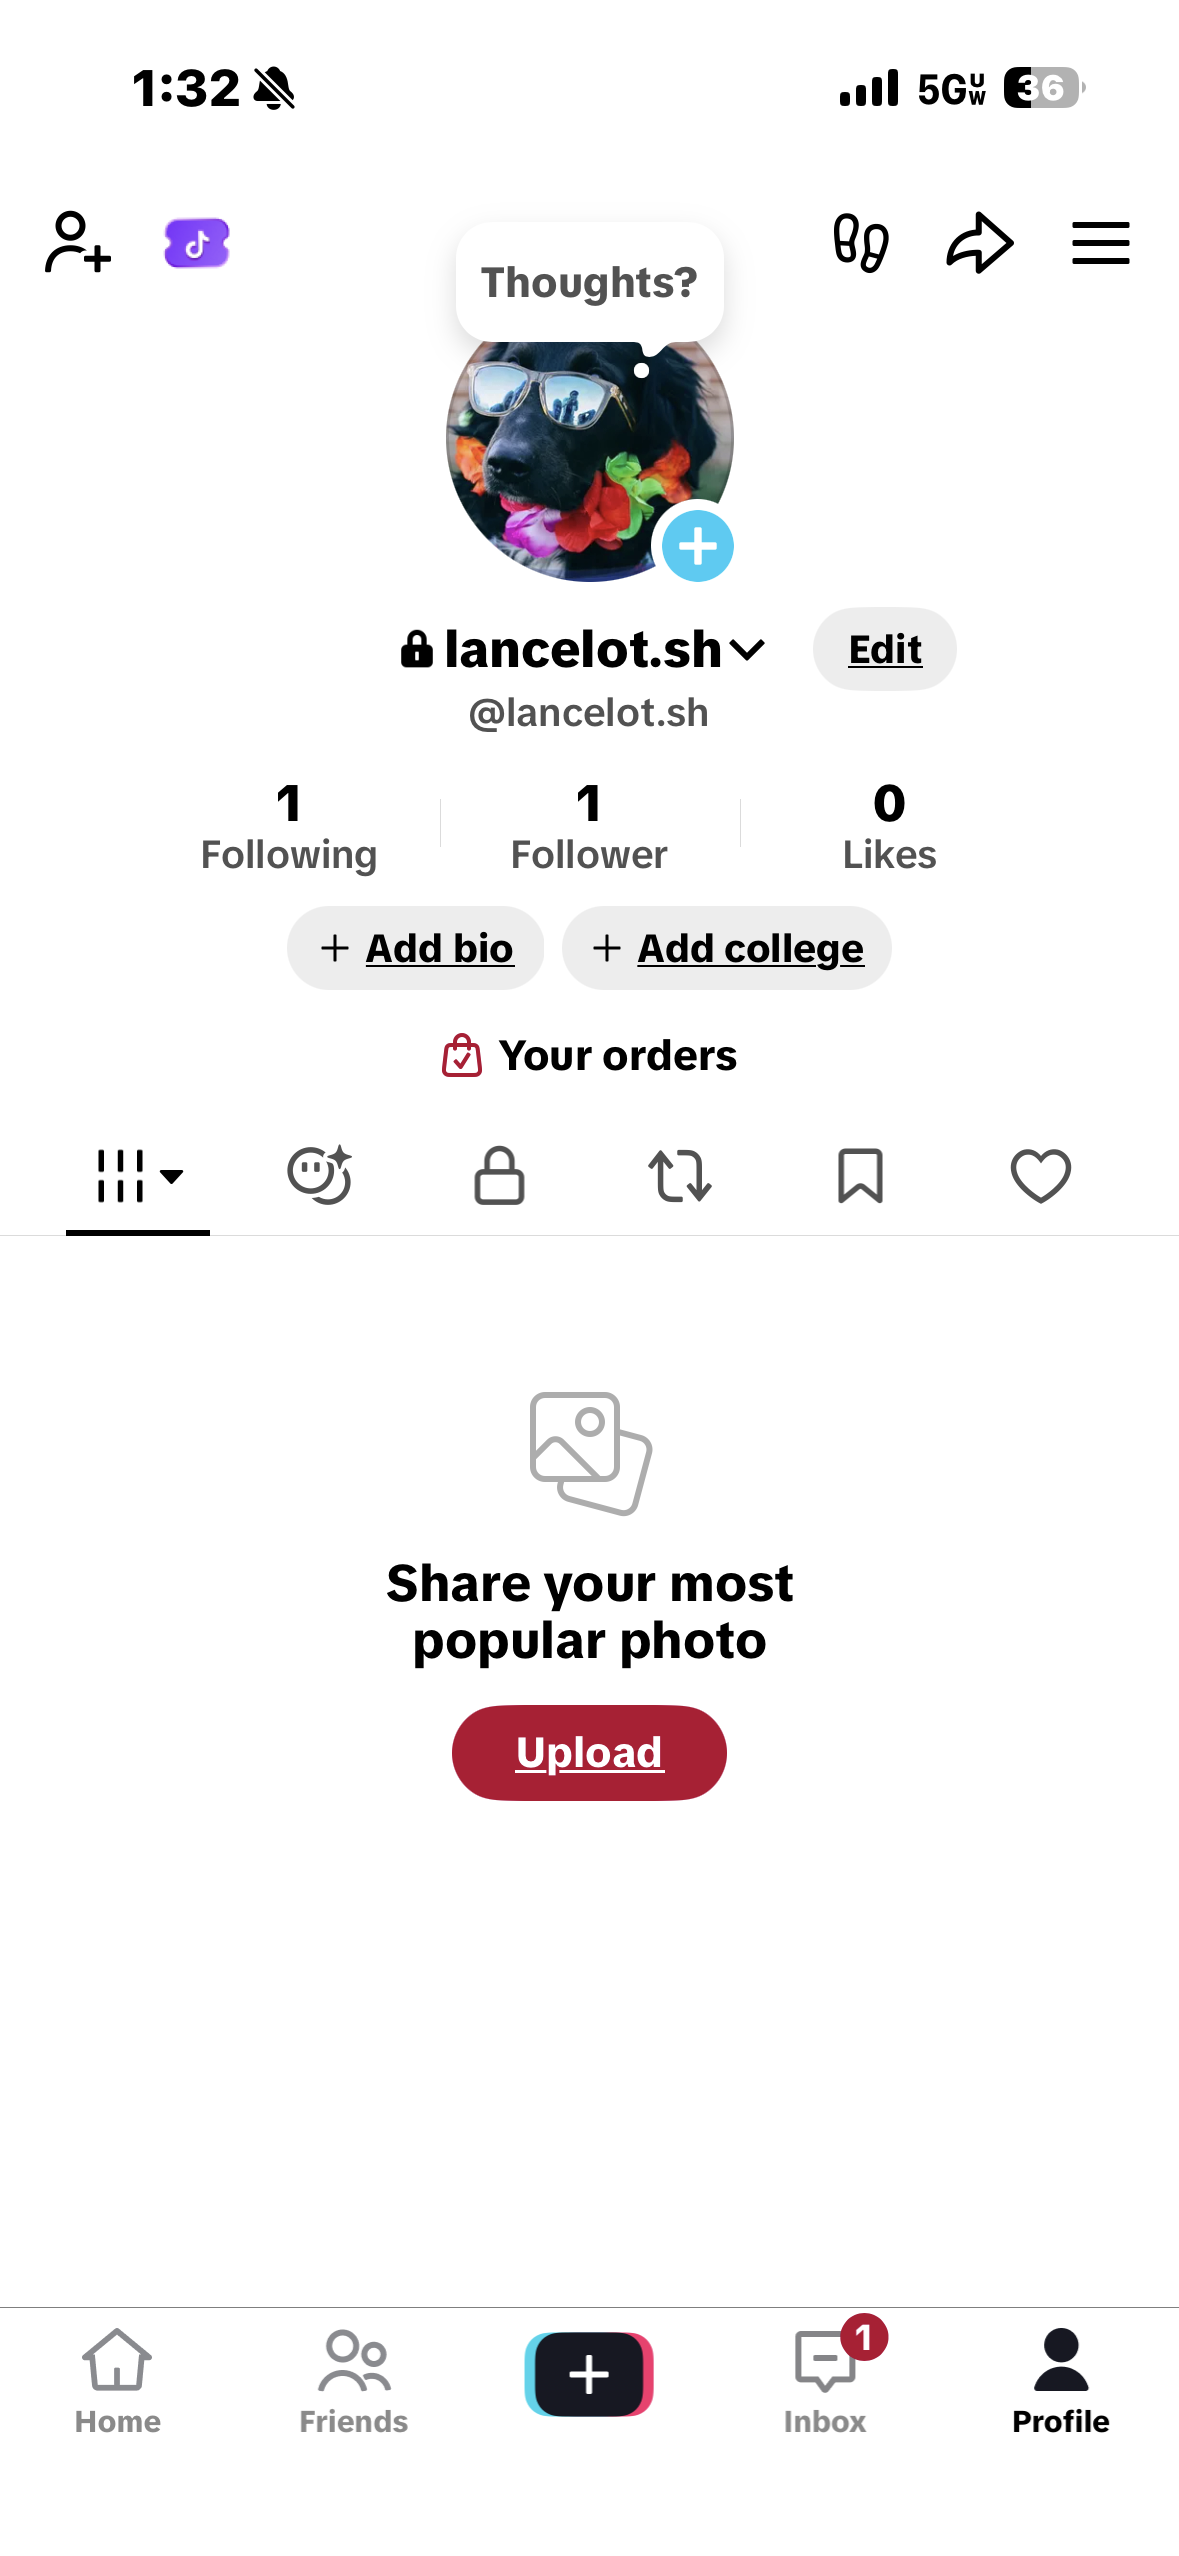
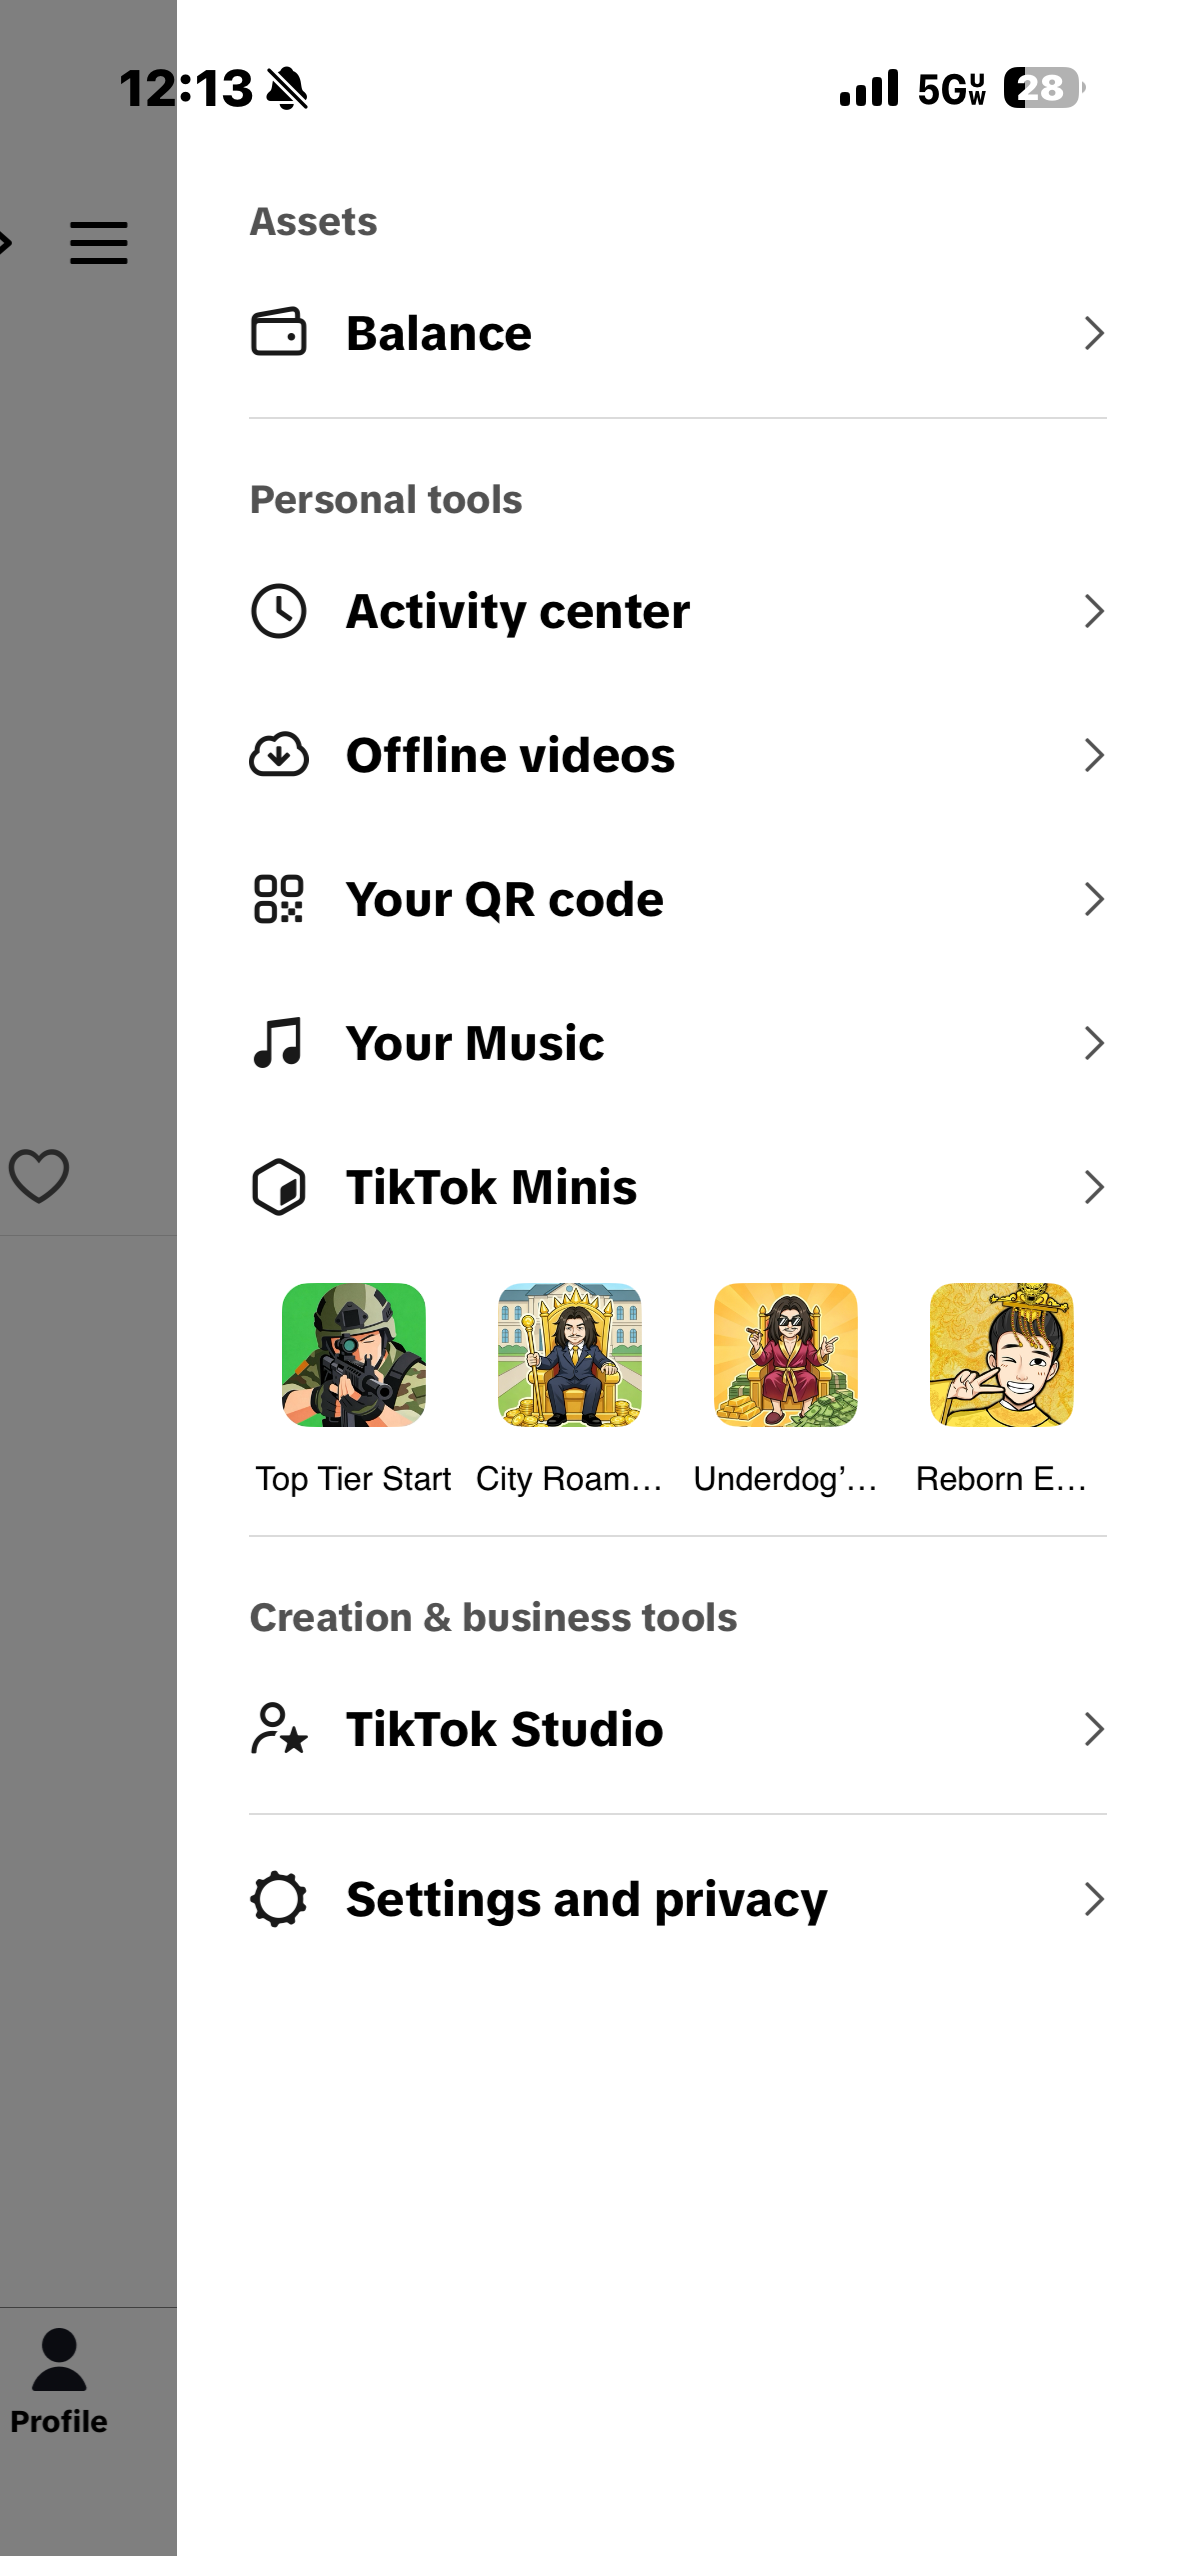
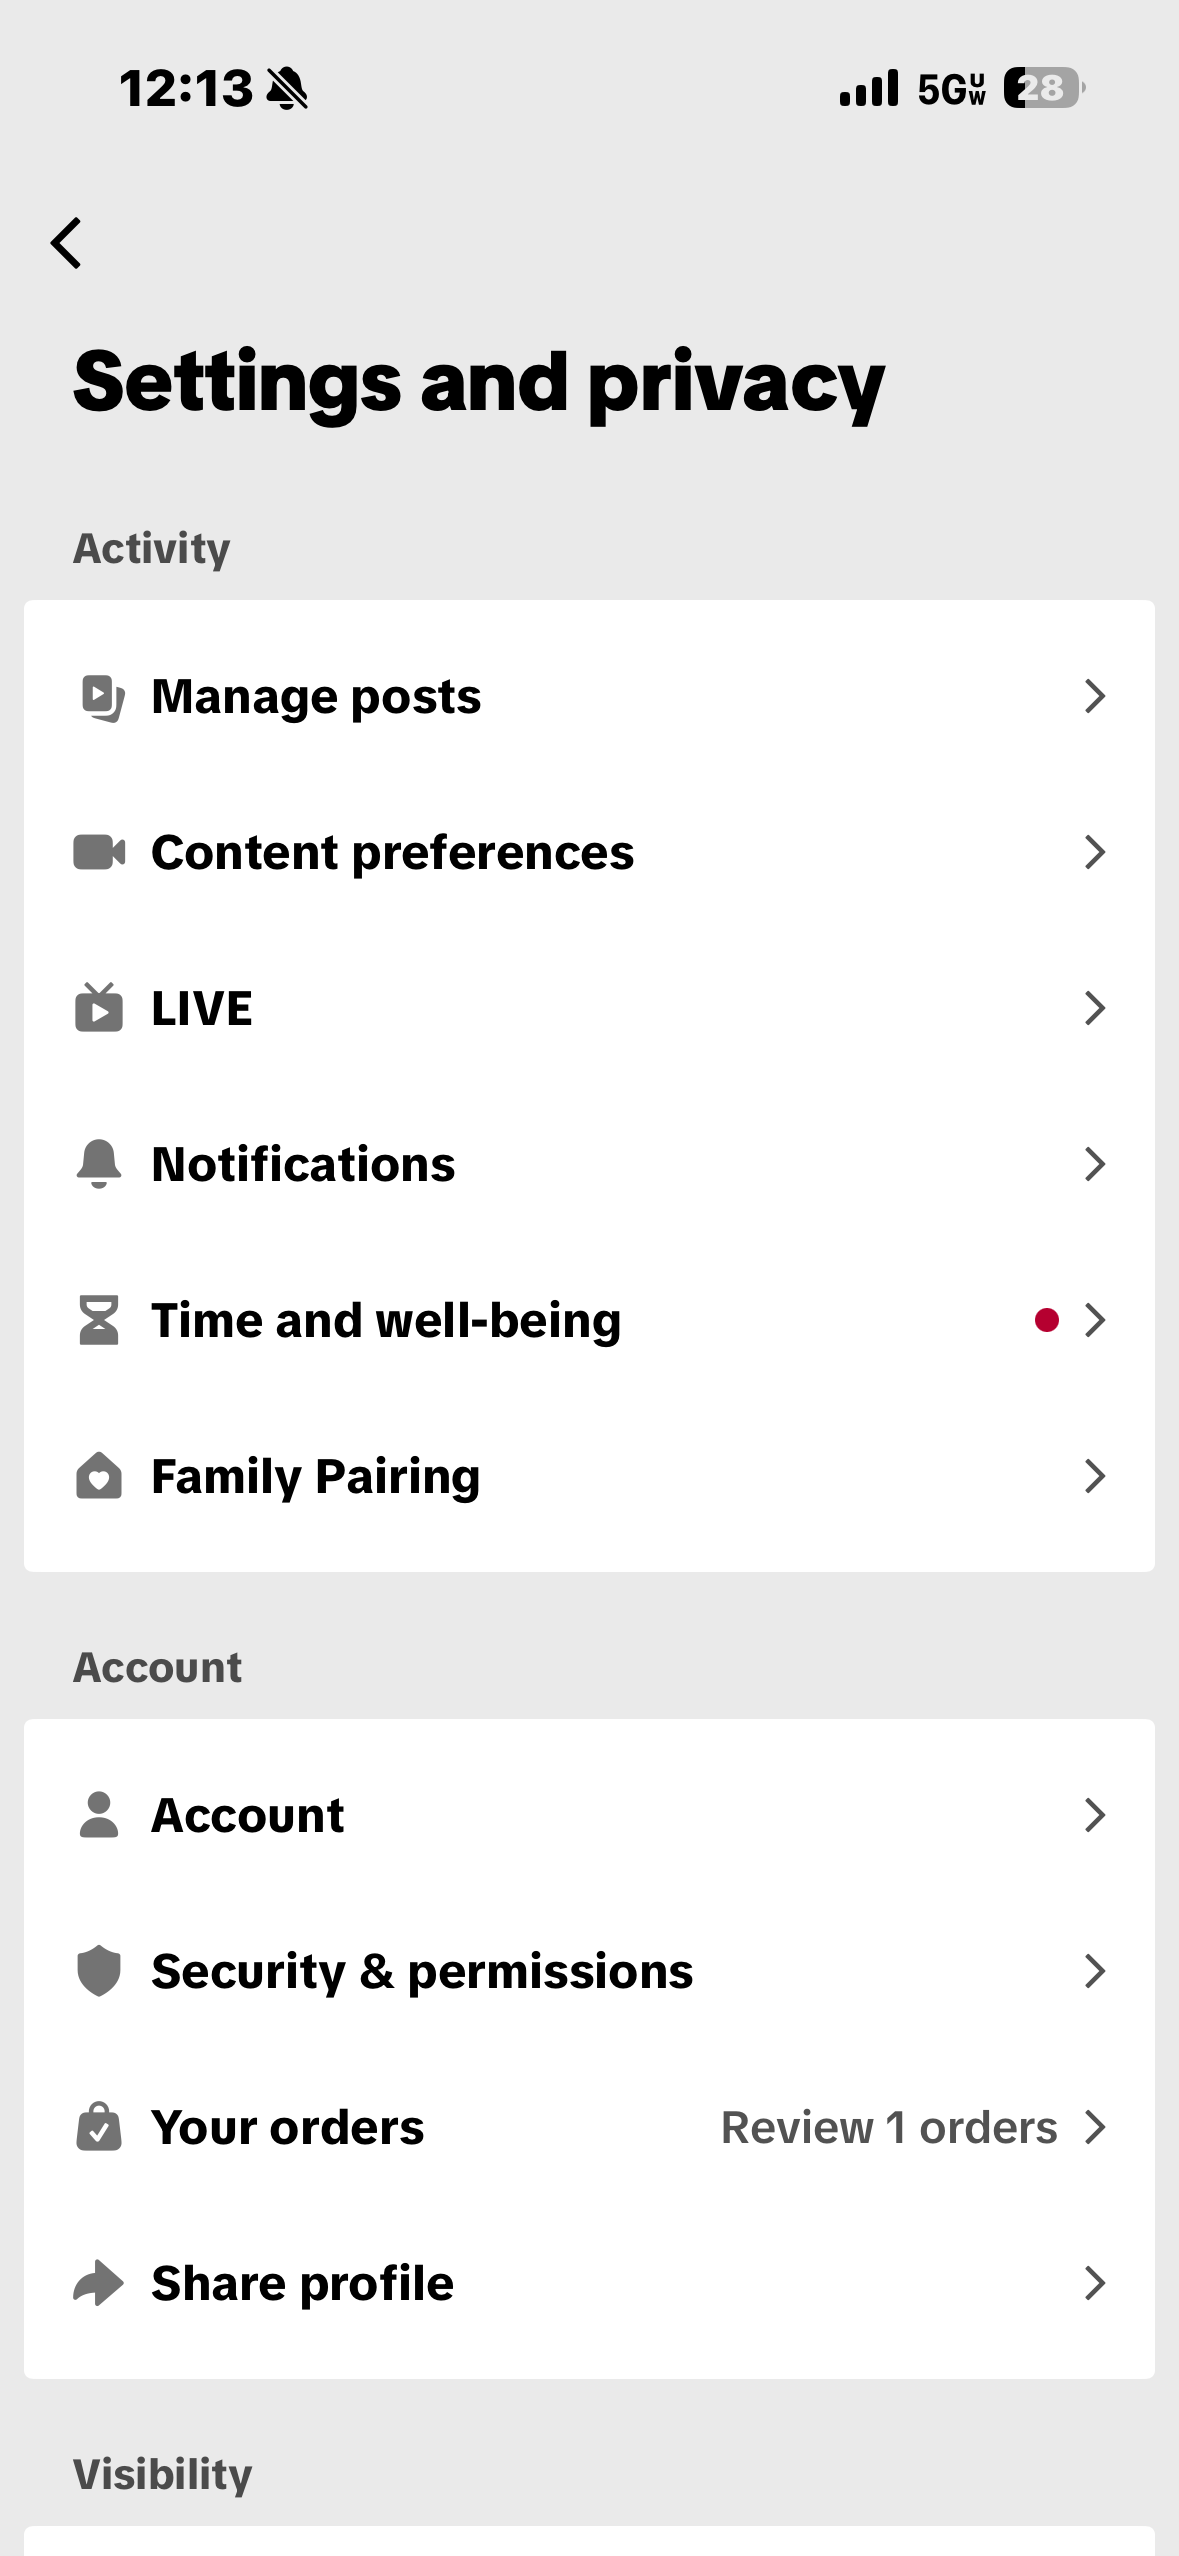
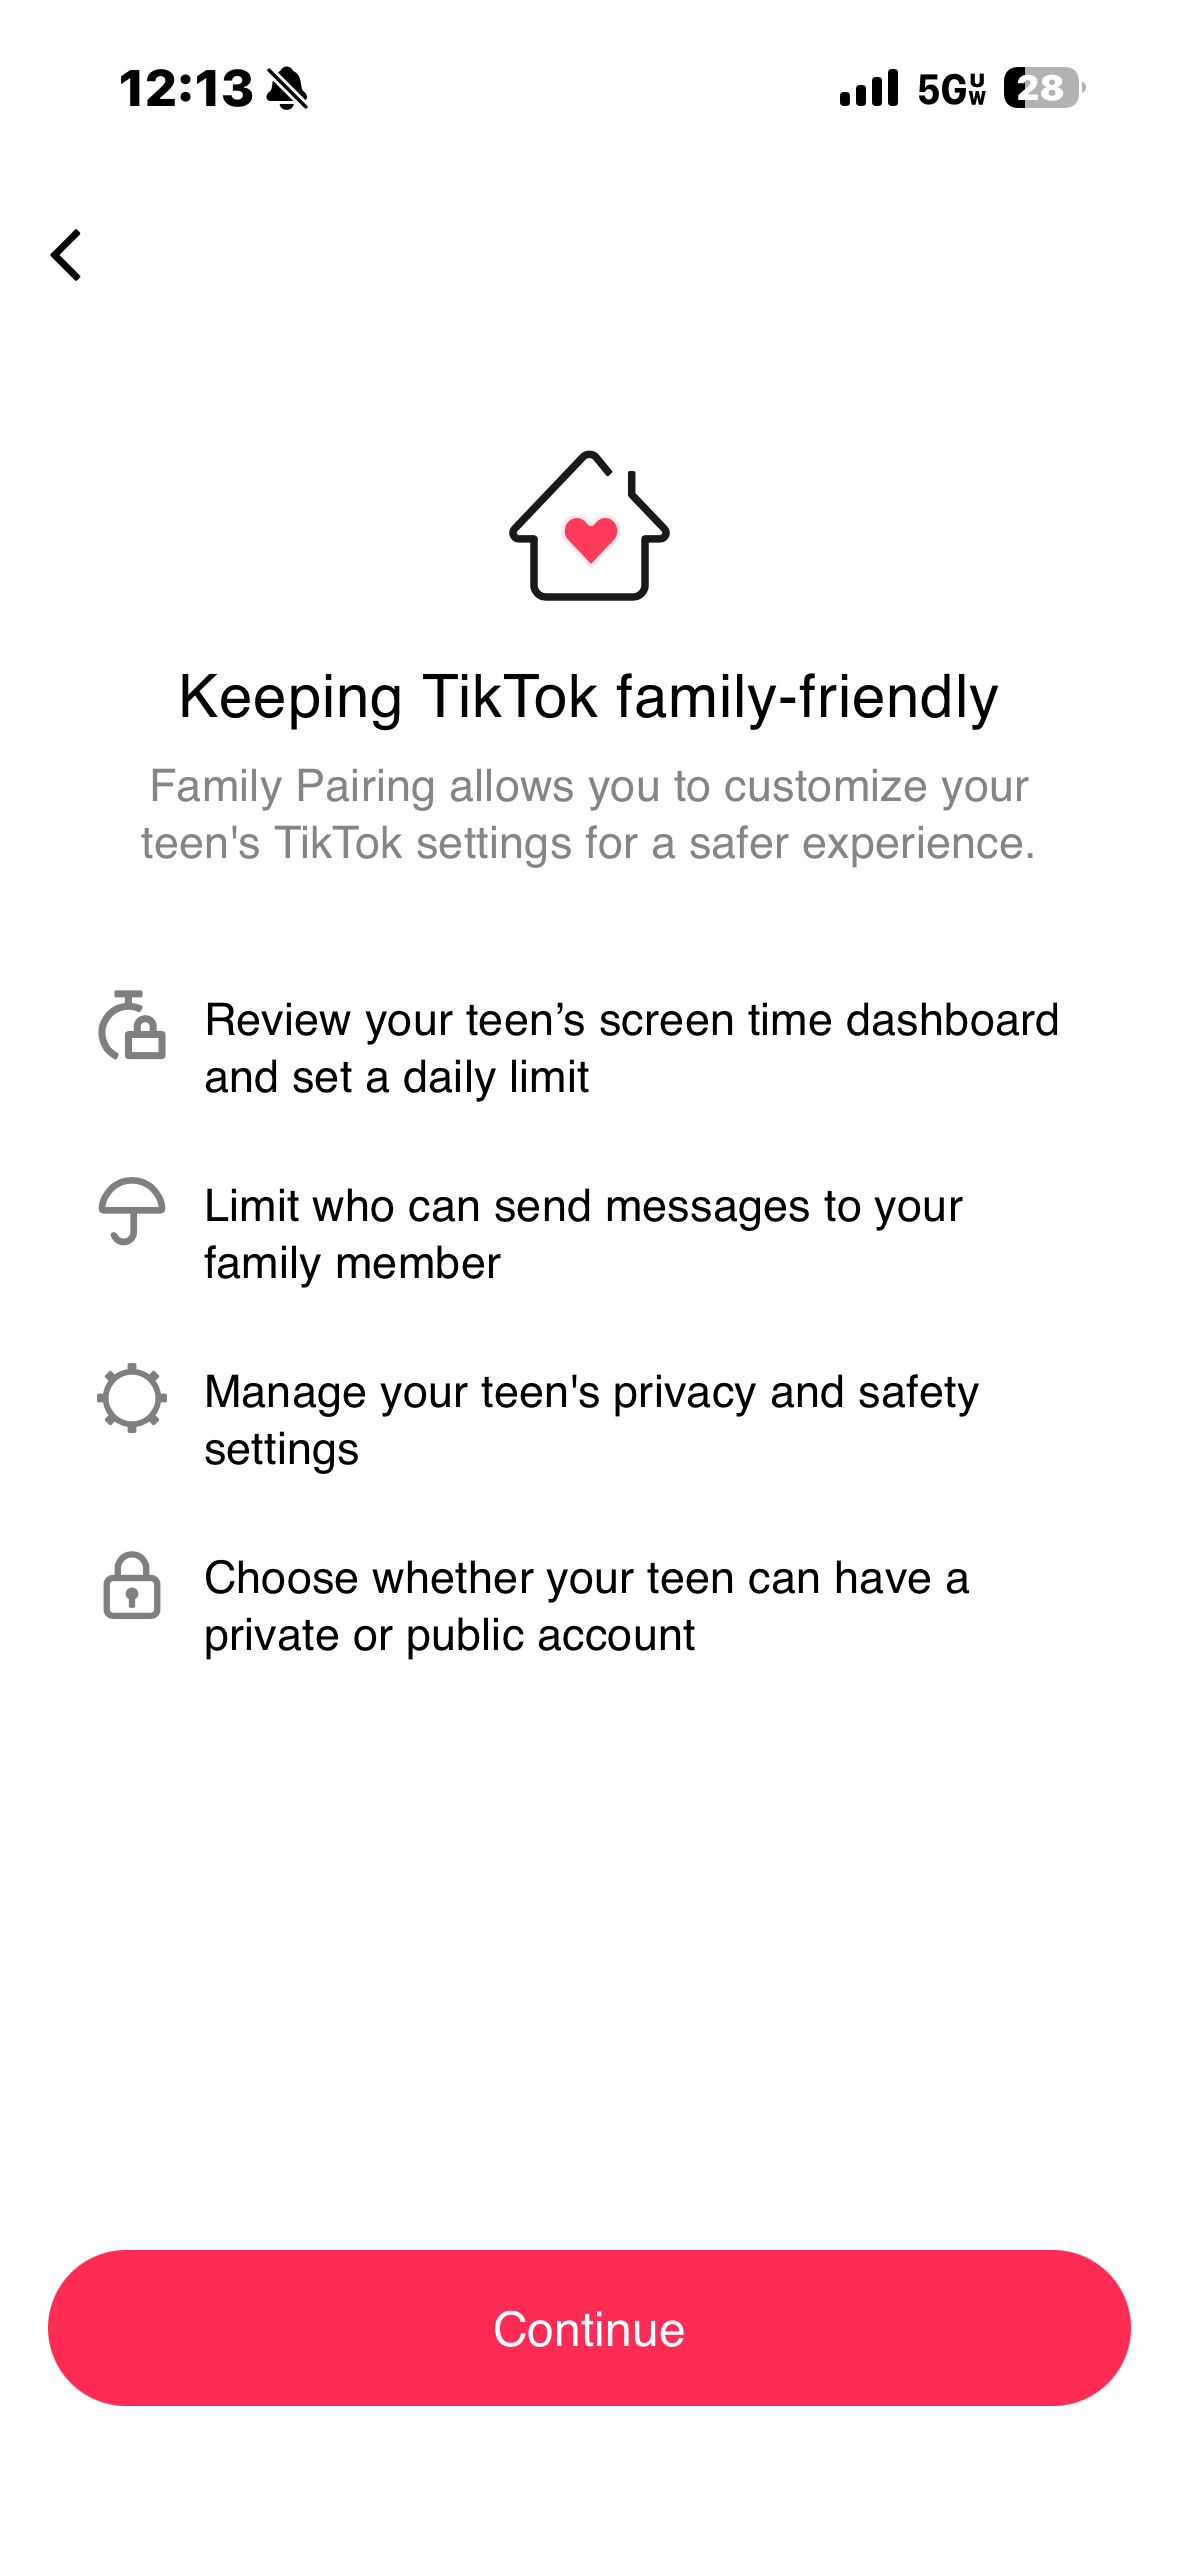
3. Tap Family Pairing.
4. Tap Continue.
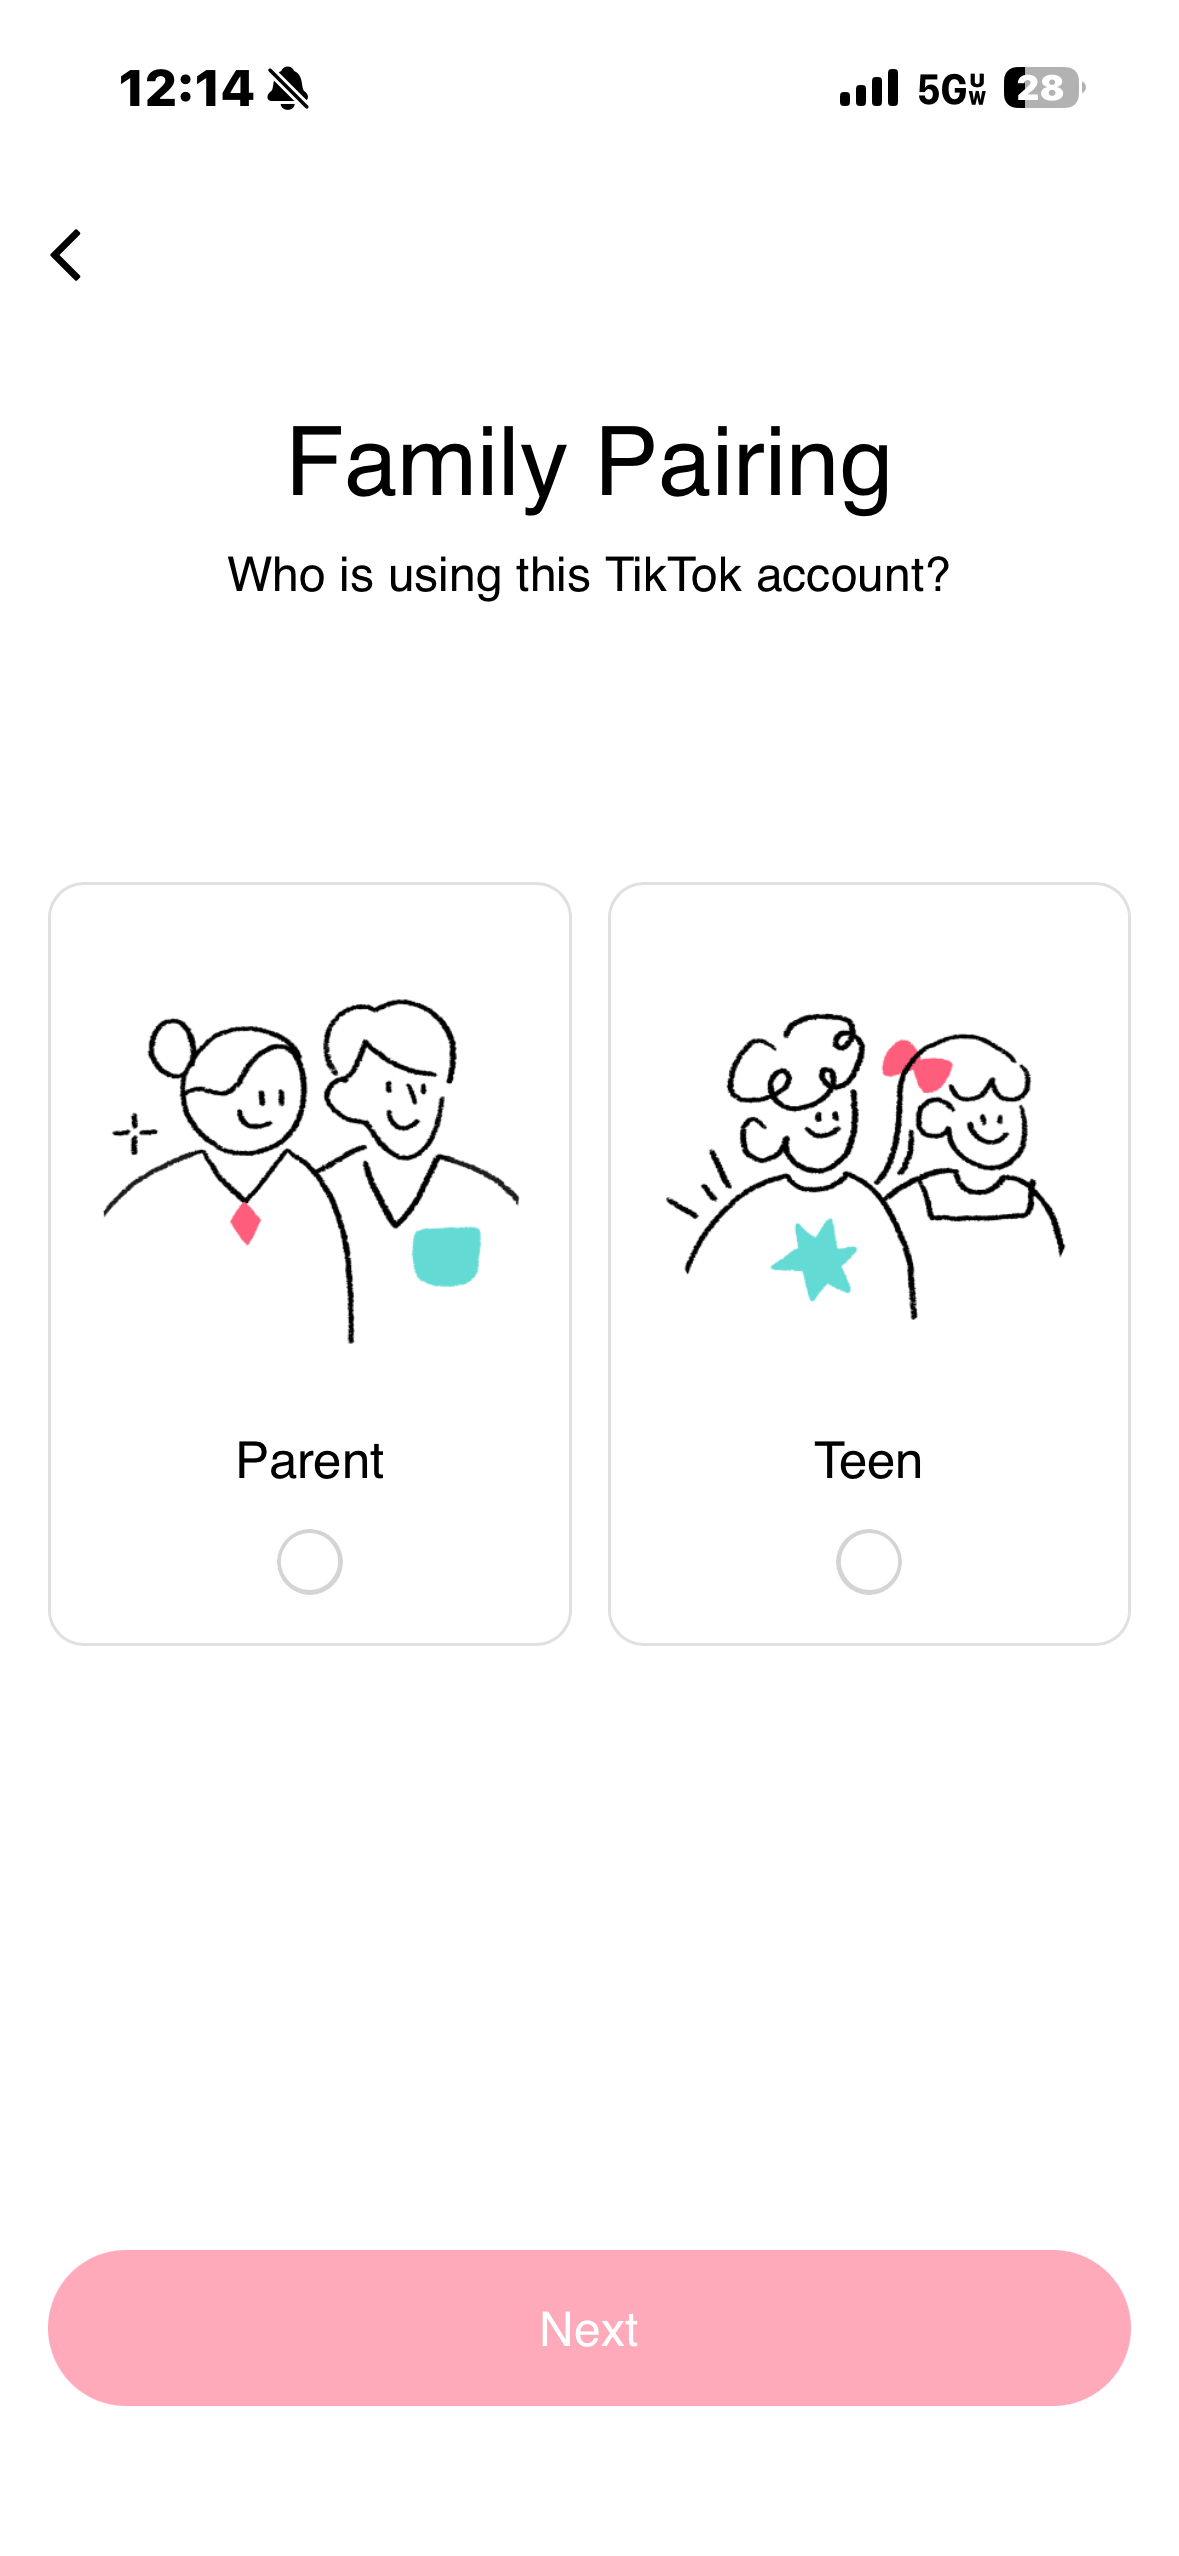
5. Tap Parent or Teen, then tap Next.
6. Follow the steps to link the accounts.
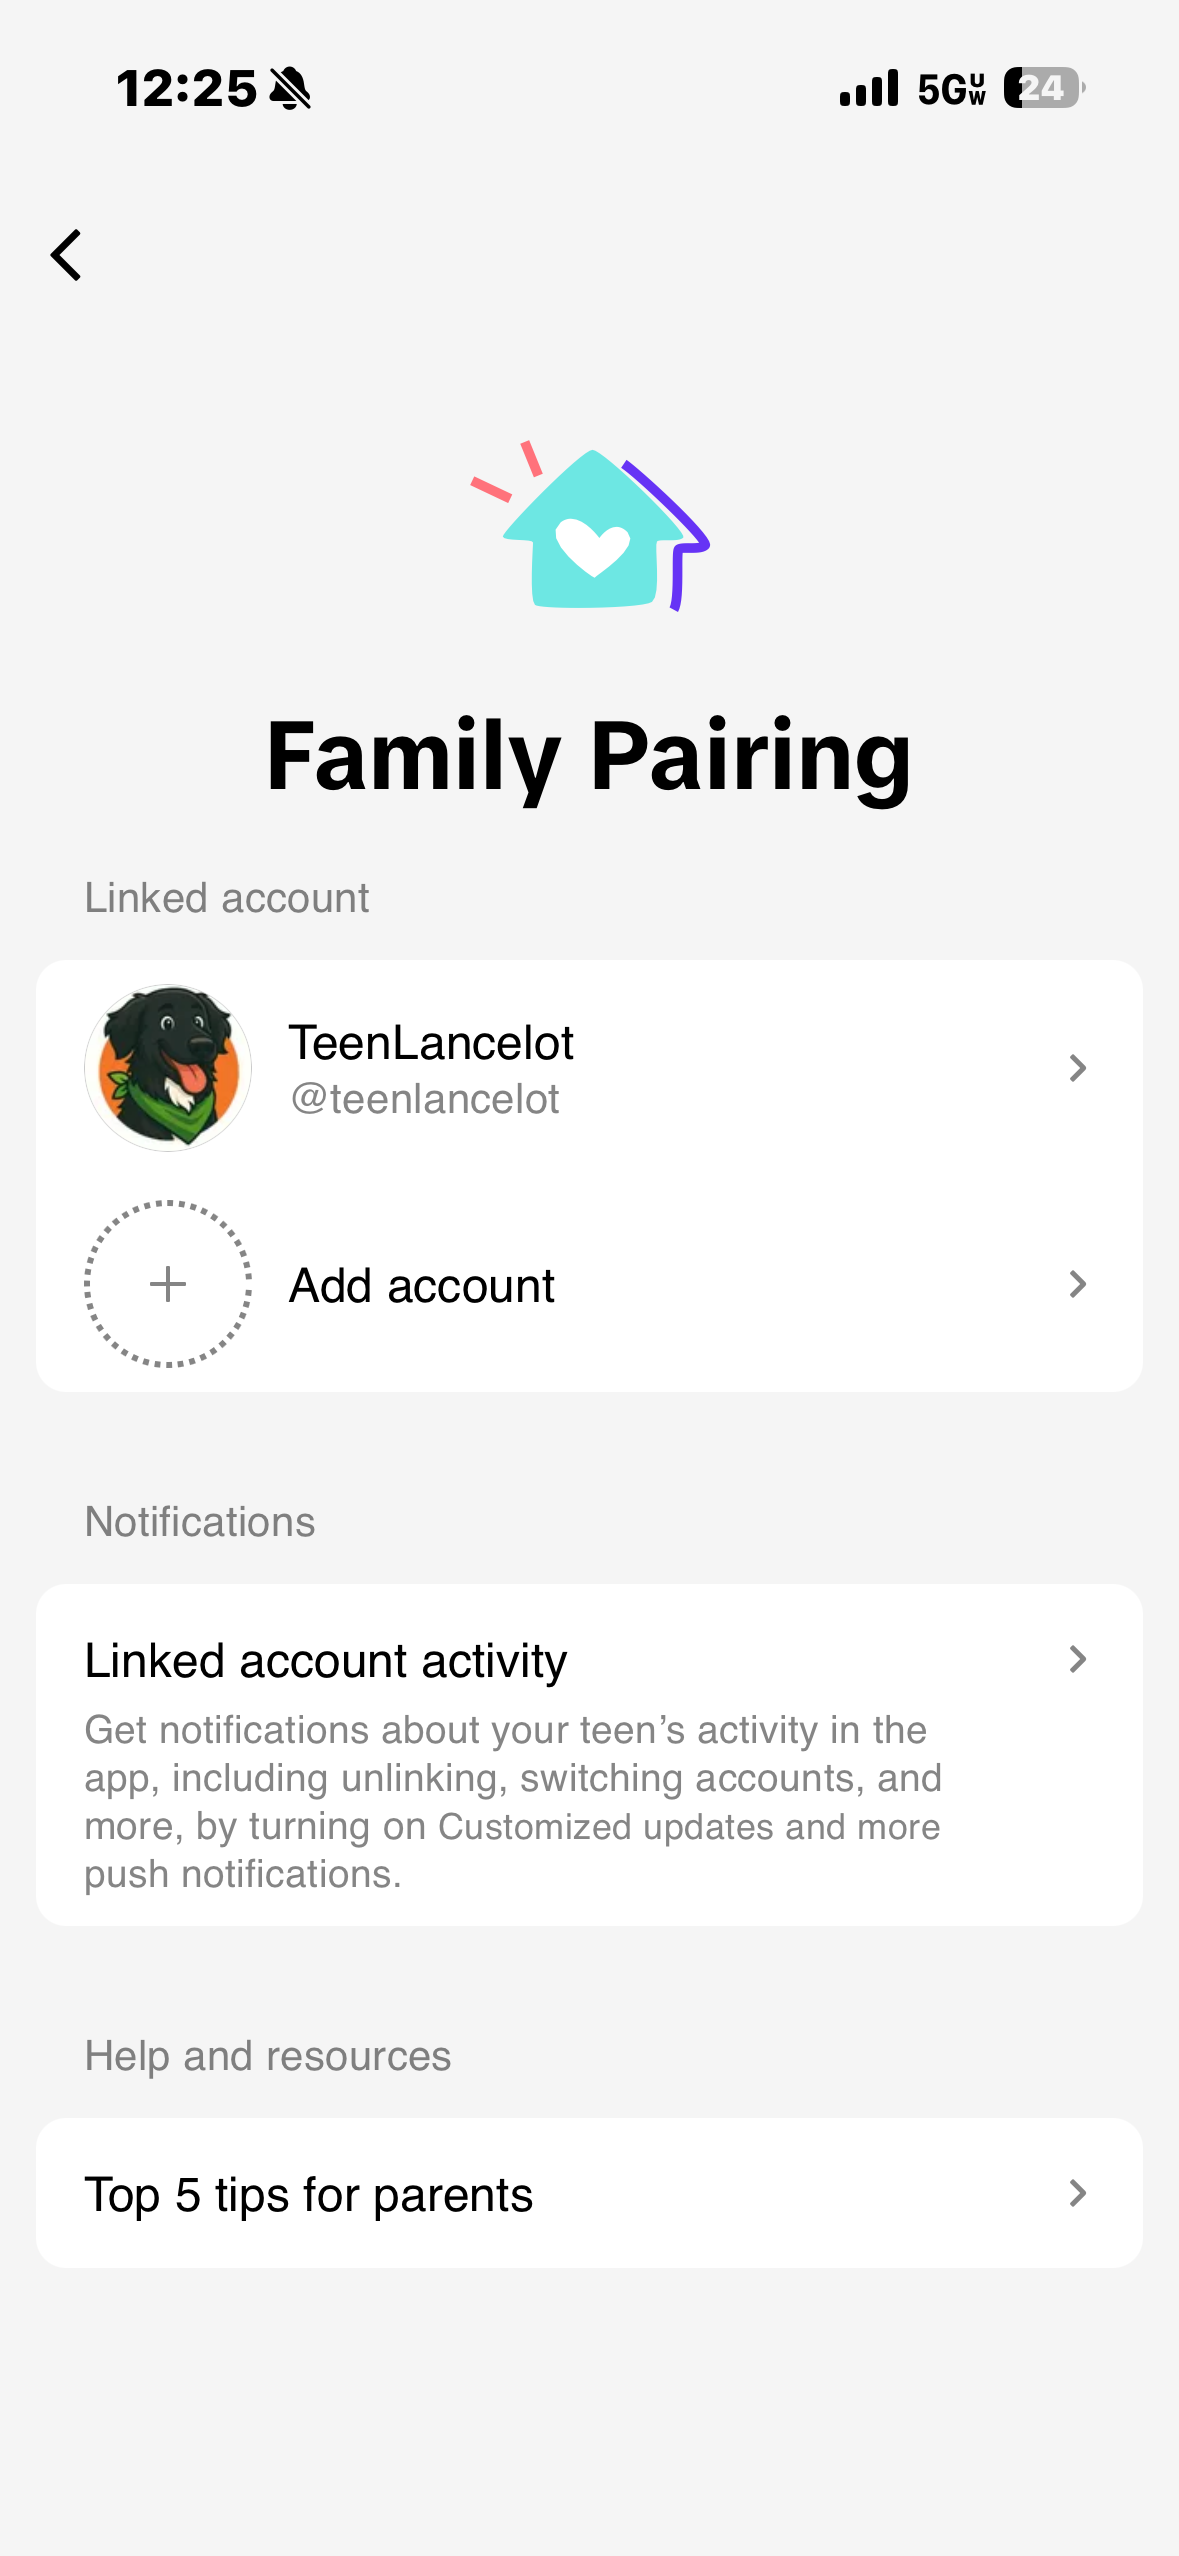
How to Manage Family Pairing Settings on TikTok
To manage Family Pairing settings:
1. In the TikTok app, tap Profile at the bottom.
2. Tap the Menu ☰ button at the top, then select Settings and privacy. 3. Tap Family Pairing.
4. Select the account you want to manage, then update the settings as needed.
How to Manage Restricted Mode on TikTok
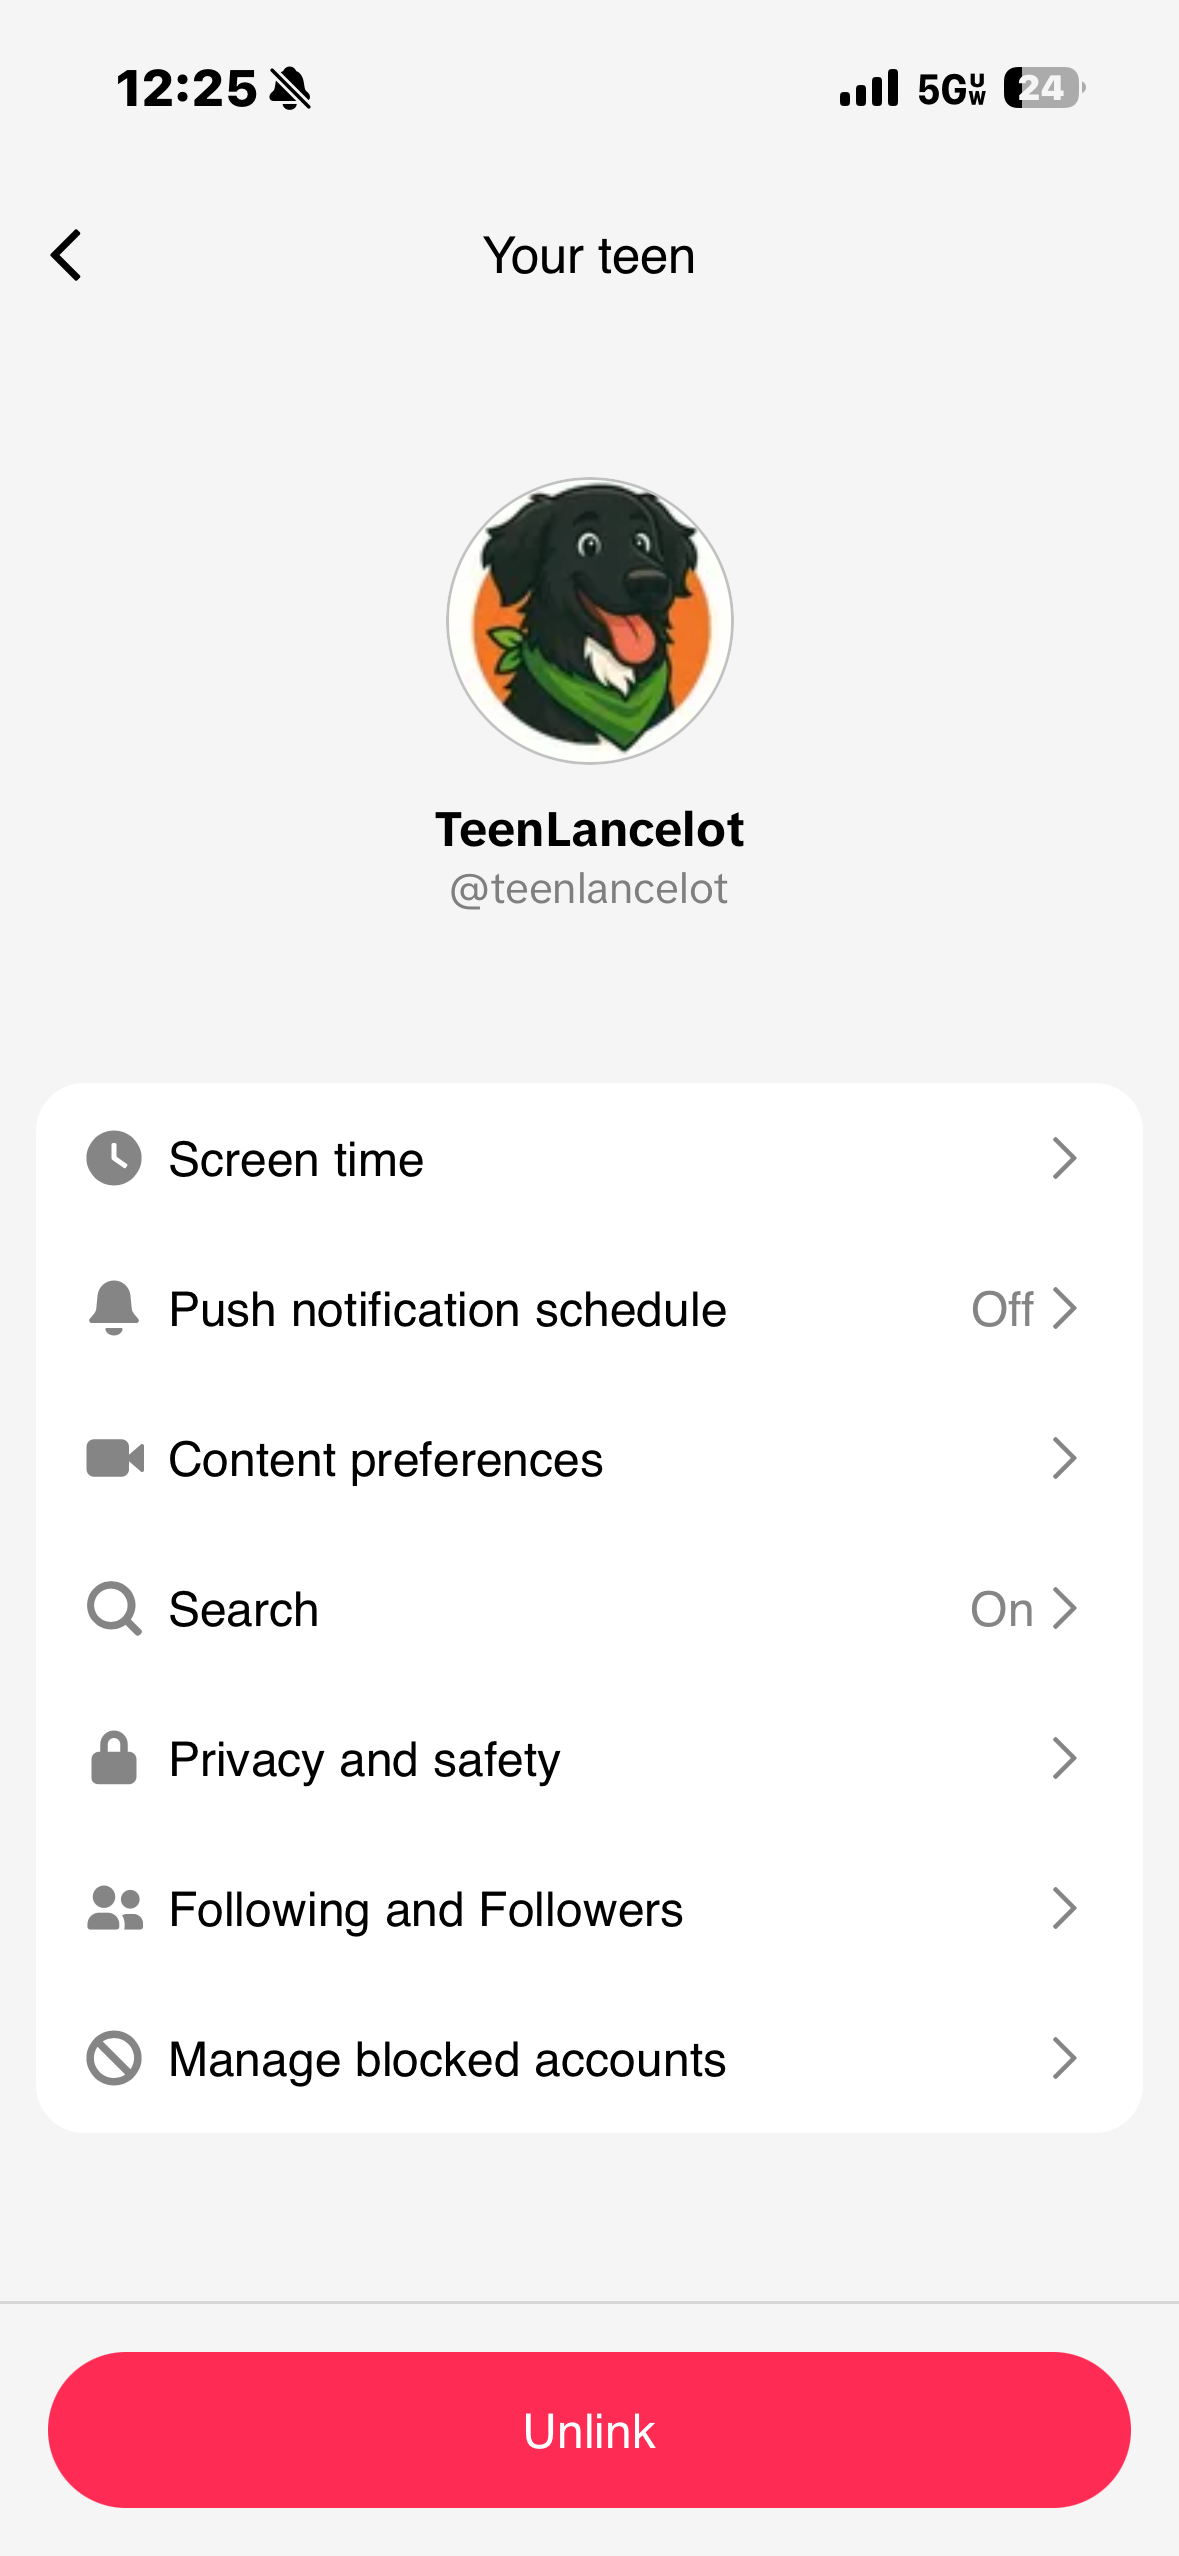
- To turn Restricted Mode on or off:
1. In the TikTok app, tap Profile at the bottom.
2. Tap the Menu ☰ button at the top, then select Settings and privacy.
3. Tap Content preferences.
4. Tap Restricted Mode.
5. Follow the steps in the app to set or enter a passcode, then turn Restricted Mode on or off. If this is your first time turning on Restricted Mode, you’ll need to tap Turn on before you can set a passcode.
A few things to know about Restricted Mode:
• If you have multiple accounts, you must turn Restricted Mode on for each account separately.
• If you’re a parent or guardian, you can turn Restricted Mode on for your teen’s account through Family Pairing.
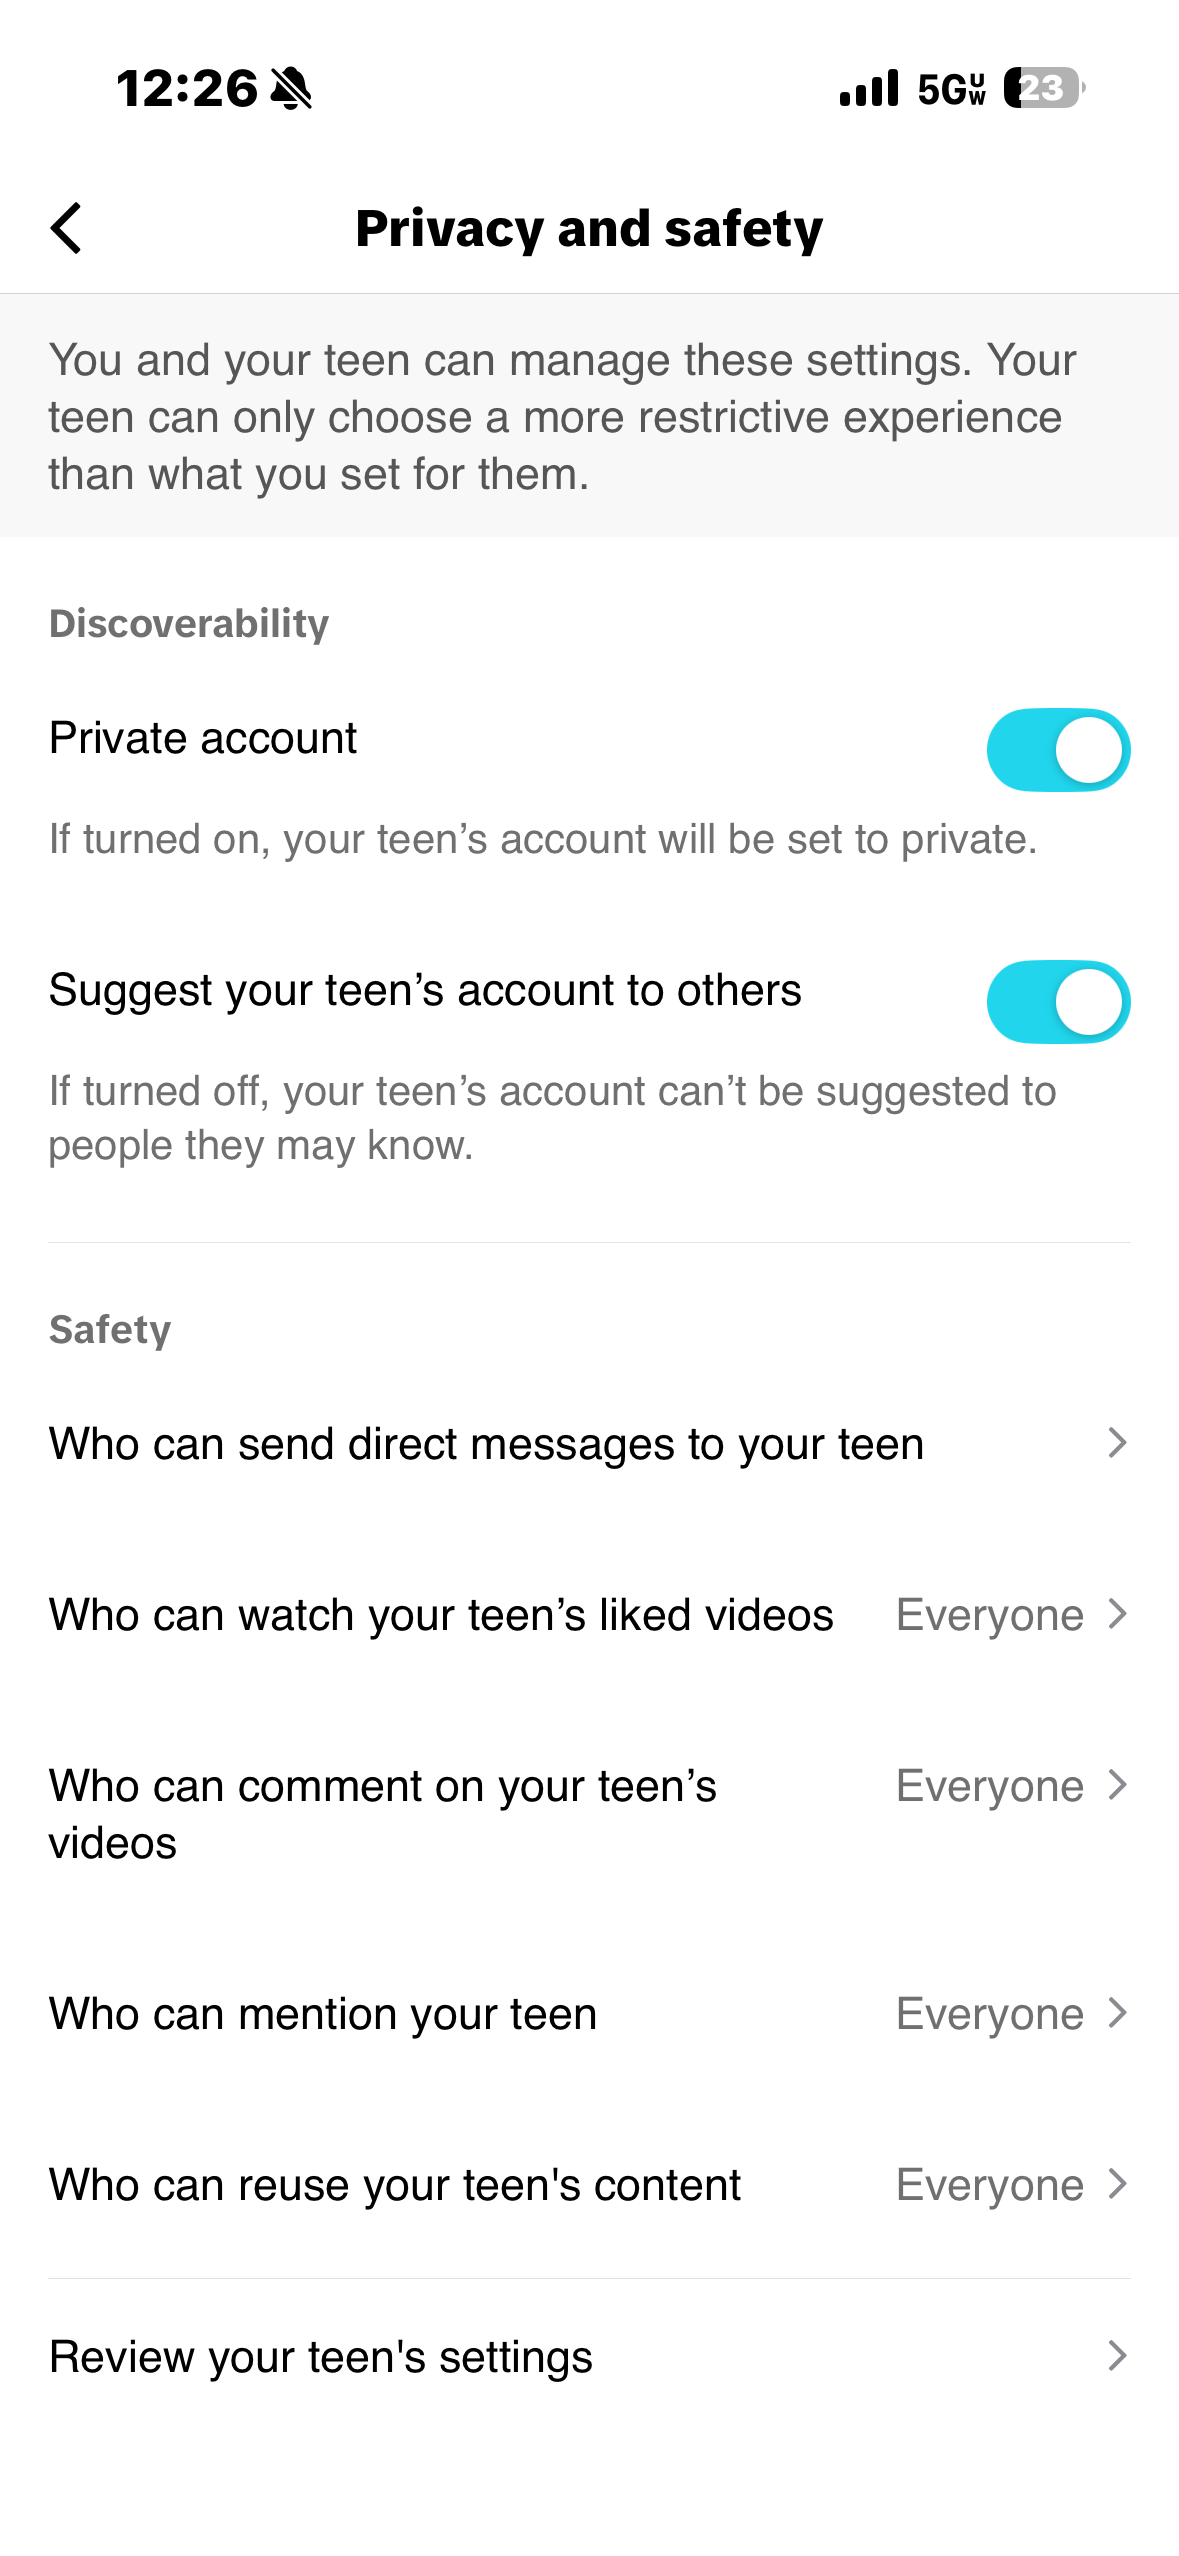
If your child is under 16 but used an incorrect birthday to bypass controls, then you can follow these steps:
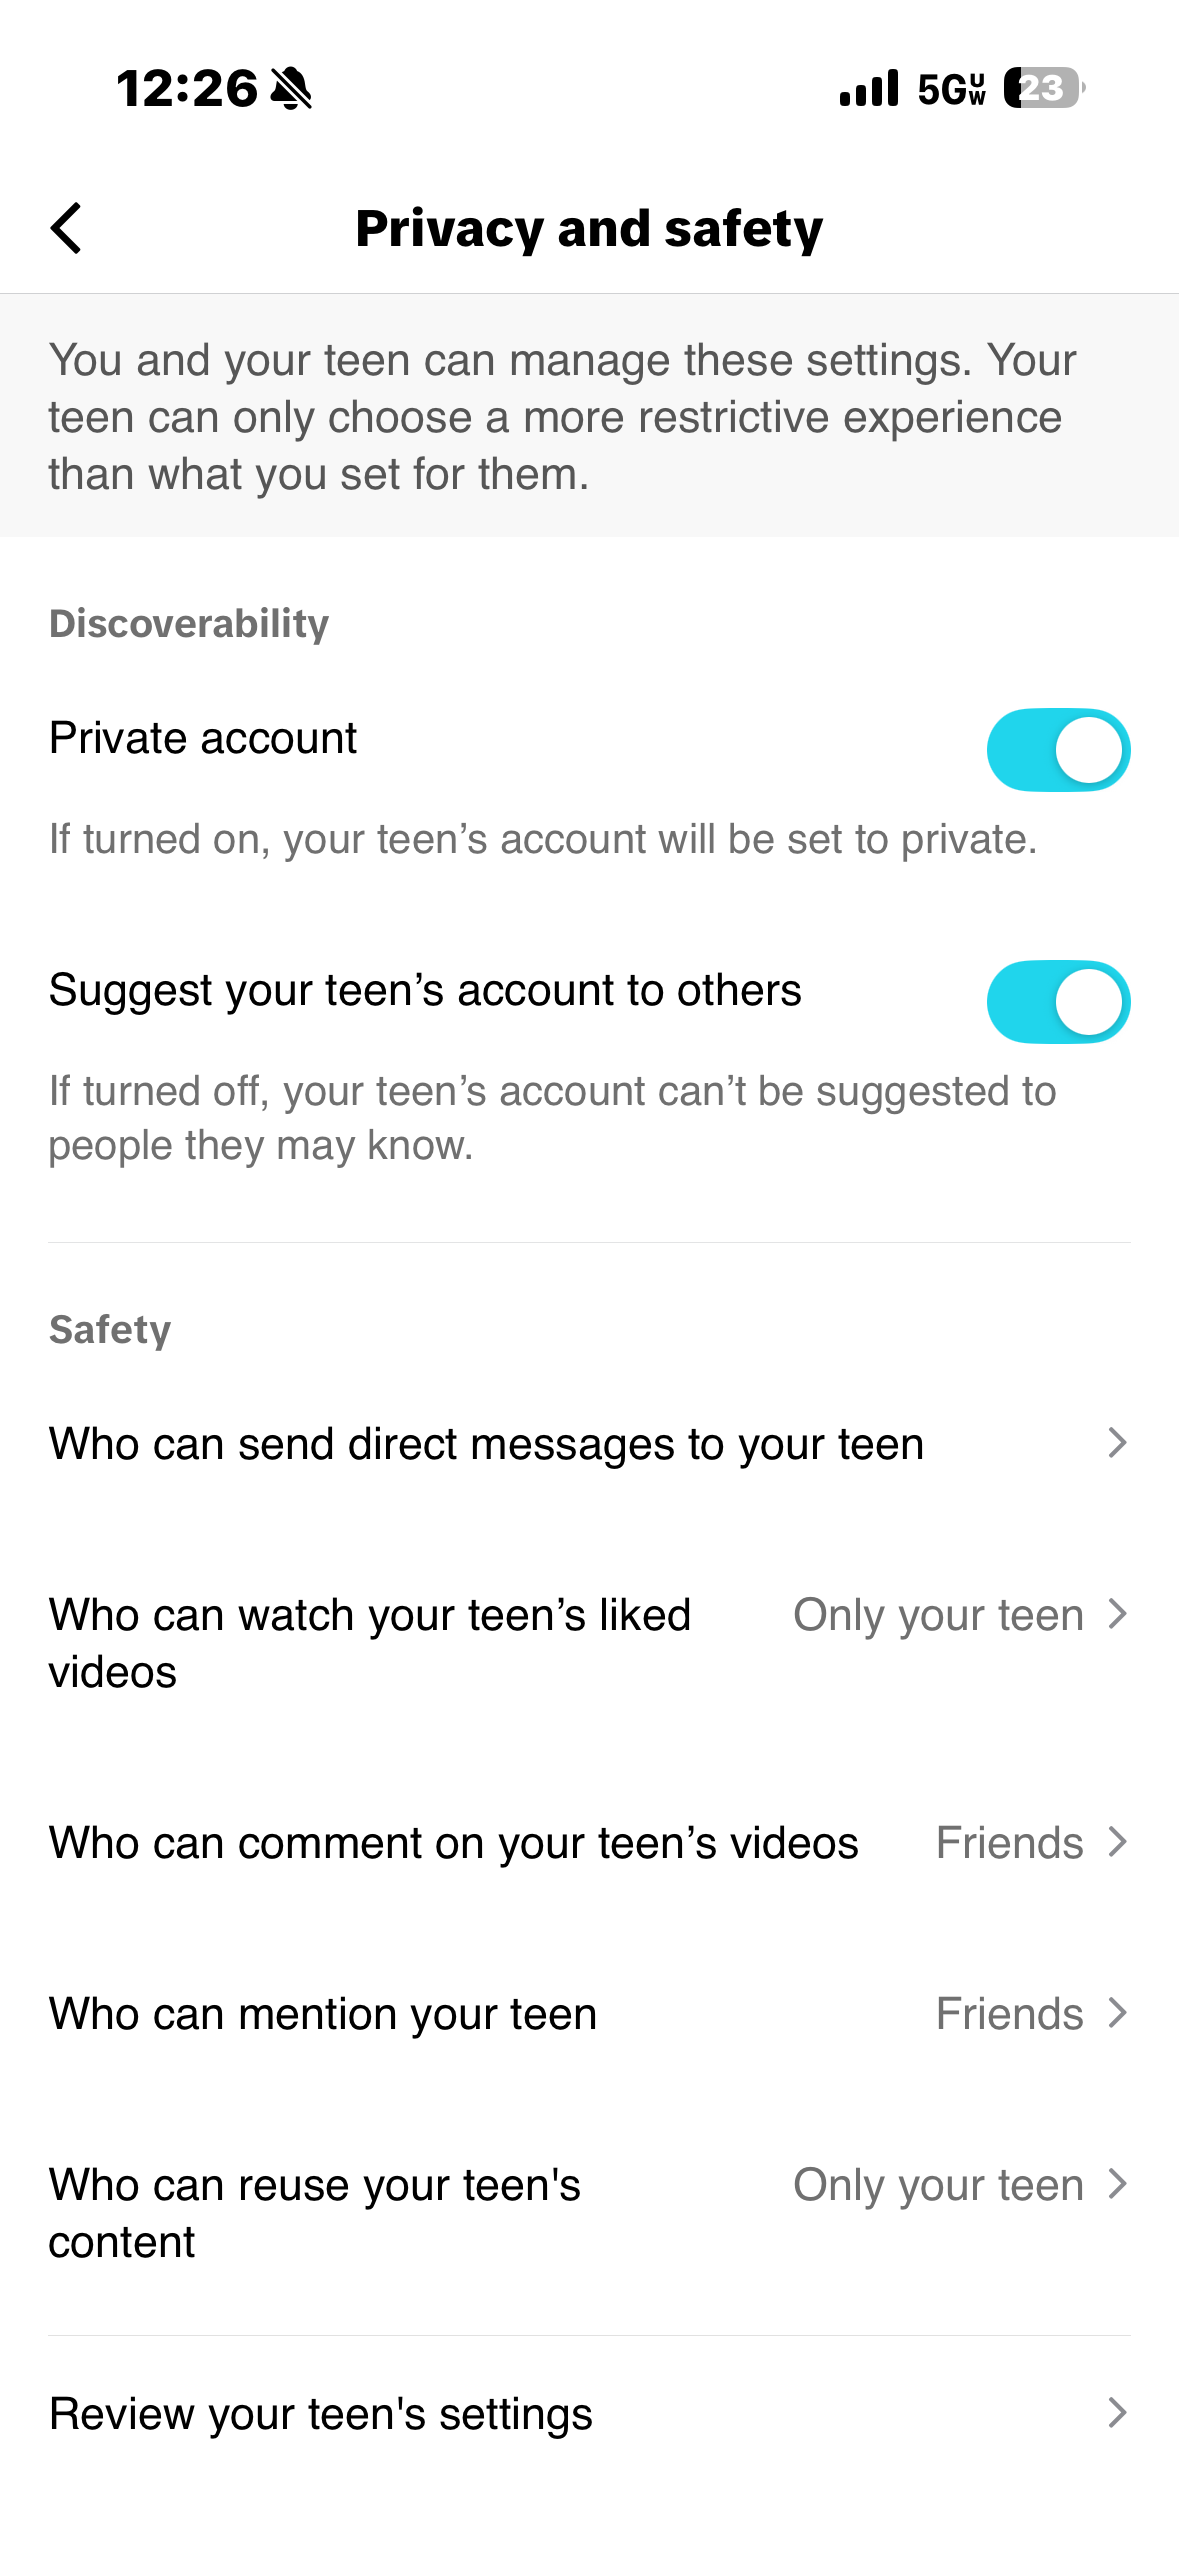
- Switch to a private account – this will prevent complete strangers from contacting your child.
- Change the “Allow others to find me” toggle – an additional layer of privacy to prevent your child’s account from showing up in search results.
- Opt out of personalized data – this prevents user data from being gathered. And for a company that historically hasn’t handled privacy issues well, it’s a good idea.
- Change all SAFETY settings to “friends” – the default safety setting for “who can post comments,” “who can duet with you,” “who can react to your videos” is “Everyone.” Although making the account private should ensure strangers can’t find your child, these settings make it so that your child can’t invite strangers in.
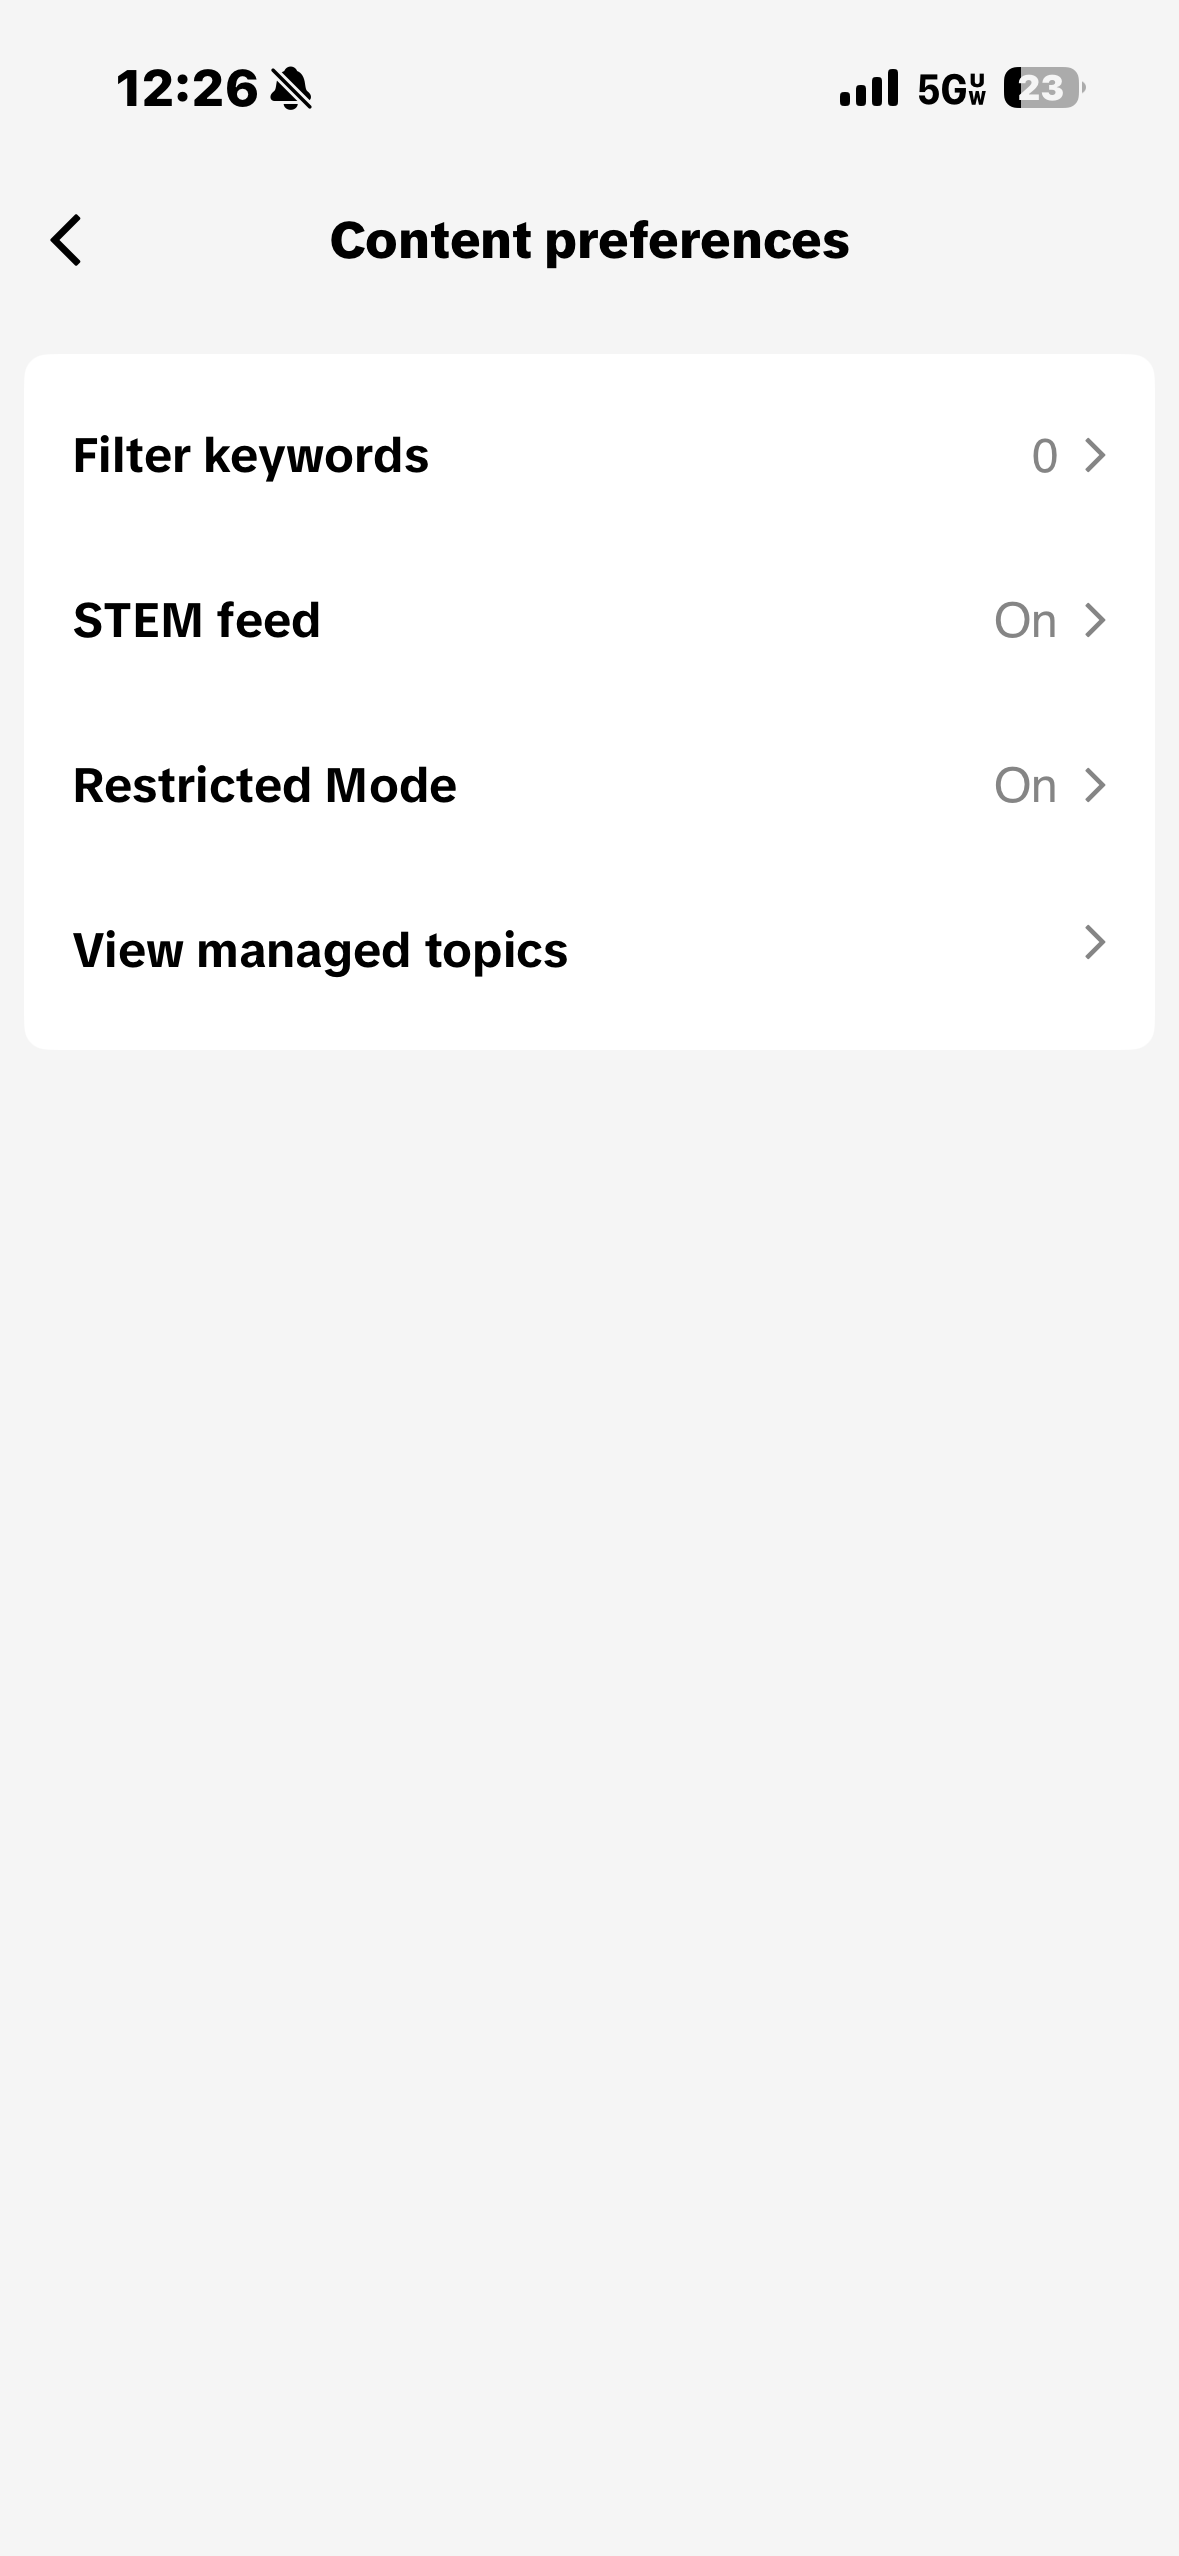
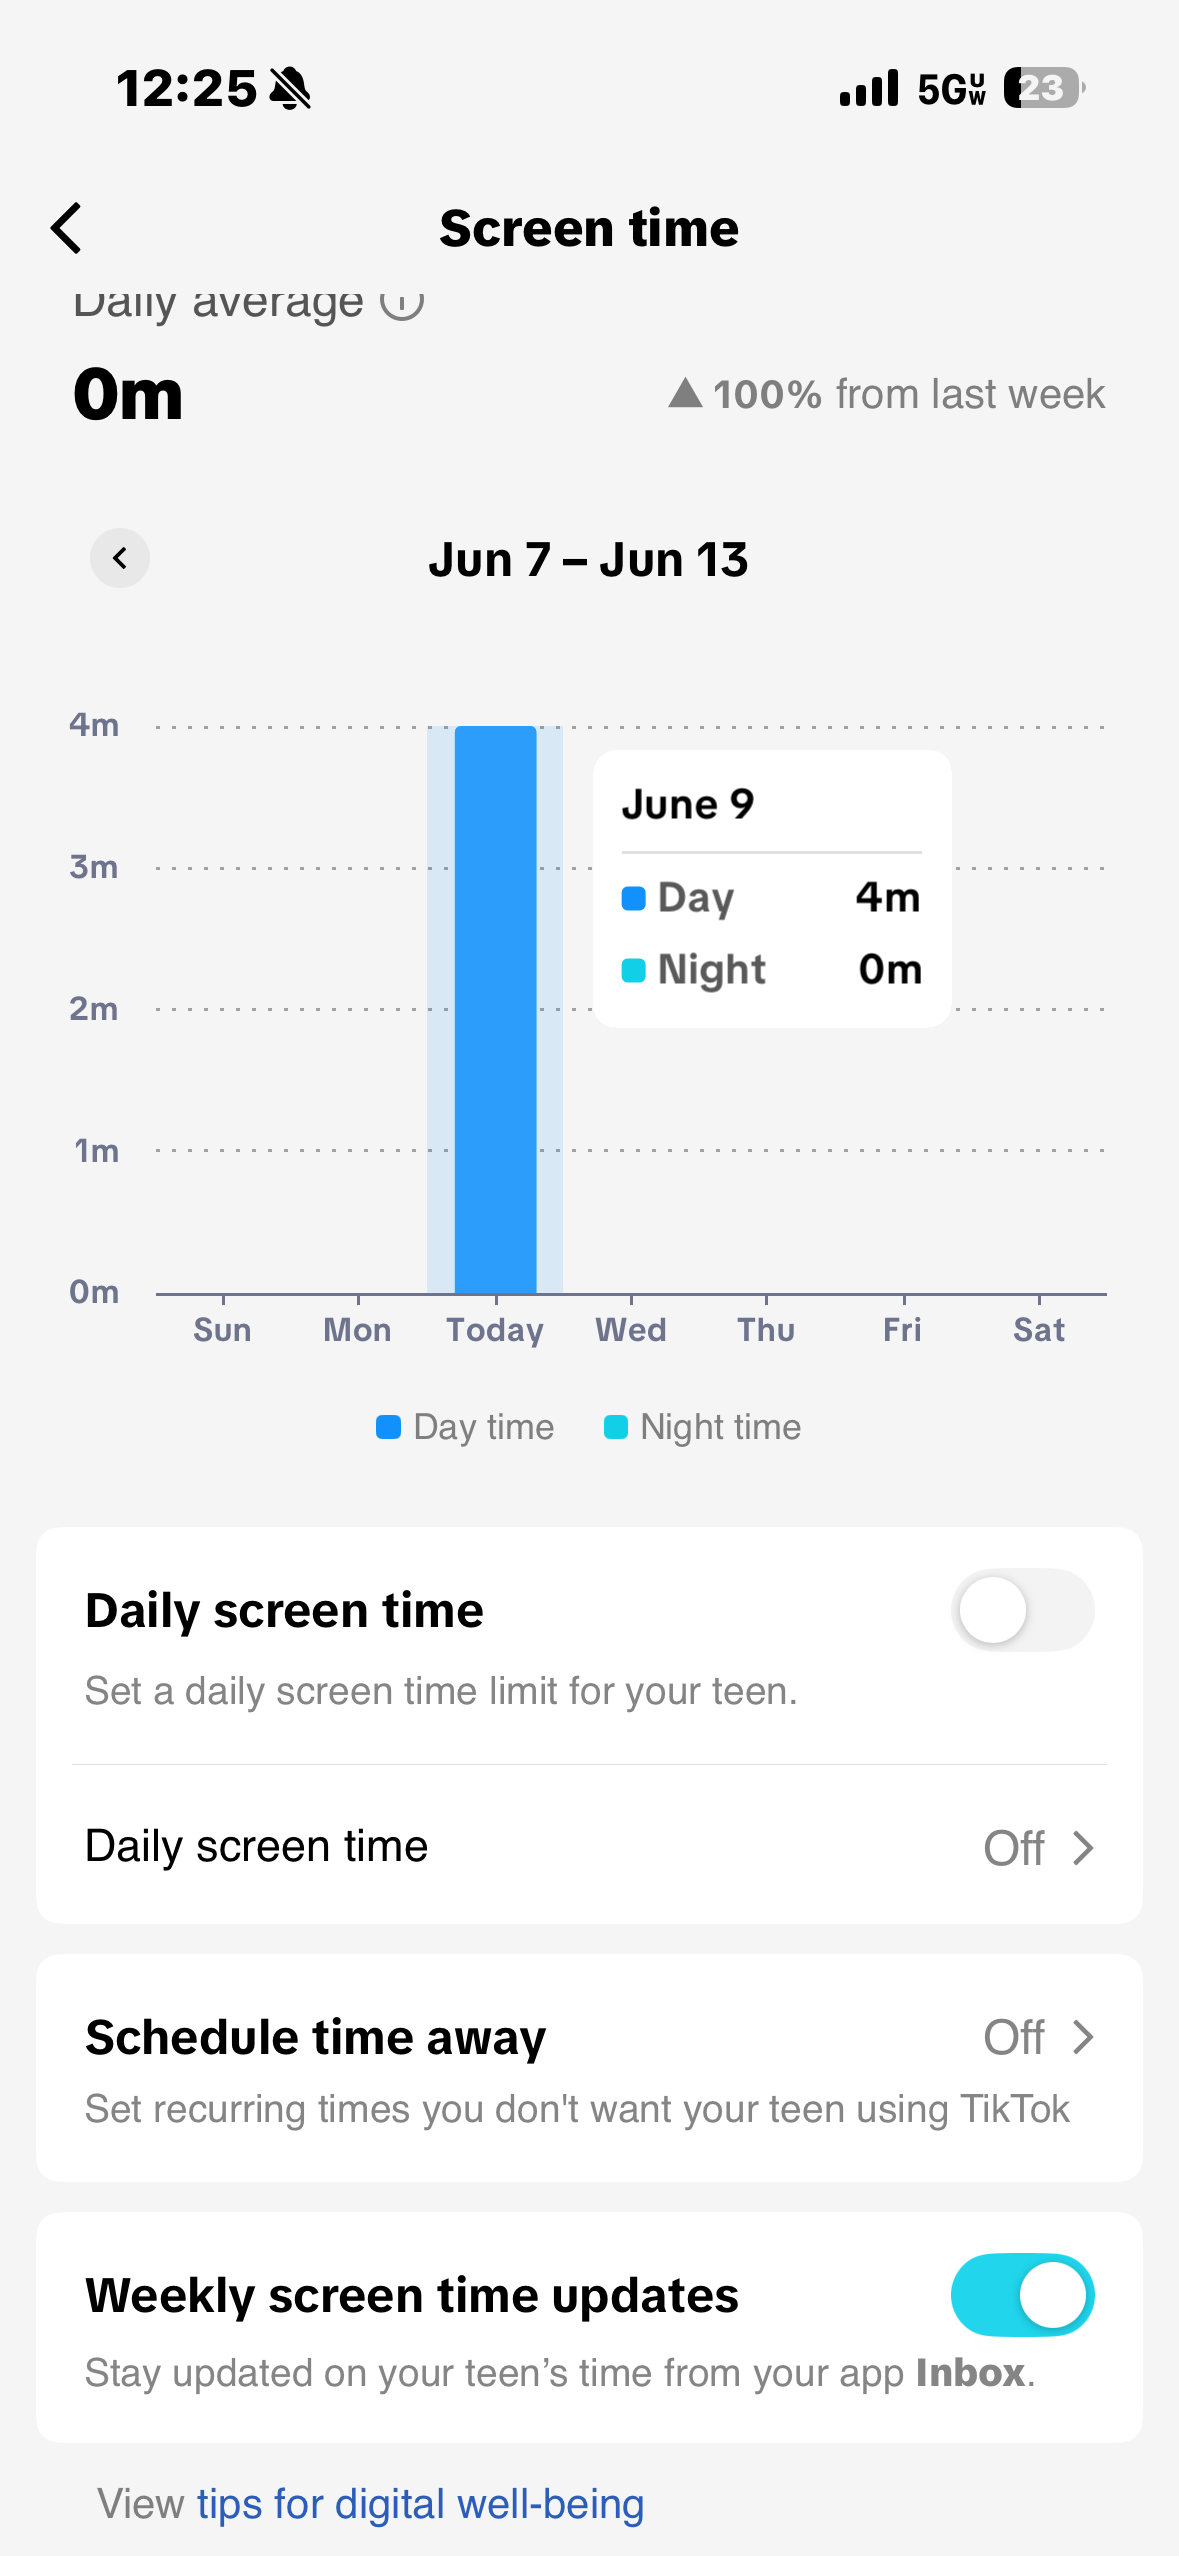
- Enable Time Management and Restricted Mode – you can find these under “Digital Wellbeing” under “Privacy and safety.” These help with screen time and blocking mature content – both require a 4-digit passcode, which means parents can set restrictions.
YOUTUBE KIDS
How to set up access to YouTube Kids
YouTube Kids offers children under 13 a somewhat safer online experience. It limits them from accessing content that is inappropriate for their age.
To set up access to YouTube Kids:
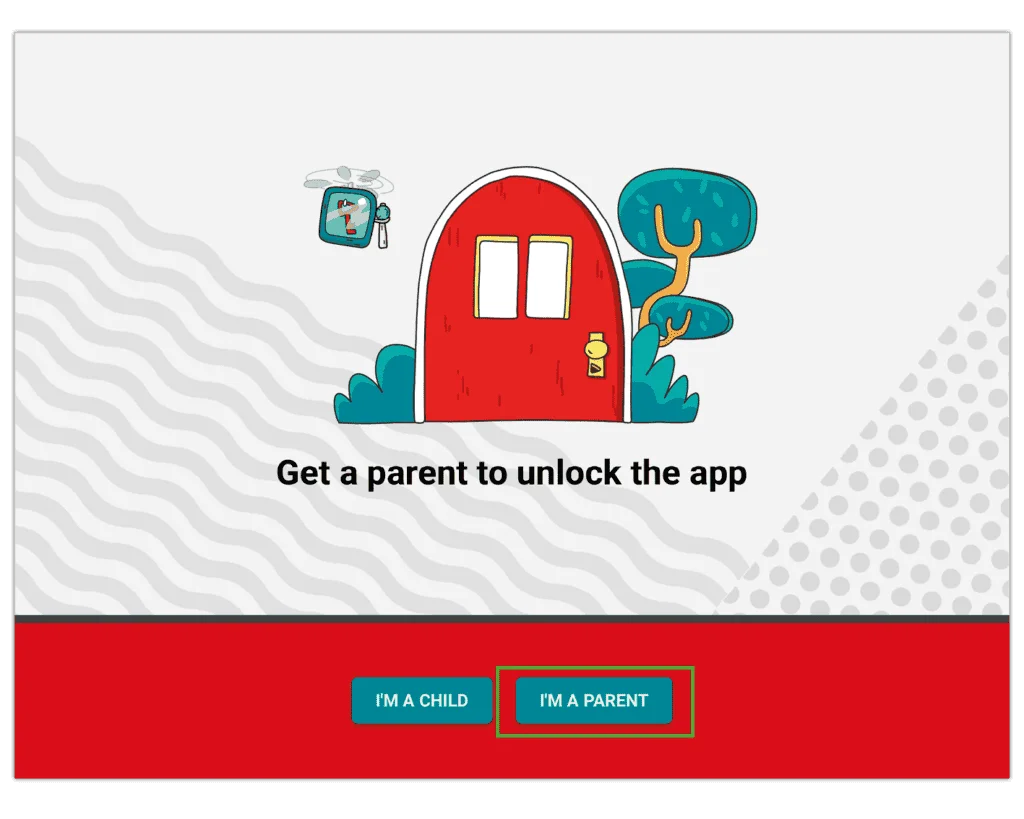
Step 1 – Download and launch the app onto your device. Click I’M A PARENT.
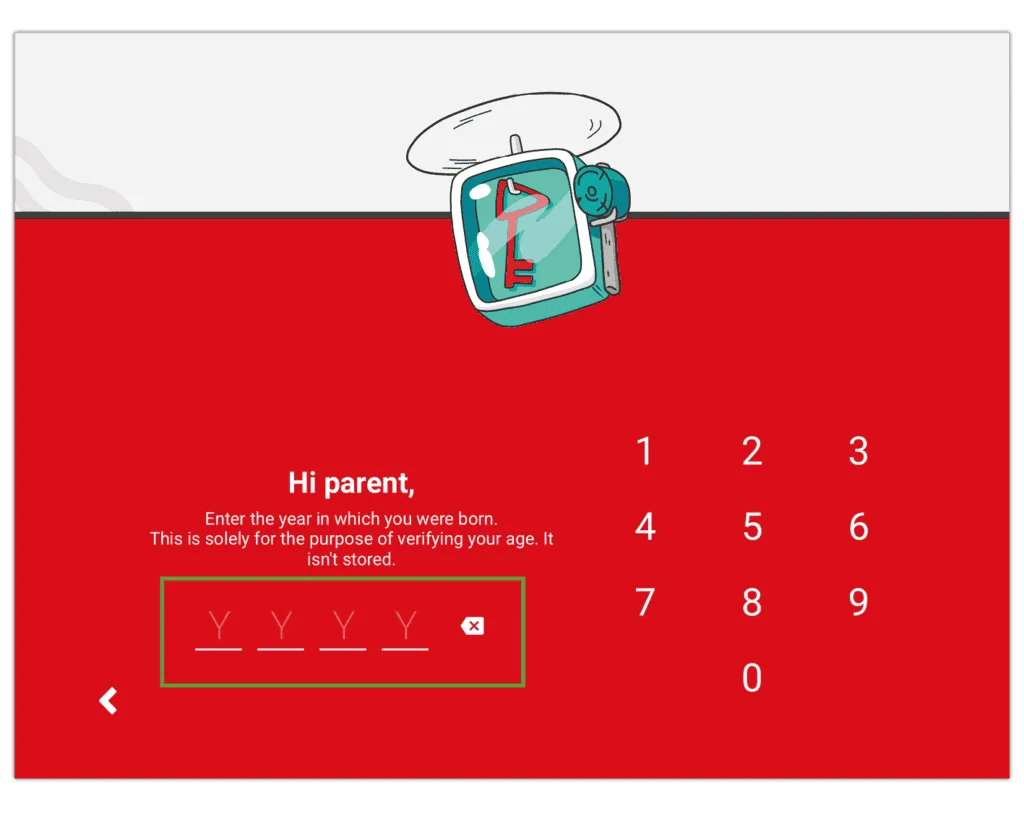
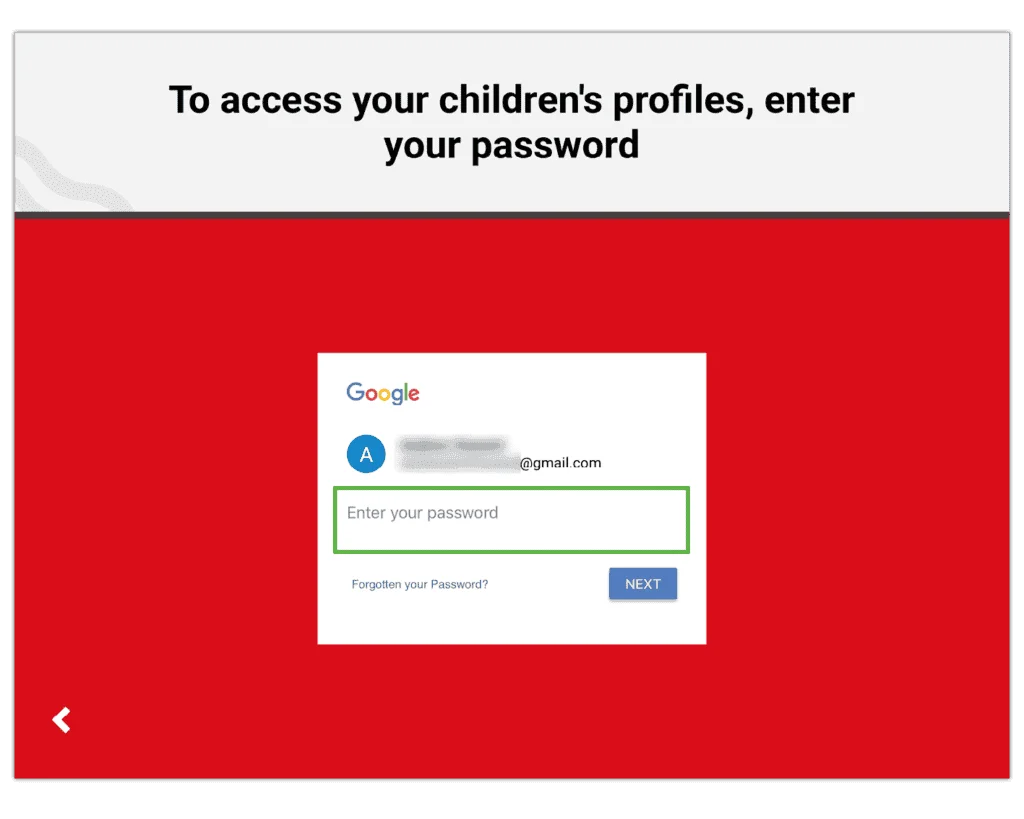
Step 2 – Follow the prompts to set up your child’s account. These include verifying your age, signing in with your Google account and selecting or creating your child’s profile
Create a new profile
When you set up the YouTube Kids app, you’ll be brought to the profile page. You can set individual permissions for each account.
To create a new profile:
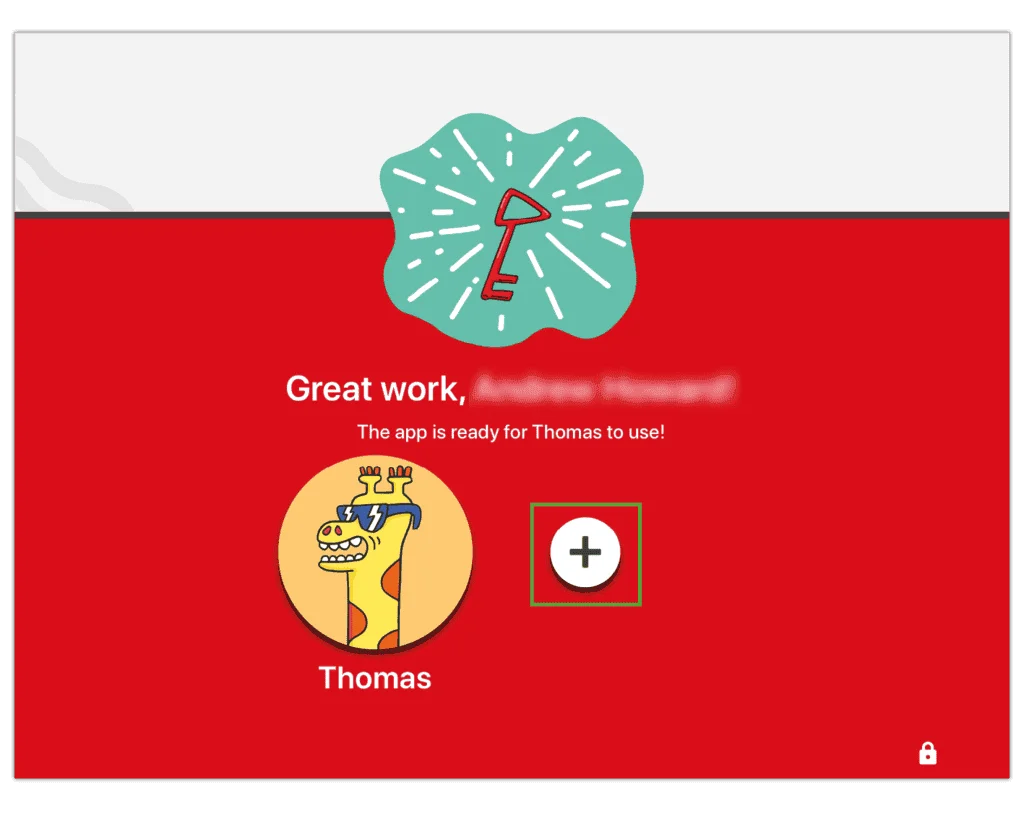
Step 1 – From the profile screen, select the + symbol to create a new profile.
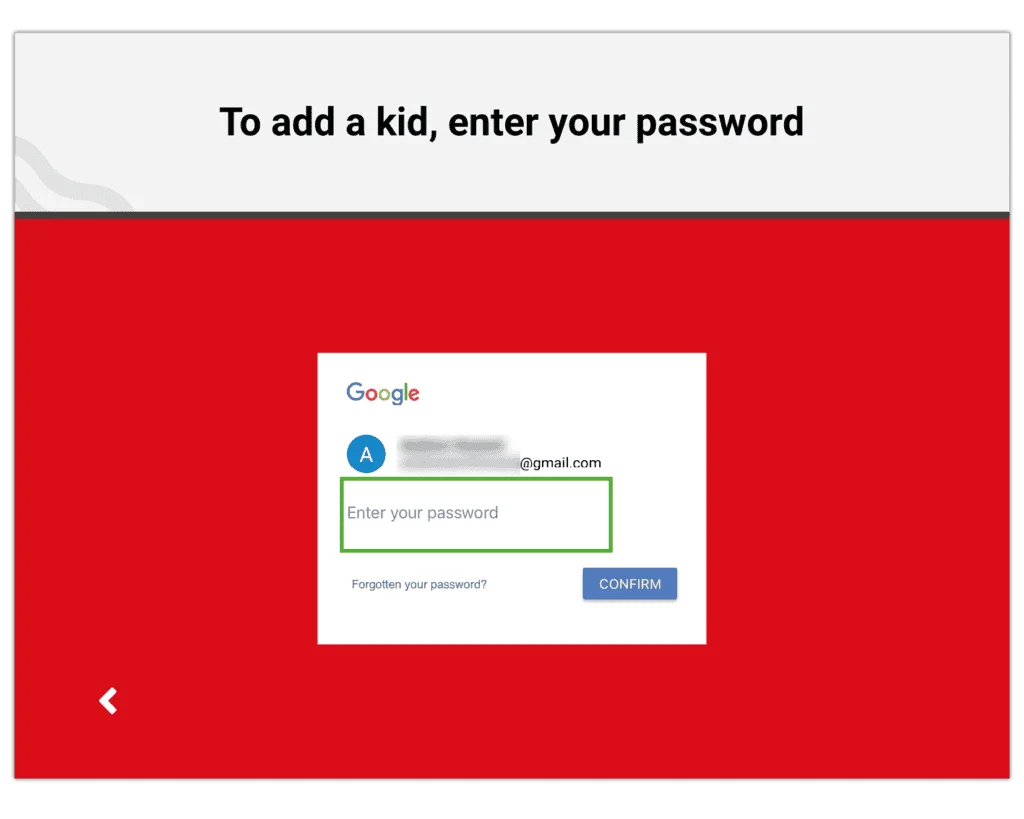
Step 2 – Sign into your Google Account by entering your password.
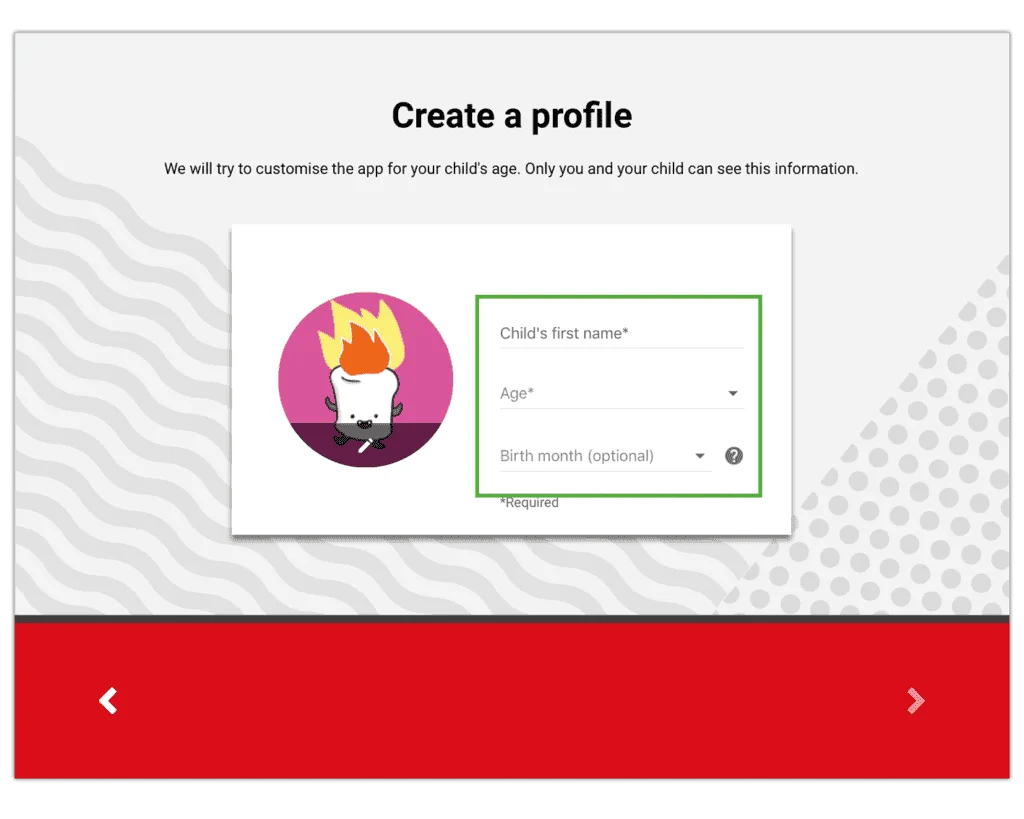
Step 3 – Fill in the relevant information and customize their avatar . You may want them to choose their own avatar to help them better recognize their account. Select the > button
Step 4 – Select the recommended content settings for your child’s age. This will make sure they see content appropriate for their age. Tap the > button to complete the profile
How to set up a passcode
Once you’ve created a YouTube Kids profile, you can set additional limits in their account. You should do this before they use the profile.
To set up limits:
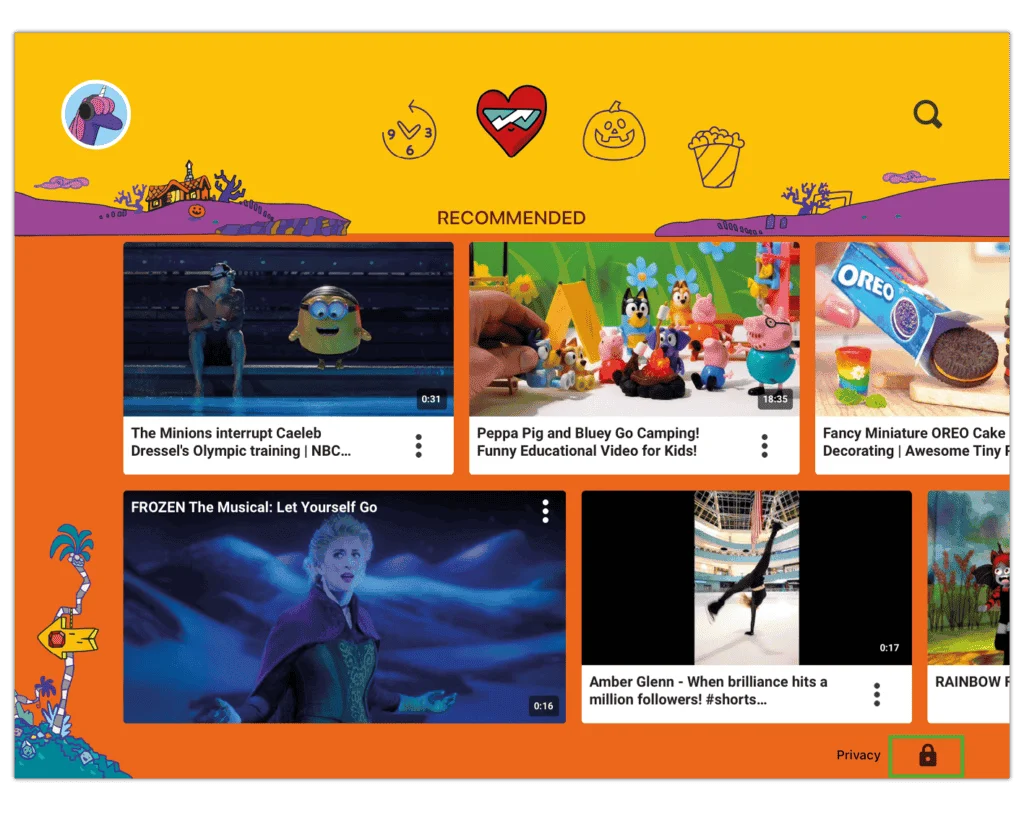
Step 1 – From the profile screen, select the profile you want to update. On the home page, select the lock in the lower right corner.
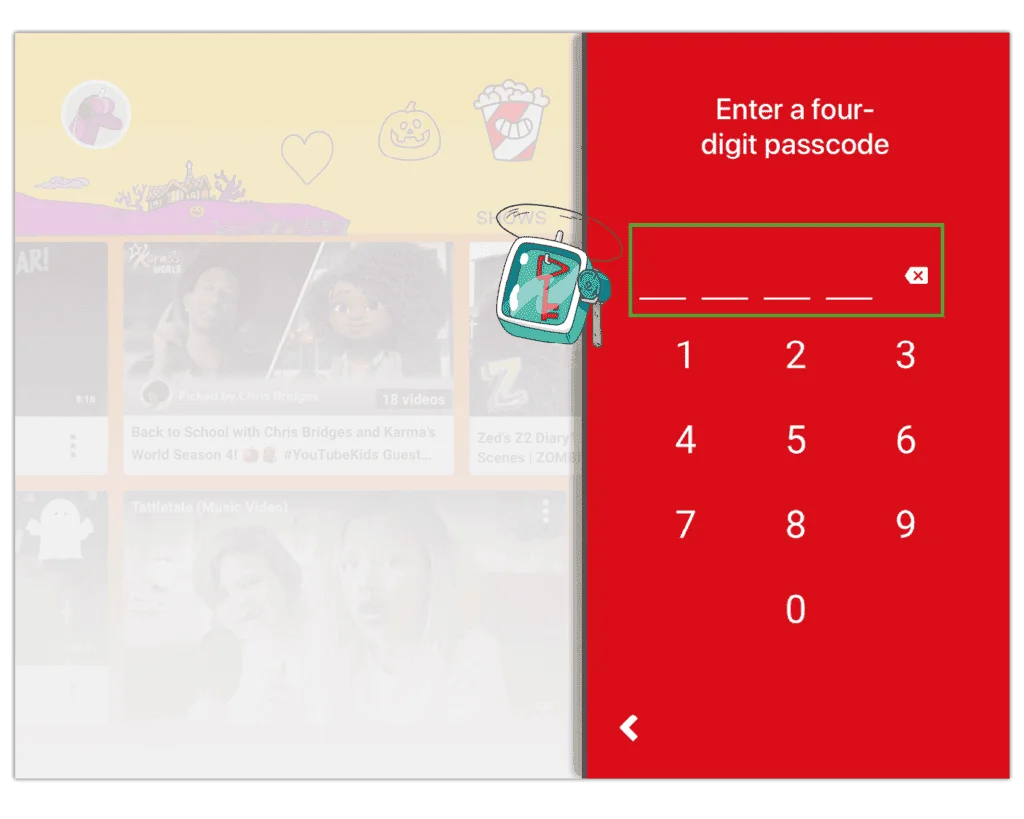
Step 2 – Answer the math question to gain access, then tap SUBMIT . Enter a 4 digit passcode that you will use whenever you want to update settings.
How to manage screen time
Setting a timer on YouTube Kids will help you and your child manage how much time they spend watching content.
To set up a timer:
Step 1 – From the profile screen, select the profile you want to update. On the home page, select the lock in the lower right corner.
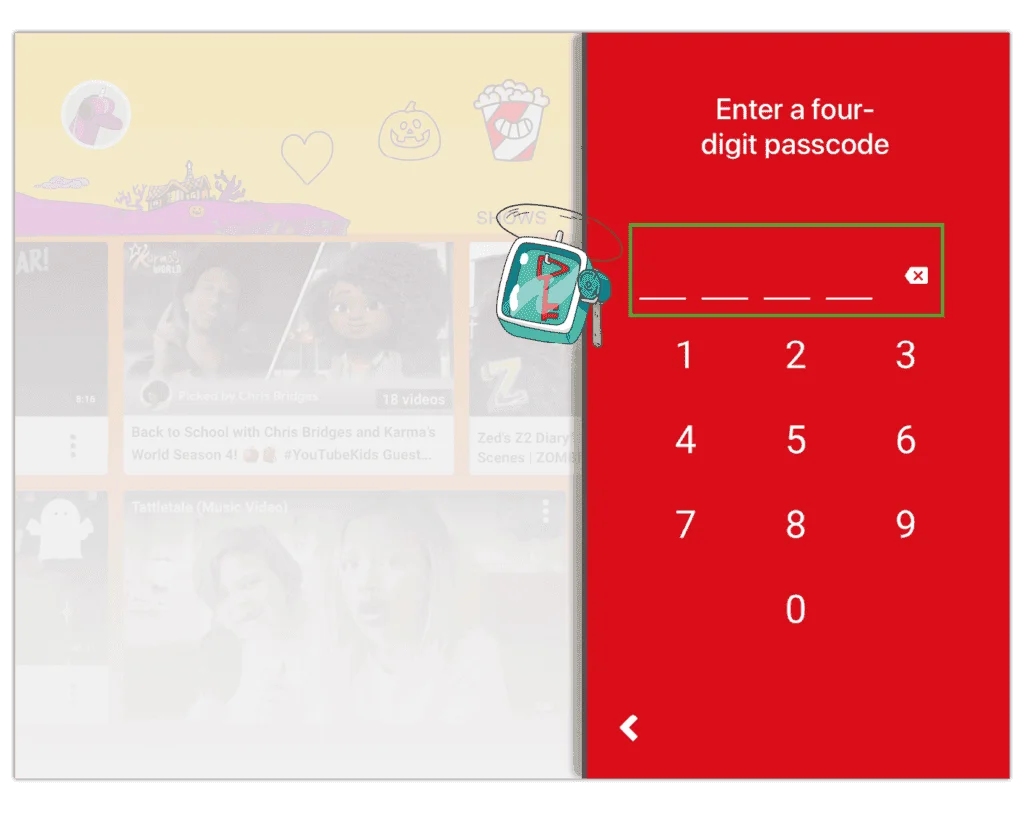
Step 2 – Enter your passcode then select the Timer icon.
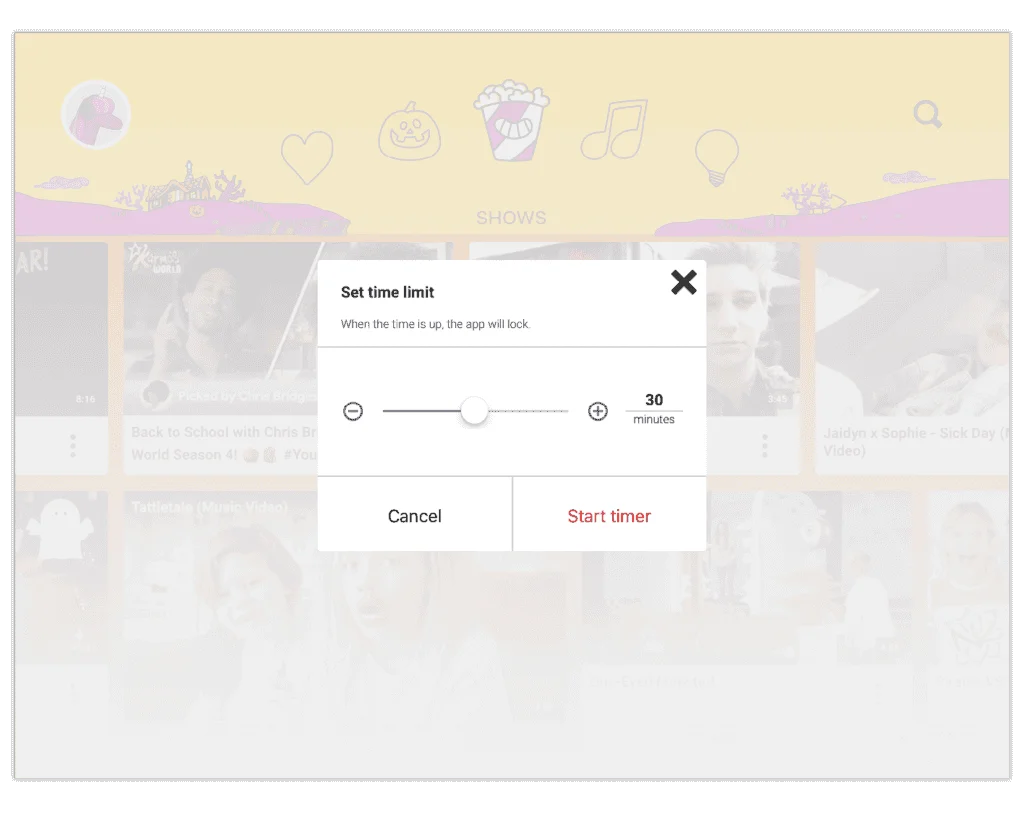
Step 3 – Set a time in minutes and then click Start timer . Exit the settings and give the device to your child to start watching.
Other account settings
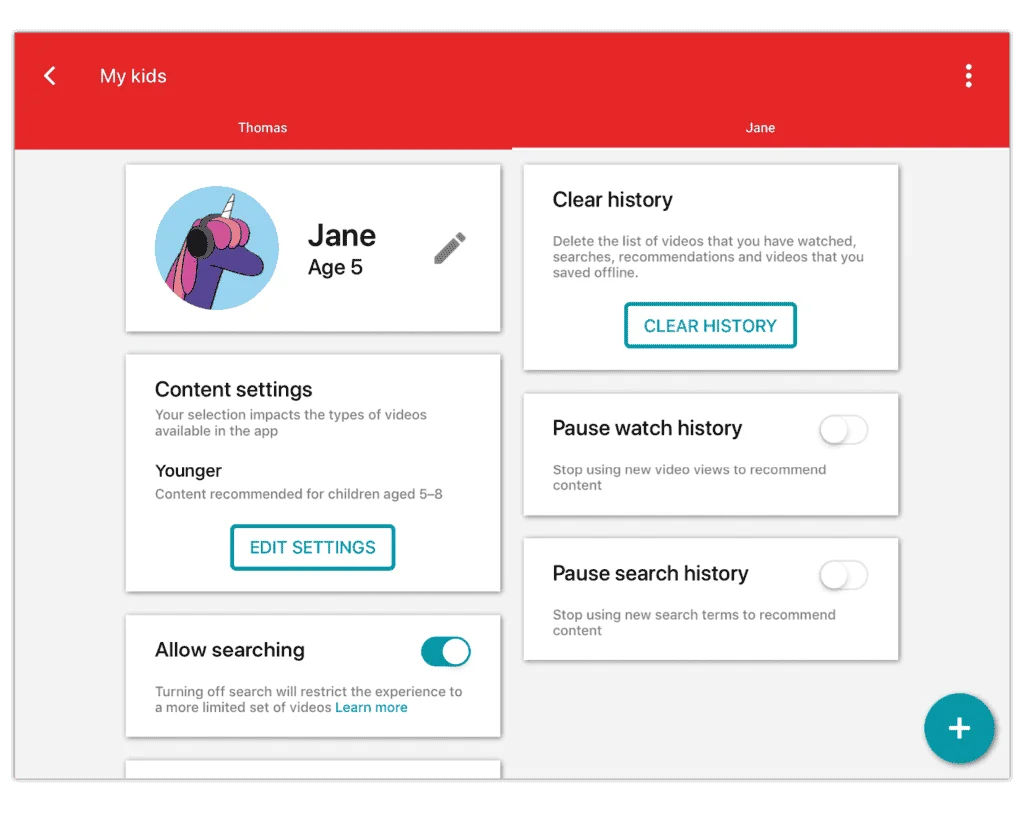
On the YouTube Kids app, you can also turn off search, update age settings, clear history to remove similar suggestions and more.
To use other parent settings:
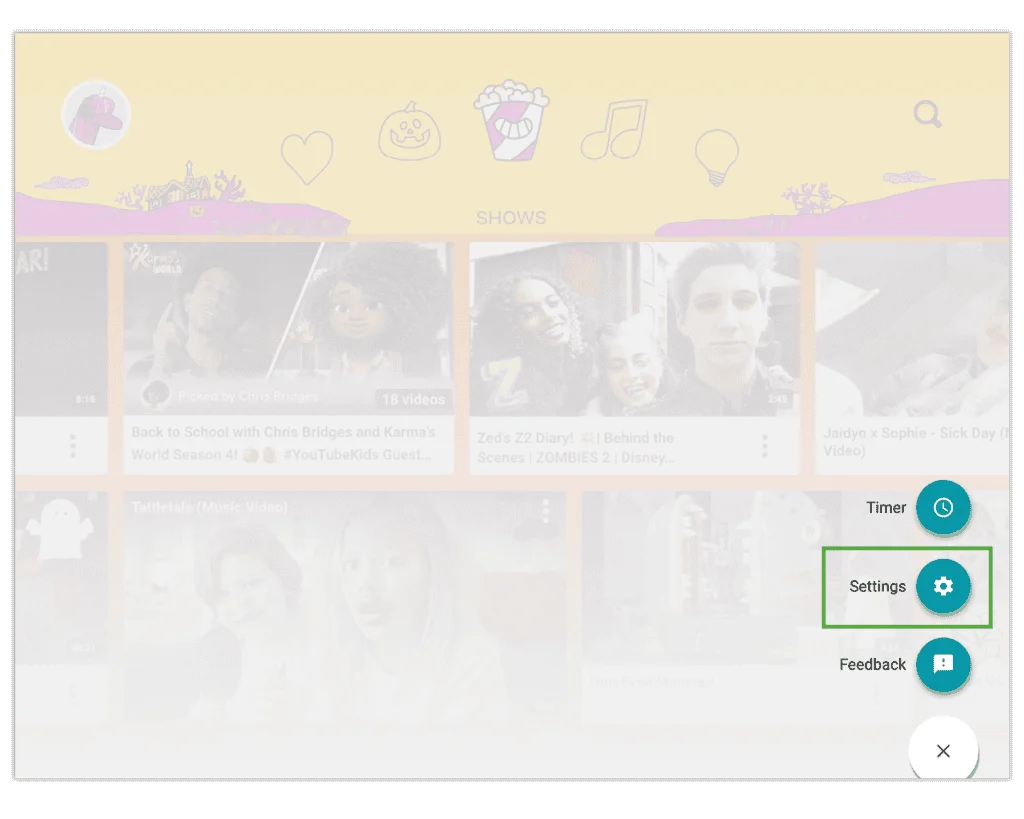
Step 1 – From any profile’s home screen, select the lock in the bottom right corner.
Step 2 – Tap Settings. Here, you can access the parent’s account, general app settings and each child’s profile.
Step 3 – To update settings for a child, select the relevant profile. Enter your password to edit their settings.
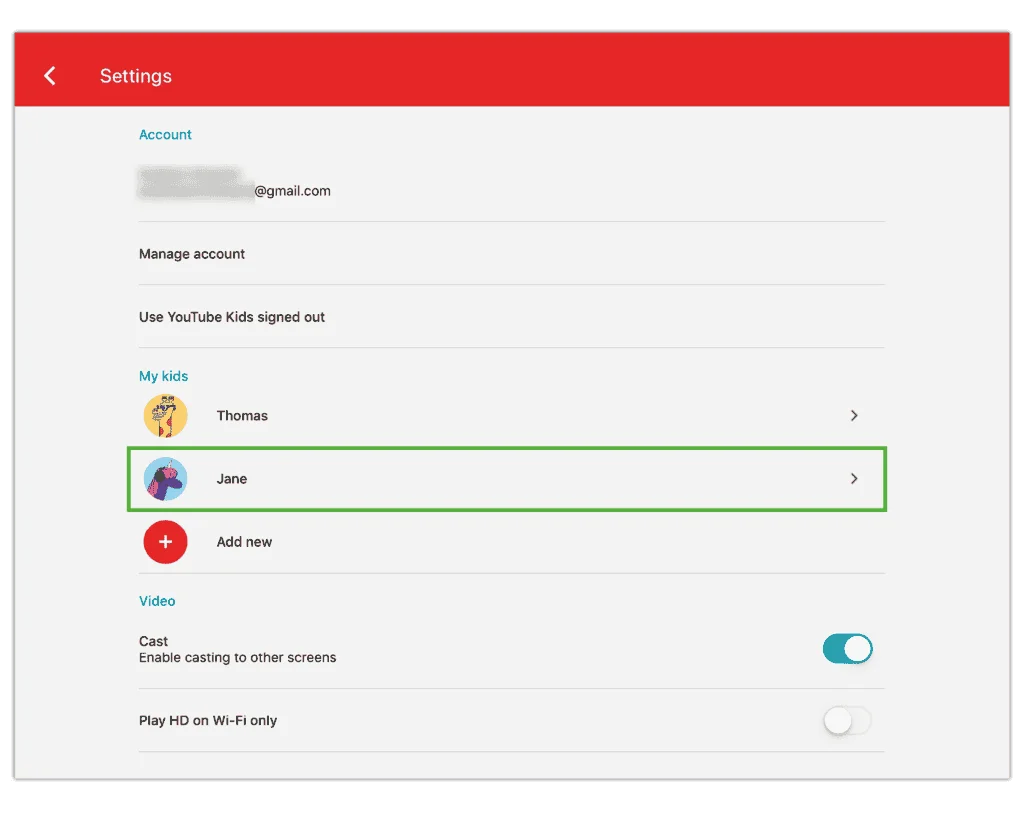
Step 4 – Choose the relevant setting you wish to edit and follow any prompts . Tap the back arrow in the top left corner to return to previous screens.
Note: These settings can also be accessed through your Google Family Link account. Simply select your child then Controls > Content restrictions > YouTube and go to YouTube Kids settings.
YOUTUBE
How to set up a Supervised Account
If your child is 13 or older and you feel comfortable, they might be ready to transition from YouTube Kids to the regular platform.
A Supervised Account helps children learn key online safety skills in safer online spaces.
To create a Supervised Account:
Step 1 – Sign-in to your parent account. If you use Google Family Link, your account will be the same as it is there. Select your profile icon.
Step 2 – Select Settings and then Parental settings in the menu. You will see all users associated with your Google account. Choose the child you wish to create a Supervised Account for.
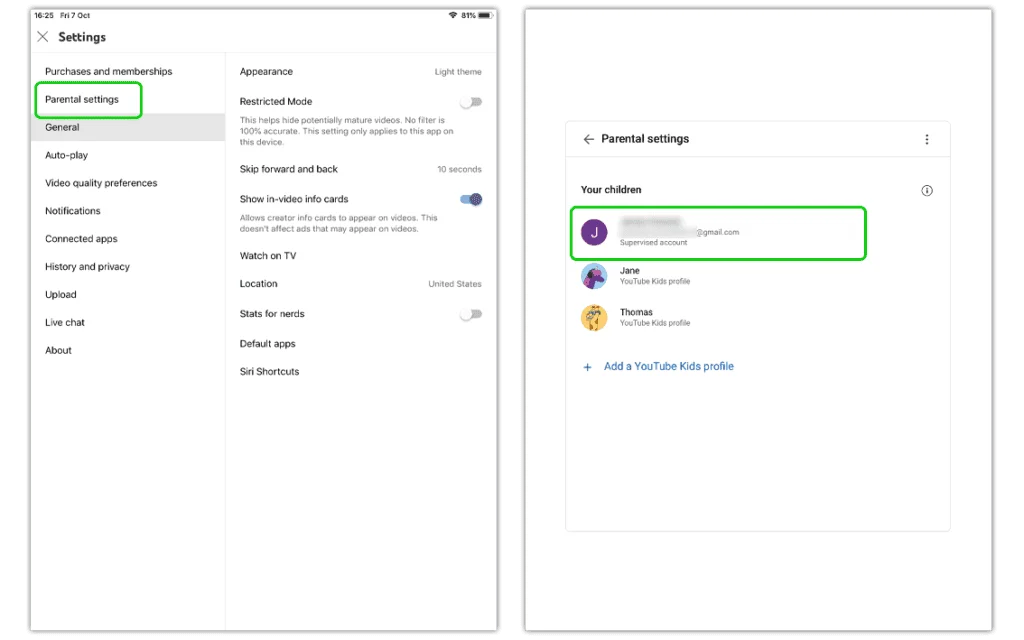
Step 3 – Select the box next to YouTube and YouTube Music then press NEXT. Read the notice and press SELECT .
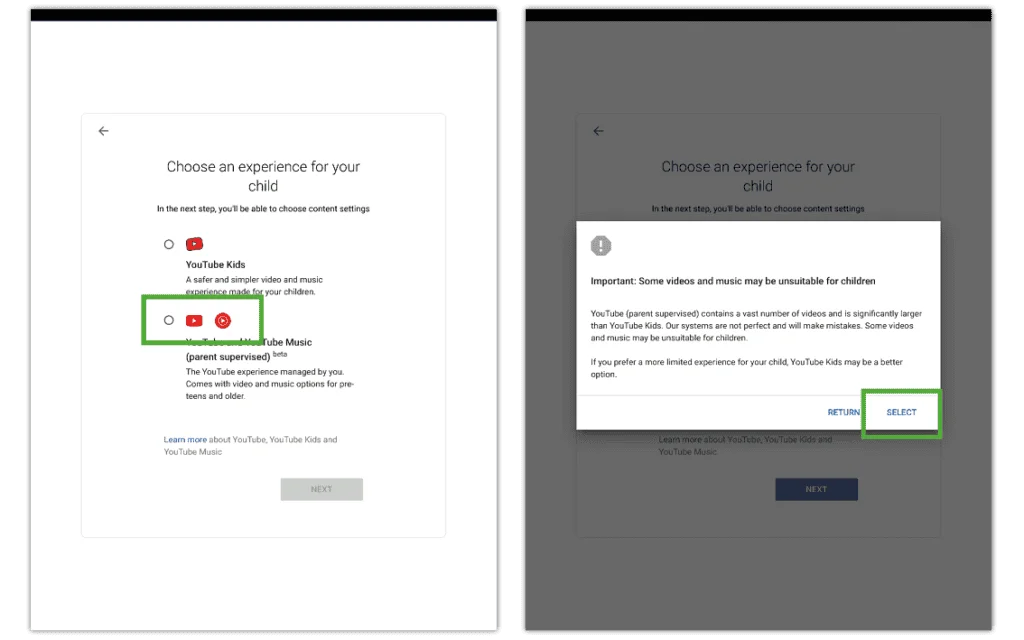
Step 4 – Choose the content settings for your child. Then, read the notice and press SELECT.
Explore: for those 9+
Explore more: for those 13+
Most of YouTube: most content on YouTube except if marked as 18+
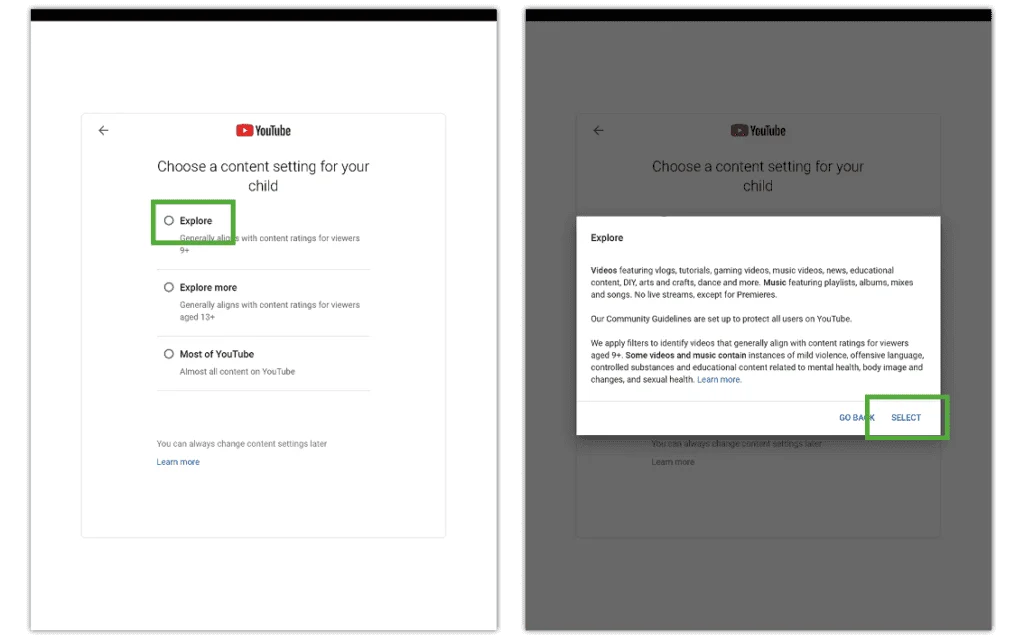
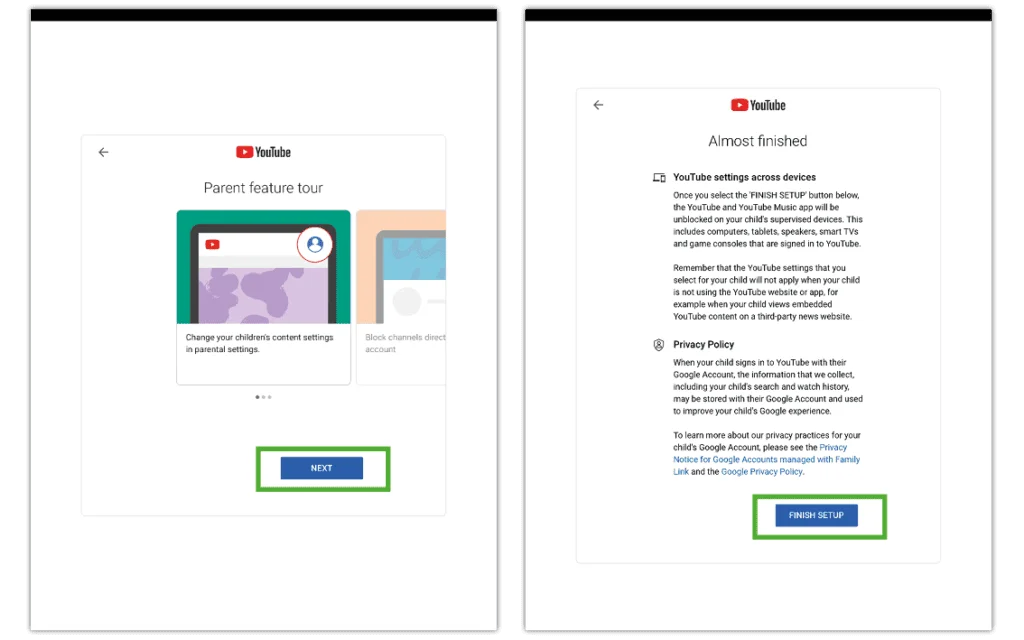
Step 5 – Review the parental controls features, read the Almost Finished page and select FINISH SETUP.
Your child now has a YouTube Supervised Account.
Where to update parental controls
Once you set up a Supervised Account for your child, you can customize the settings relevant to your child. As they age, you can change the content settings and more to provide them with more freedom to explore their online space, helping them practice key online safety skills.
To update parental controls:
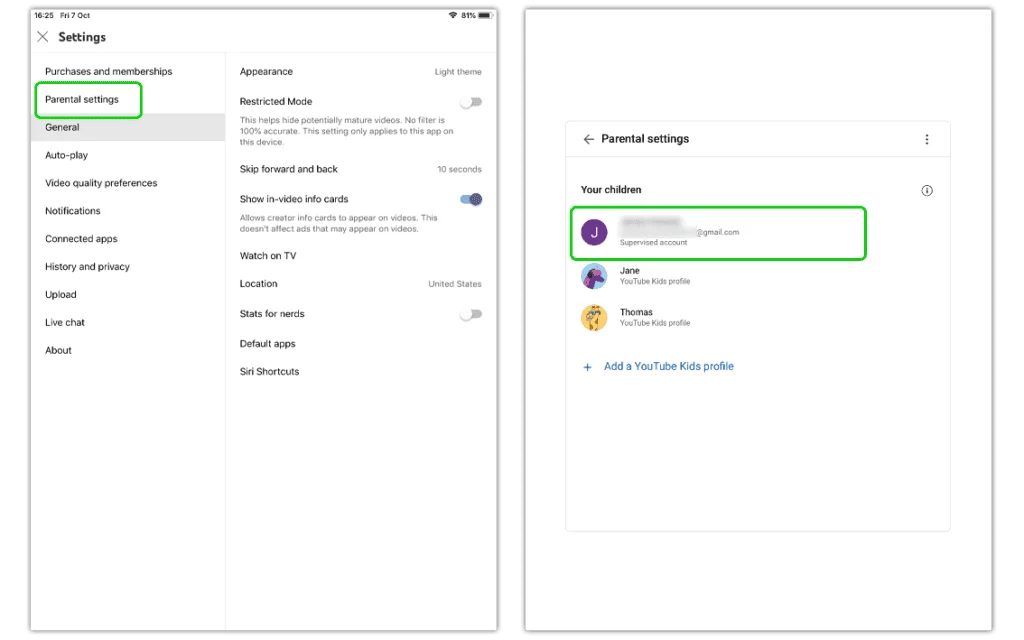
Step 1 – Sign-in to your YouTube account. Select your profile icon and Settings.
Step 2 – In the menu, select Parental settings to see users. Choose the child you’d like to update parental controls for.
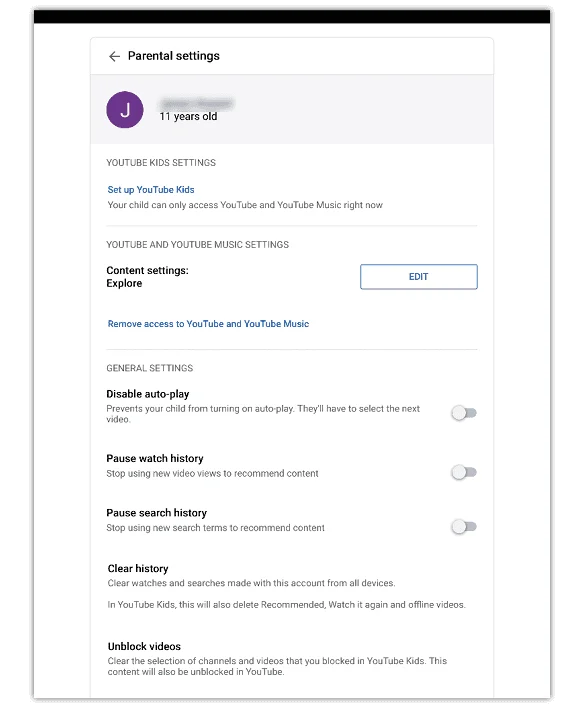
Step 3 – On their profile, you can do the following:
Update content settings
You change change the content levels to Explore (under-13s), Explore More (13+) or Most of YouTube (almost all content). Change this as your child grows.
Reduce screen time
Under general settings, there are various features that you can disable such as autoplay, watch history, and search history. These features reduce how much content children are likely to watch. For instance, turning off autoplay helps them move on after watching one video instead of falling into the habit of watching one video after another.
Monitor YouTube activity
Monitoring your child’s YouTube activity means you gain insight into how they use their online time. You can use this as an opportunity to discuss and learn about their favorite creators. This creates a space of trust and openness while also helping you keep an eye out for any harmful content.
To monitor YouTube activity:
Step 1 – Sign-in with your child’s account that you set up and select their profile icon.
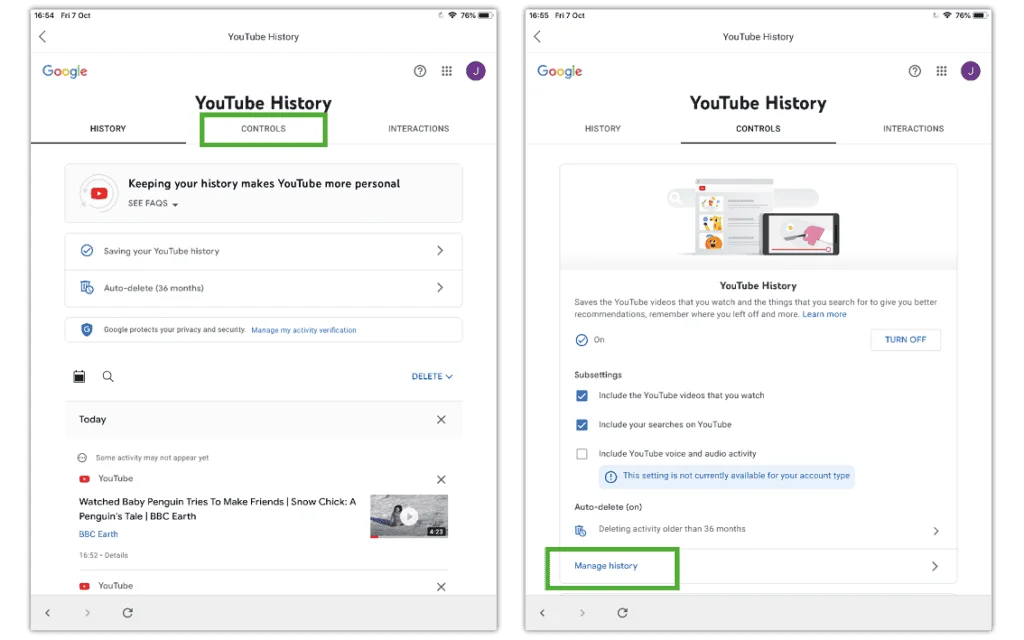
Step 2 – Go to Settings and then History and privacy . In this menu, go to Manage all activity.
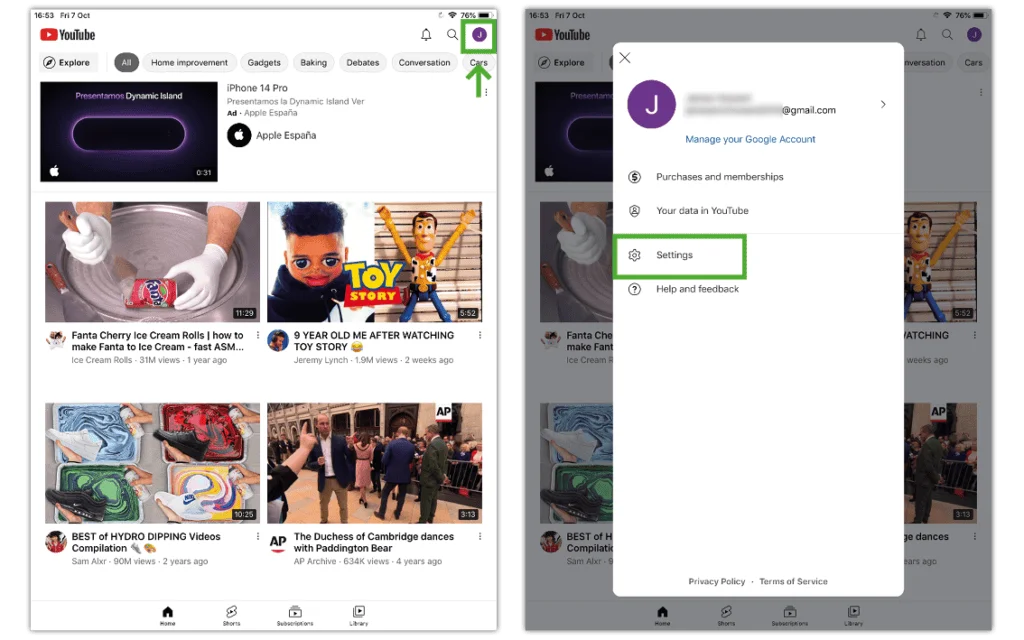
Step 3 – Here, you can see account’s history. If this feature gets turned off, your parent account will be notified.
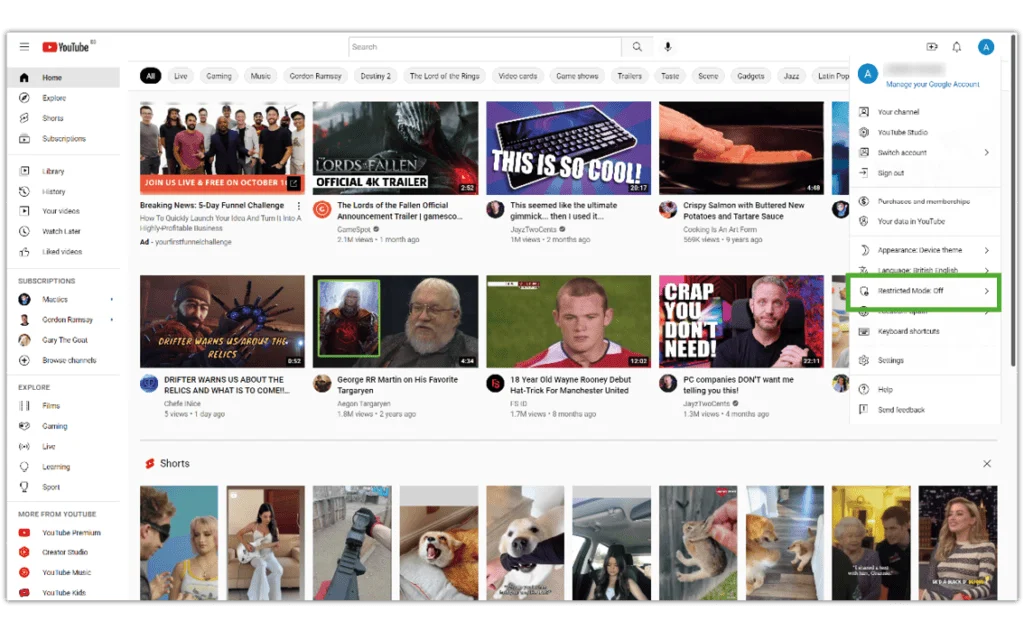
How to turn on Restricted Mode
YouTube’s restricted mode can help filter out mature content that poses potential harm to your child. Setting up restricted mode can help keep children safe online.
To set up restricted mode in the YouTube app:
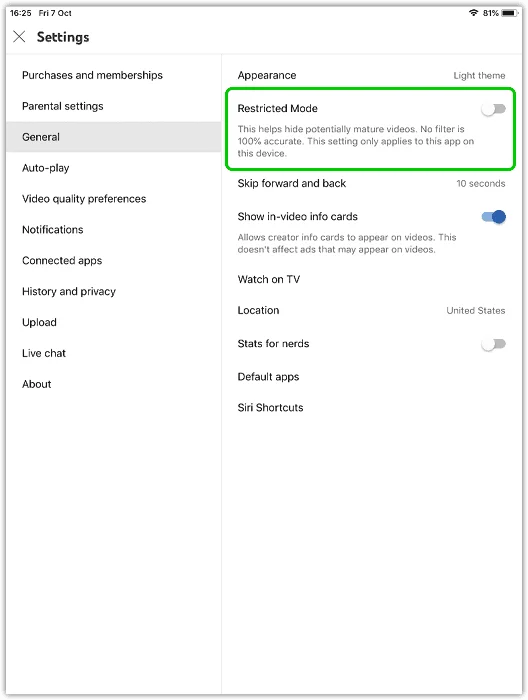
Step 1 – Sign-in to the YouTube app and navigate to Settings by tapping your profile icon.
Step 2 – In the settings menu, tap General . Next to Restricted Mode, tap the toggle. Blue means restricted mode is on.
To set up restricted mode on the YouTube website:
Step 1 – Sign-in to YouTube.com and click your profile icon.
Step 2 – On the menu that appears, look for Restricted Mode . It will say Off or On. If Off, click on the option and then the toggle. Blue means it is on.